Today we will discuss about Ajax. Ajax is a collection of several technologies aiming to provide a better user experience compared to traditional web applications. End to end implementation of Ajax includes HTML, CSS, DOM, JavaScript, a Server Side Language, and XMLHttpRequest which is also called as XHR.

In traditional web applications, the browser sends a request to server, server processes, send some data back to browser and then it is rendered by the browser. But meanwhile, when server is processing, user has to wait. This, needless to say, does not provide the user with a good experience. Ajax, helps to get rid of the issue. It makes the user's interaction to the application asynchronous. User interface and communicating to the server goes hand in hand and without waiting for the server to come with the processed data or without reloading the webpage, the user interface responds to user's action; greatly improving user experience.
In this tutorial we will see how to make Ajax work with PHP and MySQL. We will create a small web application. In that, as soon as you start typing an alphabet in the given input field, a request goes to the PHP file via Ajax, a query is made to the MySQL table, it returns some results and then those results are feteched by Ajax and displayed.
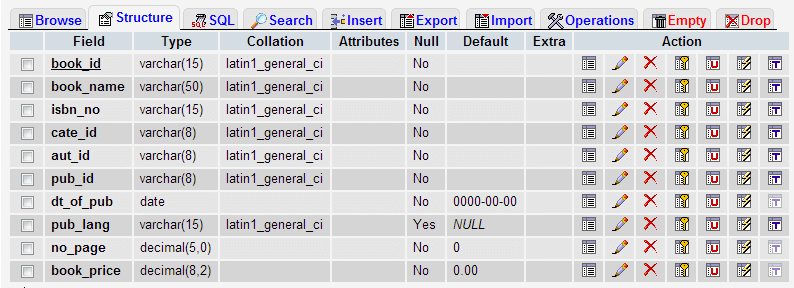
You need to make MySQL table. The structure of the MySQL table we use.

We have a simple user inerface created with HTML and CSS where user can supply data in the input field. This is the basic HTML code. Though, we will make modifications on it and add JavaScript code later.
<!DOCTYPE html>
<html lang="en">
<head>
<meta charset="utf-8">
<title>User interface for Ajax, PHP, MySQL demo</title>
<meta name="description" content="HTML code for user interface for Ajax, PHP and MySQL demo.">
<link href="../includes/bootstrap.css" rel="stylesheet">
<style type="text/css">
body {padding-top: 40px; padding-left: 25%}
li {list-style: none; margin:5px 0 5px 0; color:#FF0000}
</style>
</head>
<body>
<form class="well-home span6 form-horizontal" name="ajax-demo" id="ajax-demo">
<div class="control-group">
<label class="control-label" for="book">Book</label>
<div class="controls">
<input type="text" id="book">
</div>
</div>
<div class="control-group">
<div class="controls">
<button type="submit" class="btn btn-success">Submit</button>
</div>
</div>
</form>
</body>
</html>
This is how it looks :

We will now create JavaScript code to send data to server. And we will call that code on onkeyup event of the of the input field given.
function book_suggestion()
{
var book = document.getElementById("book").value;
var xhr;
if (window.XMLHttpRequest) { // Mozilla, Safari, ...
xhr = new XMLHttpRequest();
} else if (window.ActiveXObject) { // IE 8 and older
xhr = new ActiveXObject("Microsoft.XMLHTTP");
}
var data = "book_name=" + book;
xhr.open("POST", "book-suggestion.php", true);
xhr.setRequestHeader("Content-Type", "application/x-www-form-urlencoded");
xhr.send(data);
}
Processing data on server side
<?php
include('../includes/dbopen.php');
$book_name = $_POST['book_name'];
$sql = "select book_name from book_mast where book_name LIKE '$book_name%'";
$result = mysql_query($sql);
while($row=mysql_fetch_array($result))
{
echo "<p>".$row['book_name']."</p>";
}
?>
Now we have to retreive data returned by MYSQL and display that data using Ajax. So, we will write that code in our HTML file. We will add follwing code
xhr.onreadystatechange = display_data;
function display_data() {
if (xhr.readyState == 4) {
if (xhr.status == 200) {
document.getElementById("suggestion").innerHTML = xhr.responseText;
} else {
alert('There was a problem with the request.');
}
}
}
We have to add <div id="suggestion"></div> bellow the input field whose id is book.
Now we set the value of the string to be displayed within the div whose id is 'suggestion' as 'responseText' property of the XMLHttpRequest object. 'responseText' is the response to the request as text.
So, the final JavaScript code of the HTML file becomes as follows:
function book_suggestion()
{
var book = document.getElementById("book").value;
var xhr;
if (window.XMLHttpRequest) { // Mozilla, Safari, ...
xhr = new XMLHttpRequest();
} else if (window.ActiveXObject) { // IE 8 and older
xhr = new ActiveXObject("Microsoft.XMLHTTP");
}
var data = "book_name=" + book;
xhr.open("POST", "book-suggestion.php", true);
xhr.setRequestHeader("Content-Type", "application/x-www-form-urlencoded");
xhr.send(data);
xhr.onreadystatechange = display_data;
function display_data() {
if (xhr.readyState == 4) {
if (xhr.status == 200) {
//alert(xhr.responseText);
document.getElementById("suggestion").innerHTML = xhr.responseText;
} else {
alert('There was a problem with the request.');
}
}
}
}
HostForLIFE.eu AJAX Hosting
HostForLIFE.eu revolutionized hosting with Plesk Control Panel, a Web-based interface that provides customers with 24x7 access to their server and site configuration tools. Plesk completes requests in seconds. It is included free with each hosting account. Renowned for its comprehensive functionality - beyond other hosting control panels - and ease of use, Plesk Control Panel is available only to HostForLIFE's customers. They offer a highly redundant, carrier-class architecture, designed around the needs of shared hosting customers.
