Full Trust European Hosting

BLOG about Full Trust Hosting and Its Technology - Dedicated to European Windows Hosting Customer

European Visual Studio 2017 Hosting - HostForLIFE.eu :: How To Organize Classes Using Namespaces?

clock February 13, 2019 10:23 by author Peter

Today, in this article, we shall see what namespace actually does and how to organize the classes using namespaces. We use namespaces to organize classes into a logically related hierarchy. Namespaces function as both an internal system for organizing our application and an external way to avoid name collision between source code and application. Because more than one company may create a class with the same name, such as Employee, when we create code, that may be seen or used by third parties. It’s highly recommended that we shall organize our classes by using a hierarchy of namespaces. By practising this, we can avoid interoperability issues on application.

To create a namespace, we simply type a keyword namespace followed by the name. It is recommended to use Pascal case for namespaces.

It is also recommended that you create at least two-tiered namespaces, which is one that contains two levels of classification, separated by a period.

Let us see sample example of a two-tiered namespace.

namespace Infosys.Sales {  
    //define your classes within the namespace  
    public class customer() {}  
}   

Above two-tiered namespace declaration is identical to writing each namespace in nested format, as shown in the following code. 


namespace CompanyName {  
    namespace Sales {  
        public class Customer() {}  
    }  
}   

In both cases, we refer to class by using the following code.

CompanyName.Sales.Customer();   

Note

We should avoid creating a class with the same name as namespace.

Commonly used namespaces in .NET Framework
Microsoft .NET Framework is made of many namespaces, the most important one being System. The System namespace contains classes that most of the applications use to interact with operating system.

For example, the system namespace contains the console class which provides several methods, including WriteLine, which is a command that enables us to write code to an on-screen console.

We can access WriteLine method of console as follows.

System.Console.WriteLine("Prem Kumar Rathrola");   

A few of other namespaces that are provided by .NET Framework through the system namespace are listed below. 

  • System.Windows.Forms
    Provides the classes that are useful for building applications based on windows. 
  • System.IO
    Provides classes for reading and writing data to files

  • System.Data
    Provides classes that are useful for data access

  • System.Web
    Provides classes that are useful for building web forms applications


European Visual Studio 2017 Hosting - HostForLIFE.eu :: Shortcuts For Debugging In Visual Studio

clock November 28, 2018 10:06 by author Peter

Debugging is one of the most important aspect of programming. It is crucial to successful software development, but even many experienced programmers find it challenging. With the help of keyboard shortcuts , it can be made faster. So here is the list of all shortcut keys available in visual studio for debugging.

Debugging Shortcuts in Visual Studio
 

Shortcut

Description

Ctrl-Alt-V, A Displays the Auto window to view the values of variables currently in the scope of the current line of execution within the current procedure
Ctrl-Alt-Break Temporarily stops execution of all processes in a debugging session. Available only in run mode
Ctrl-Alt-B Displays the Breakpoints dialog, where you can add and modify breakpoints
Ctrl-Alt-C Displays the Call Stack window to display a list of all active procedures or stack frames for the current thread of execution. Available only in break mode
Ctrl-Shift-F9 Clears all of the breakpoints in the project
Ctrl-Alt-D Displays the Disassembly window
Ctrl-F9 Enables or disables the breakpoint on the current line of code. The line must already havek a breakpoint for this to work
Ctrl-Alt-E Displays the Exceptions dialog
Ctrl-Alt-I Displays the Immediate window, where you can evaluate expressions and execute individual commands
Ctrl-Alt-V, L Displays the Locals window to view the variables and their values for the currently selected procedure in the stack frame
Ctrl-Alt-M, 1 Displays the Memory 1 window to view memory in the process being debugged. This is particularly useful when you do not have debugging symbols available for the code you are looking at. It is also helpful for looking at large buffers, strings, and other data that does not display clearly in the Watch or Variables window
Ctrl-Alt-M, 2 Displays the Memory 2 window
Ctrl-Alt-M, 3 Displays the Memory 3 window
Ctrl-Alt-M, 4 Displays the Memory 4 window
Ctrl-Alt-U Displays the Modules window, which allows you to view the .dll or .exe files loaded by the program. In multiprocess debugging, you can right-click and select Show Modules for all programs
Ctrl-B Opens the New Breakpoint dialog
Ctrl-Alt-Q Displays the Quick Watch dialog with the current value of the selected expression. Available only in break mode. Use this command to check the current value of a variable, property, or other expression for which you have not defined a watch expression
Ctrl-Alt-G Displays the Registers window, which displays CPU register contents
Ctrl-Shift-F5 Terminates the current debugging session, rebuilds if necessary, and then starts a new debugging session. Available in break and run modes
Ctrl-Alt-N Displays the Running Documents window that displays the set of HTML documents that you are in the process of debugging. Available in break and run modes
Ctrl-F10 Starts or resumes execution of your code and then halts execution when it reaches the selected statement. This starts the debugger if it is not already running
Ctrl-Shift-F10 Sets the execution point to the line of code you choose
Alt-NUM * Highlights the next statement to be executed
F5 If not currently debugging, this runs the startup project or projects and attaches the debugger. If in break mode, this allows execution to continue (i.e., it returns to run mode).
Ctrl-F5 Runs the code without invoking the debugger. For console applications, this also arranges for the console window to stay open with a “Press any key to continue” prompt when the program finishes
F11 Executes code one statement at a time, tracing execution into function calls
Shift-F11 Executes the remaining lines of a function in which the current execution point lies
F10 Executes the next line of code but does not step into any function calls
Shift-F5 Available in break and run modes, this terminates the debugging session
Ctrl-Alt-V, T Displays the This window, which allows you to view the data members of the object associated with the current method
Ctrl-Alt-H Displays the Threads window to view all of the threads for the current process
F9 Sets or removes a breakpoint at the current line
Ctrl-F11 Displays the disassembly information for the current source file. Available only in break mode
Ctrl-Alt-W, 1 Displays the Watch 1 window to view the values of variables or watch expressions
Ctrl-Alt-W, 2 Displays the Watch 2 window
Ctrl-Alt-W, 3 Displays the Watch 3 window
Ctrl-Alt-W, 4 Displays the Watch 4 window
Ctrl-Alt-P Displays the Processes dialog, which allows you to attach or detach the debugger to one or more running processes


European Visual Studio 2017 Hosting - HostForLIFE.eu :: Live Unit Testing With Visual Studio 2017

clock November 14, 2018 08:41 by author Peter

Visual Studio 2017 v15.3 or higher versions support Live Unit Testing. This feature executes the already-written test cases automatically as a programmer makes the code changes. Live Unit Testing helps a developer to do the following:


  • It executes all the impacted Test Cases as a programmer modifies the code and makes sure changes do not break Unit Test Cases.
  • Through the Visual Studio editor, the programmer sees the code coverage in a realistic view.
  • It also indicates which line is covered or not using Live Unit Testing.
  • Live Unit Testing is supported in  both .NET Framework and .NET Core.

Enabling
Live Unit Testing is only available in Visual Studio 2017 with the Enterprise edition. We can enable the Live Unit Testing by going to the following menus - Test > Live Unit Testing > Start.

After enabling the Live Unit Testing for a project, Live Unit Testing shows options as Start, Pause, Stop and Reset.

Configuration
The default configuration can be changed from the Visual Studio Menu Tool > Options > Live Unit Testing > General. We can configure the Live Unit Testing for the Battery and Memory usages, Testcase Timeout, and Logging Level can be set as needed.

Setup Project Solution

  • Open the Visual Studio 2017.
  • Create one Windows Library Project as “ClassLibrary1” and Change the “Class1.cs” to the “AreaCalculator.cs”.
  • Right click on the solution and add a Unit Test Project as “UnitTestProject1” and change the “UnitTest1.cs” to the “AreaCalculatorTest.cs”
  • Add the Reference of the “ClassLibrary1” project to the “UnitTestProject1”.
  • Add the using statement “using ClassLibrary1;” to the “AreaCalculatorTest.cs” in the using statement section.
  • Build the Solution.

Demo
Open the AreaCalculator.cs and add the code as per the below screenshot.
Open the AreaCalculatorTest.cs and paste the below code. I have not added the Test Method for the triangle’s area calculation and incorrectly calculated the Test Method of the square’s area, just to show some behavior of Live Unit Testing.

Replace the below code in the AreaCalculatorTest.cs file
Now start the Live Unit Testing from the Test menu, then an automatic background process triggers and we see an icon in-line with code. Description of each icon is mentioned here

  • Green Tick Mark represents that this Method is covered for the unit testing.
  • Cross Mark represents that this method is covered for the unit testing, but the test case failed during execution.
  • Blue Negative Mark represent that this method is not covered for the unit testing so a test case needs to be created.

Below screenshots represent each icon of the Live Unit Testing

Icon’s in AreaCalculator.cs


Icon’s in AreaCalculatorTest.cs


So, with the help of Live Unit Testing of Visual Studio, a developer will know about the impact of the changes he is making, and if it's covered for unit testing or not. This is an awesome feature of Visual Studio 2017


European Visual Studio 2017 Hosting - HostForLIFE.eu :: Using the BackgroundWorker component

clock September 20, 2018 11:12 by author Peter

The BackgroundWorker allows you to execute operations that take a long period of time such as database transaction or file downloads, asynchronously on a separate thread and allow the user interface to remain responsive.


Start an Operation in the Background
First, you need to add an instance of the BackgroundWorker component to your application, if you use visual studio, just drag it from the toolbox to your application or you can create it manually as follow:
BackgroundWorker backgroundWorker1 = new BackgroundWorker(); 

To start the operation in the background you have to call the RunWorkerAsync() method of the BackgroundWorker, when you call this method the BackgroundWroker starts the execution of the background operation by raising the DoWork event, the code in the DoWork event handler is executed on a separate thread.
BackgroundWorker backgroundWorker1 = new BackgroundWorker(); 
//start the operation on another thread 
private void btnStart_Click(object sender, EventArgs e) 

    backgroundWorker1.RunWokerAsync(); 

//DoWork event handler is executed on a separate thread 
private void backgroundWorker1_DoWork(object sender, DoWorkeventArgs e) 

    //a long running operation 
    Thread.Sleep(5000); 


You can send a parameter to the background operation using the RunWorkerAsync() method. You can receive this parameter by using the Argument property of the instance of DoWorkEventArgs in the DoWork event handler then you cast it to use it in the background operation.

BackgroundWorker backgroundWorker1 = new BackgroundWorker(); 
//start the operation on another thread 
private void btnStart_Click(object sender, EventArgs e) 

    backgroundWorker1.RunWokerAsync(2000); 

//DoWork event handler is executed on a separate thread 
private void backgroundWorker1_DoWork(object sender, DoWorkeventArgs e) 

    int input = (int)e.Argument; 
    //a long running operation 
    Thread.Sleep(input); 


Reporting progress of a background operation using BackgroundWorker

By using the BackgroundWorker you have the ability to report progress updates of the executing operation. To use this options you must set the WorkerReportsProgress to true.

To start report progress you call ReportProgress() method and use it to pass a parameter that have the value of the percentage of the progress that have been completed. This method raises the BackgroundWorker.ProgressChanged event. In the event handler of the ProgressChanged you can recieve the value of the progress precentage on the main thread using the ProgressPercentage property of the instance of ProgressChangedEventArgs.

BackgroundWorker backgroundWorker1 = new BackgroundWorker(); 
backgroundWorker1.WorkerReportsProgress = true; 
//start the operation on another thread 
private void btnStart_Click(object sender, EventArgs e) 

    backgroundWorker1.RunWokerAsync(); 

//DoWork event handler is executed on a separate thread 
private void backgroundWorker1_DoWork(object sender, DoWorkeventArgs e) 

    //a long running operation 
    for (int i = 1; i < 11; i++) 
    {    
        Thread.Sleep(2000); 
        backgroundWorker1.ReportProgress(i*10); 
    } 

private void backgroundWorker1_ProgressChanged(object sender, ProgressChangedEventArgs e) 

    progressBar1.value = e.ProgressPercentage; 


Canceling a background operation using BackgroundWorker

With the BackgroundWorker you have the ability to cancel the background operation, to do this you first must set WorkerSupportsCancellation property to true.

The next step is to call the CancelAsync() method by doing so you set the CancellationPending property to true, by polling the CancellationPending property you can determine whether or not to cancel the background operation.

BackgroundWorker backgroundWorker1 = new BackgroundWorker(); 
backgroundWorker1.WorkerSupportsCancellation = true; 
//start the operation on another thread 
private void btnStart_Click(object sender, EventArgs e) 

    backgroundWorker1.RunWokerAsync(); 

//a buttun to cancel the operation 
private void btnCancel_Click(object sender, EventArgs e) 

    backgroundWorker1.CancelAsync(); 

//DoWork event handler is executed on a separate thread 
private void backgroundWorker1_DoWork(object sender, DoWorkeventArgs e) 

    //a long running operation 
    for (int i = 1; i < 11; i++) 
    { 
        Thread.Sleep(2000); 
        backgroundWorker1.ReportProgress(i*10); 
        if(backgroundWorker1.CancellationPending) 
        { 
            e.cancel = true; 
            return; 
        } 
    } 


Alert the user in the completion of the background operation
When the background operation completes, whether because the background operation is completed or canceled, the RunWorkerCompleted event is raised. You can alert the user to the completion by handling the RunWorkerCompleted event.

You can determine if the user canceled the operation by using the Cancelled property of the instance RunWorkerCompletedEventArgs.
BackgroundWorker backgroundWorker1 = new BackgroundWorker(); 
//start the operation on another thread 
private void btnStart_Click(object sender, EventArgs e) 

    backgroundWorker1.RunWokerAsync(); 

//a buttun to cancel the operation 
private void btnCancel_Click(object sender, EventArgs e) 

    backgroundWorker1.CancelAsync(); 
}  
//DoWork event handler is executed on a separate thread 
private void backgroundWorker1_DoWork(object sender, DoWorkeventArgs e) 

    //a long running operation 
    for (int i = 1; i < 11; i++) 
    { 
        Thread.Sleep(2000); 
        backgroundWorker1.ReportProgress(i*10); 
        if (backgroundWorker1.CancellationPending) 
        { 
            e.Cancel = true; 
            return; 
        } 
    } 
}  
private void backgroundWorker1_RunWorkerCompleted(object sender, RunWorkerCompletedEventArgs e) 

    if(e.Cancelled) 
    { 
        MessageBox.Show("Operation Cancelled"); 
    } 
    else 
    { 
        MessageBox.Show("OperationCompleted"); 
    } 


Return a value from the background operation
You can return a value from the background operation that in the DoWork event handler using the Result property of the DoWorkEventArgs instance, and you can receive it in the RunWorkerCompleted event handler using the Result property of the RunWorkerCompletedEventArgs instance.

BackgroundWorker backgroundWorker1 = new BackgroundWorker(); 
//start the operation on another thread 
private void btnStart_Click(object sender, EventArgs e) 

    backgroundWorker1.RunWokerAsync(); 

//DoWork event handler is executed on a separate thread 
private void backgroundWorker1_DoWork(object sender, DoWorkeventArgs e) 

    //a long running operation here 
    Thread.Sleep(2000); 
    //return the value here 
    e.Result = 10; 

private void backgroundWorker1_RunWorkerCompleted(object sender, RunWorkerCompletedEventArgs e) 

    //recieve the return value here 
    int returnValue = (int)e.Result; 


European Visual Studio 2017 Hosting - HostForLIFE.eu :: Visual Studio IntelliCode Preview Available

clock August 24, 2018 11:08 by author Peter

Recently, Microsoft has announced the availability of Preview of Visual Studio IntelliCode in its Build 2018 developer’s conference. This is a new experimental tool for Visual Studio users bringing more of the company’s artificial intelligence smart to software development.

It is a set of AI-assisted capabilities which improves the developer’s productivity with features like contextual, IntelliSense and focused reviews for pull requests.
 
The company states -
“The IntelliCode extension augments productivity features in Visual Studio 2017 with insights based on understanding your code combined with machine learning. The first iteration of this extension enhances your IntelliSense experience by sorting completion items—which are recommended in your code context--to the top of the list.”
 
According to the company, IntelliCode is now applicable only for C# code but in future, it will be upgraded to support more languages.


European Visual Studio 2017 Hosting - HostForLIFE.eu :: Customize Visual Studio Code Shortcuts

clock August 10, 2018 11:13 by author Peter

A couple of months ago, I started using Visual Studio Code for my development activities. I found myself very uncomfortable with the keys and shortcuts. I have been using Visual Studio for more than 6 years now. So, I was very comfortable with the keys and shortcuts of that. The difference in shortcuts was creating a challenge for me. Should I remember a different set of shortcuts for VS Code? Should I start using some other editor?

Then, I started to customize the VS Code shortcuts. If you are also facing the same issues, then it's time you should consider customizing the Visual Studio Code shortcuts. It’s not worth spending energy on remembering a new set of shortcuts for a specific editor. Following are some tips,

  1. Open keyboard shortcuts in Visual Studio Code and update the shortcuts as per your need.
    Press ctrl+K, ctrl+s to open the keyboard shortcut window. This looks something like below.
  2. You can see the Edit button on the right side of the row (highlighted one). On click of the Edit button, it will ask you to change the combination you want to execute the command for.

    You can change the combination for your convenience.

  1. You can open keybindings.json file and update as per your need.
    To open the keybindings.json, you need to open the Keyboard shortcuts first by pressing ctrl+k, ctrl+s. You can click on the keybindings.json file.
  2. This will open the default keybindings. This is a JSON file which can be modified to get your desired shortcuts.
  1. You can have your custom JSON file with your shortcut commands.
    When you open default keybindings.json file in the right-hand side window, it opens a keybindings.json file where you can write your custom keys and commands.

Given are a couple of commands I have added in the keybindings.json file to work with the VS Code. Please let me know your feedbacks/ comments. Are there better ways I am not just aware of?


European Visual Studio 2017 Hosting - HostForLIFE.eu :: How To Open Browser Or Run Program Directly From Visual Studio Code

clock August 3, 2018 09:39 by author Peter
Visual Studio Code is a Editor for running your code efficiently. It is now very popular editor for running your Source Code. Its features are very awesome and anyone can shift to Visual Studio Code. The best part is, it is free to use and free to download. The developers who are get bored from the OLD, Simple looking, Boring HTML code Editors can also shift to Visual Studio Code. It is Developed by Microsoft.Nowadays developers facing problems while running a simple HTML code directly from the Editor as Visual Studio Code does not have any in-built direct feature to run the code like other Editors or its own Visual Studio. But here is a solution to run the code directly from the Editor.

Start the Visual Studio Code Editor. On the left panel click on the Extensions Tab. Or Press (Ctrl + shift + X)


Then in the search bar search for "open in browser". You will get a list of plugins. For simplicity select first plugin and click install

After completion of the installation process it will ask for RELOAD.Just RELOAD the VSC(Visual Studio Code) Editor it will not cause any damage to your unsaved data.

After reloading just right click on your html file and select "Open in Other Browsers".

Select your required Browser and See your Output.

Another way to run is a Short cut key from your keyboard is (Alt+Shift+B).


European Visual Studio 2017 Hosting - HostForLIFE.eu :: Working With Progress Bar Control In Visual Studio 2017

clock July 18, 2018 11:12 by author Peter

In this article, I will explain how to use Progress Bar control in Windows.Forms applications. Progress Bar control is an important control; many applications need to include progress bar control in them. Designing a Progress Bar in Windows.Forms application is simple and it can be used in the application. Follow the steps given below to create a Progress Bar.

Step 1
Open Visual Studio 2017--->NewProject--->Windows.Forms application and name it Progress Bar.


Step 2
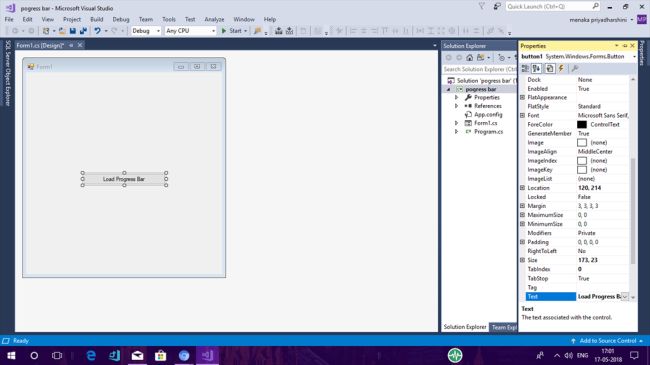
From the toolbox, drag and drop the button control into the form and right click on the button. Select property. Here, you can change the text, font, and the name of the button. In my Project, I changed the text of the button to "Load Progress Bar".

Step 3
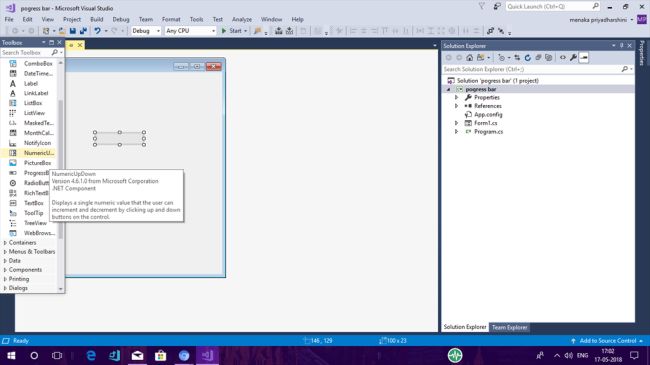
Now, drag and drop the Progress Bar from the Toolbox to Windows.Forms in Visual Studio. Right-click on the progress bar and select property. Here also, you can change the text, font, and name of the Progress Bar. Progress bar is a control that applications use to indicate the progress of a lengthy operation, such as calculating the result, downloading a large file from the web etc. Progress Bar control is used whenever an operation takes more than a short period of time. The maximum and minimum properties define the range of values to represent the progress of a task.

Step 4
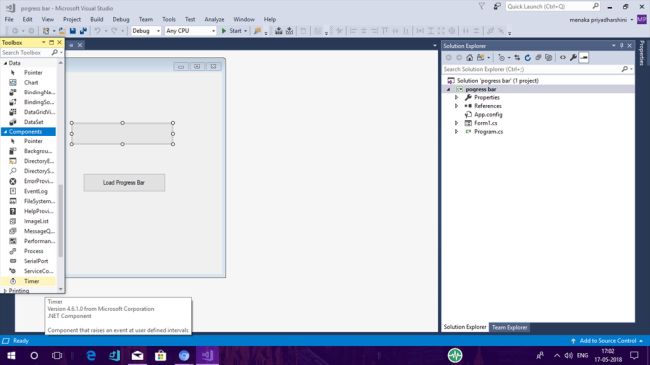
Now, drag and drop the timer control from the toolbox to the Windows.Forms in Visual Studio. The detailed function of Timer control is already explained in my previous article.

Step 5
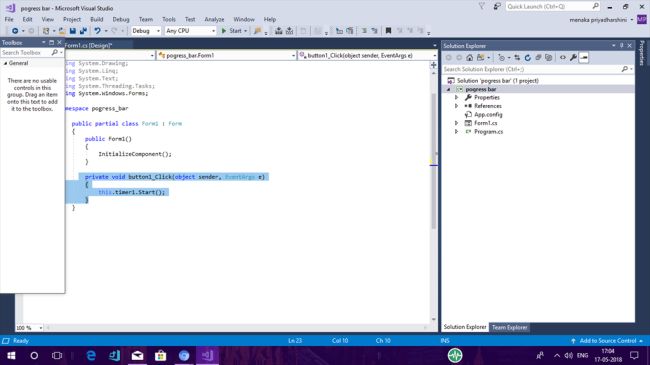
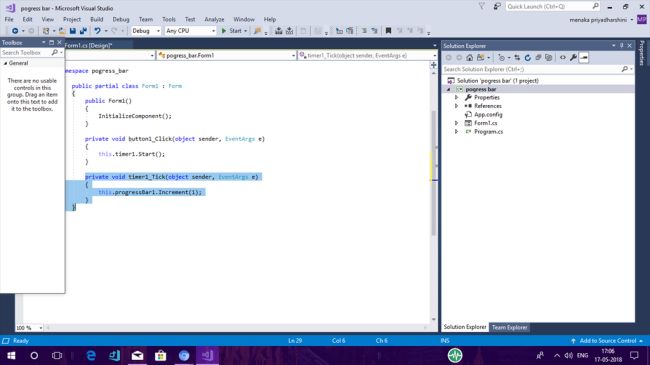
Now, it's time to code. Follow the code given below in the screenshot for the Button-Click event.

Step 6
Now, follow the code given below in the screenshot for the timer click event. A progress bar control is used to display the progress of some activity. I have added a timer control to the form and on the timer tick event handler, I increment the value of the progress bar.
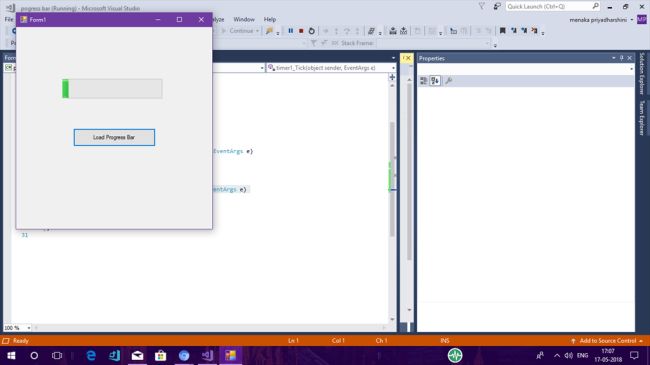
Output
Compile and run the project. The final output of the project obtained is as given below in the screenshot. As the "Load Progress bar" button is pressed, the progress bar starts to display the progress.

Summary
Hope you all understand the working of a progress bar. In case of any problem or error, please feel free to comment down below. In my next article, I will explain how to install NuGet Packages and work with Circular progress bar control in Windows.Forms application.


European Visual Studio Hosting - HostForLIFE.eu :: How to Remove White Line Or Space In Visual Studio

clock August 10, 2016 20:56 by author Peter

In this tutorial, i will tell you about how to Remove White Line Or Space In Visual Studio.  I know this a not a new concept but i seen many times in my office guys lots of time spent remove the white space or lines. I know that this type of code snippet but this code snippet is very useful for everyone experienced or fresher developer. when we make a function or develop code am sure some extra lines add in code. Like this way,


             button2.Text = "Please Select Me..."; 
         } 
  //Blank Line
  //Blank Line
         }; 
 
     } /// End button2 scope here.  
 
  //Blank line
// Blank line
 
     private void Save_Click(object sender, EventArgs e) 
     { 


suppose this type of blank lines on every pages. if you want manage your code that's no possible remove line one by one. Thank to Microsoft to give to option remove all blank line.

Open the find and replace pop up windows and past the code "^(?([^\r\n])\s)*\r?$\r?\n" in find textbox.

Note : You must be select the "Use Regular Expressions" before hit the replace button.

HostForLIFE.eu Visual Studio Hosting
HostForLIFE.eu revolutionized hosting with Plesk Control Panel, a Web-based interface that provides customers with 24x7 access to their server and site configuration tools. Plesk completes requests in seconds. It is included free with each hosting account. Renowned for its comprehensive functionality - beyond other hosting control panels - and ease of use, Plesk Control Panel is available only to HostForLIFE's customers. They
offer a highly redundant, carrier-class architecture, designed around the needs of shared hosting customers.

http://aspnetmvceuropeanhosting.hostforlife.eu/image.axd?picture=2015%2f10%2fhostforlifebanner.png


About HostForLIFE.eu

HostForLIFE.eu is European Windows Hosting Provider which focuses on Windows Platform only. We deliver on-demand hosting solutions including Shared hosting, Reseller Hosting, Cloud Hosting, Dedicated Servers, and IT as a Service for companies of all sizes.

We have offered the latest Windows 2016 Hosting, ASP.NET Core 2.2.1 Hosting, ASP.NET MVC 6 Hosting and SQL 2017 Hosting.


Tag cloud

Sign in