Full Trust European Hosting

BLOG about Full Trust Hosting and Its Technology - Dedicated to European Windows Hosting Customer

AngularJS Hosting Europe - HostForLIFE.eu :: Feature Module with Lazy Loading in Angular

clock July 25, 2023 07:29 by author Peter

In this article, we are going to discuss feature modules in Angular and lazy load them with the help of one practical example.

What is Angular?
Angular is a popular open-source JavaScript framework for building web applications. It was developed by Google and is currently maintained by the Angular Team at Google. Angular allows developers to create dynamic, single-page applications (SPAs) and provides a structured approach to building complex web applications.

What is a Module?
In programming, a module is a self-contained unit of code that performs a specific task or provides a set of related functions. It is a way of organizing and managing code in a modular and reusable manner.

A module can be a separate file or a collection of files that contain functions, classes, variables, or other code components. It encapsulates a specific set of functionalities, making it easier to understand, test, and maintain code.

Feature Module in Angular

In Angular, a feature module is a way to organize and encapsulate a specific set of features and functionality within an application.

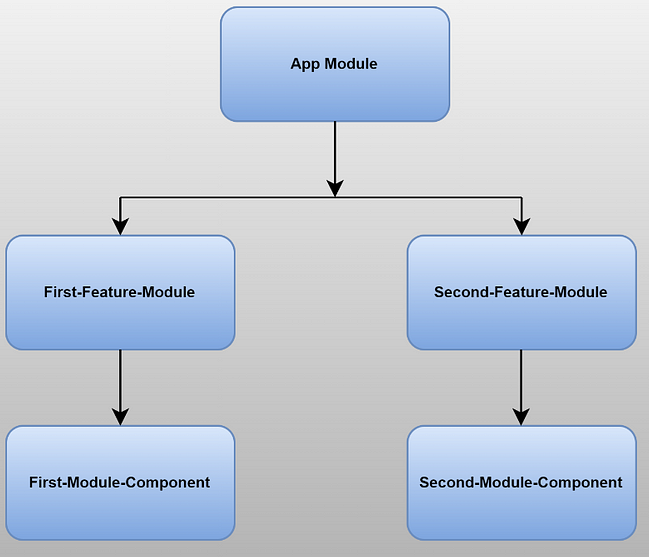
It contains a group of related components, directives, services, and a few other files. It helps us maintain and manage the application codebase.

For example, Suppose we have an online shopping application that contains feature modules like user registration, products, cart, and many more with its services, directives, components, and routing-related configuration.
Benefits of Feature Module

Here are some key benefits of feature modules in Angular:

  • Encapsulation: Feature modules encapsulate related components, directives, services, and other code files within a specific feature or functionality. This encapsulation provides a clear boundary and separation of concerns, making it easier to understand and maintain code.
  • Code Organization: Feature modules help organize your codebase by grouping related code files together. This organization enhances code readability and allows developers to navigate the codebase more efficiently.
  • Code Reusability: Feature modules can be reused across multiple applications or within the same application. This reusability promotes modular and scalable development by allowing you to extract and reuse modules with specific functionalities.
  • Lazy Loading: The lazy loading feature allows you to load feature modules on-demand, improving the initial load time and performance of your application. Lazy loading ensures that only the necessary modules are loaded when navigating to specific routes, reducing the initial bundle size and optimizing the user experience.
  • Dependency Management: Feature modules in Angular have their own set of dependencies and can manage their own imports and exports. This helps in managing dependencies and prevents naming conflicts with other modules in your application.
  • Clear Interfaces: Feature modules define clear interfaces through exports, providing a way to communicate with other parts of the application. By exporting specific components, directives, or services, other modules can make use of them and interact with the features provided by the module.
  • Testing and Debugging: Feature modules enhance testability and debugging capabilities. By encapsulating related code files, it becomes easier to write unit tests specific to a module’s functionalities and isolate any issues or bugs within that module.

Lazy Loading
Lazy loading is a technique in Angular that allows you to load modules asynchronously and on-demand when they are needed. It is a powerful feature that helps improve the initial loading time of your application by loading only the necessary code for the current route instead of loading the entire application upfront.

Feature Module Example

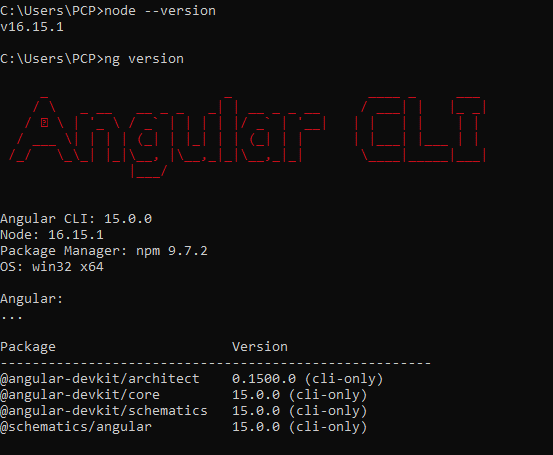
Step 1. Install NodeJS: https://nodejs.org/en/download
Step 2. Install Angular CLI using the following command:

npm install -g @angular/cli

Step 3. Verify NodeJS and Angular CLI are installed or not using the following commands:
node –version
ng version

Step 4. Create a new Angular Application.
ng new angular-modules-demo

Step 5. Open the Angular application in one of the editors, like VS Code, and install the bootstrap with the help of the following command:
npm install bootstrap

next, add the bootstrap script inside the angular.json file inside the scripts and styles section
"styles": [
  "src/styles.css",
  "./node_modules/bootstrap/dist/css/bootstrap.min.css"
],
"scripts": [
  "./node_modules/bootstrap/dist/js/bootstrap.min.js"
]

Step 6. Create the “FirstModule” feature module.
Navigate into the project directory:
cd angular-modules-demo

Next, create the “FirstModule” feature module by running the following command:
ng generate module modules/first-module –routing

This will generate a new module named FirstModule under the modules directory, along with a routing module named first-module-routing.module.ts specific to this module.
import { NgModule } from '@angular/core';
import { CommonModule } from '@angular/common';

import { FirstModuleRoutingModule } from './first-module-routing.module';
import { FirstModuleComponent } from './first-module.component';

@NgModule({
  declarations: [
    FirstModuleComponent
  ],
  imports: [
    CommonModule,
    FirstModuleRoutingModule
  ]
})
export class FirstModuleModule { }

Step 7. Create the default component for FirstModule.
Generate the default component for “FirstModule” by running the following command:
ng generate component modules/first-module/first-module-component

This will create a new component named FirstModuletComponent within the first module.
import { Component } from '@angular/core';

@Component({
  selector: 'app-first-module',
  templateUrl: './first-module.component.html',
  styleUrls: ['./first-module.component.css']
})
export class FirstModuleComponent {

}

Step 8. Configure the routing for FirstModule.
Open the first-module-routing.module.ts file under the modules/first-module directory and modify it as follows:
import { NgModule } from '@angular/core';
import { RouterModule, Routes } from '@angular/router';
import { FirstModuleComponent } from './first-module.component';

const routes: Routes = [{ path: '', component: FirstModuleComponent }];

@NgModule({
  imports: [RouterModule.forChild(routes)],
  exports: [RouterModule]
})
export class FirstModuleRoutingModule { }

Step 9. Create the “SecondModule” feature module

Create the “SecondModule” feature module by running the following command:
ng generate module modules/second-module –routing

This will generate a new module named SecondModule under the modules directory, along with a routing module named second-module-routing.module.ts specific to this module.
import { NgModule } from '@angular/core';
import { CommonModule } from '@angular/common';

import { SecondModuleRoutingModule } from './second-module-routing.module';
import { SecondModuleComponent } from './second-module.component';

@NgModule({
  declarations: [
    SecondModuleComponent
  ],
  imports: [
    CommonModule,
    SecondModuleRoutingModule
  ]
})
export class SecondModuleModule { }


Step 10. Create the default component for SecondModule.
Generate the default component for “SecondModule” by running the following command:
ng generate component modules/second-module/second-module-component

This will create a new component named SecondModuleComponent within the second module.
import { Component } from '@angular/core';

@Component({
  selector: 'app-second-module',
  templateUrl: './second-module.component.html',
  styleUrls: ['./second-module.component.css']
})
export class SecondModuleComponent {

}

Step 11. Configure the routing for the second module.
Open the second-module-routing.module.ts file under the modules/second-module directory and modify it as follows:
import { NgModule } from '@angular/core';
import { RouterModule, Routes } from '@angular/router';
import { SecondModuleComponent } from './second-module.component';

const routes: Routes = [{ path: '', component: SecondModuleComponent }];


@NgModule({
  imports: [RouterModule.forChild(routes)],
  exports: [RouterModule]
})
export class SecondModuleRoutingModule { }


Step 12. Update the App Routing
Open the app-routing.module.ts file under the src/app directory and modify it as follows:
import { NgModule } from '@angular/core';
import { RouterModule, Routes } from '@angular/router';

const routes: Routes = [
 { path: 'first-module', loadChildren: () => import('./modules/first-module/first-module.module').then(m => m.FirstModuleModule) },
 { path: 'second-module', loadChildren: () => import('./modules/second-module/second-module.module').then(m => m.SecondModuleModule) },
];

@NgModule({
  imports: [RouterModule.forRoot(routes)],
  exports: [RouterModule]
})
export class AppRoutingModule { }


Here we use lazy loading in this example to navigate features modules based on navigations.

To implement lazy loading in Angular, follow these steps:
Open the main app routing module, app-routing.module.ts, and update the routes to use the loadChildren property instead of the component property for the routes that you want to lazy load. For example:
const routes: Routes = [
 { path: 'first-module', loadChildren: () => import('./modules/first-module/first-module.module').then(m => m.FirstModuleModule) },
 { path: 'second-module', loadChildren: () => import('./modules/second-module/second-module.module').then(m => m.SecondModuleModule) },
];


By using lazy loading, you can split your application into smaller, more manageable chunks, improving performance by loading modules only when they are required. This approach is particularly useful for larger applications or when you have sections of your application that are accessed less frequently.

Lazy-loaded modules are loaded asynchronously and cached by the Angular router, so subsequent visits to the same route will load the module from the cache instead of making a new request to the server.

Step 13. Update the app.component.html file.

<button type="button" class="btn btn-primary" routerLink="first-module">First Module</button>
<button type="button" class="btn btn-secondary" routerLink="second-module">Second Module</button>
<router-outlet></router-outlet>

Here we used bootstrap buttons with a router link for navigation purposes and, at the bottom, a router outlet to render different components of the feature module based on navigation.

Step 14. Finally, start the development server by running the following command:
ng serve

Navigate to http://localhost:4200 in your web browser, and you should see the Angular Modules Demo App with two navigation links: “First Module” and “Second Module.” Clicking on each link will lazily load and display the corresponding module’s component.

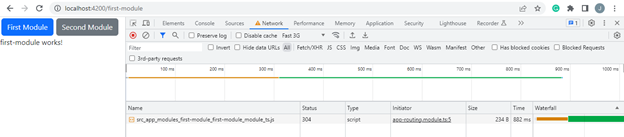
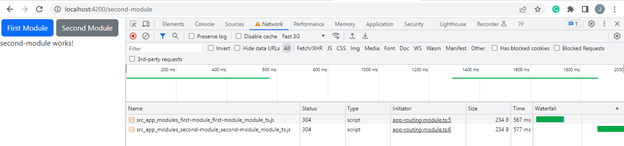
When we navigate the feature module, only its corresponding files will get loaded because we are lazy to load them with load children, as shown in the above image under the application console. Also, it improves performance when we have a big project with different complex modules.

Step 1. we need an Employee interface to define the properties of the employee objects as below. For this, we add one new file called employee.ts and add the below code there –

export interface EmployeeInfo
{
    emp_id : number;
    emp_code : string;
    emp_name : string;
    emp_mobile : number;
    emp_email : string;
}


Step 2. Now, add a new file called app.employee.service.ts and add the below code –
import { EmployeeInfo } from './employee';
import { Injectable } from '@angular/core';

@Injectable({
  providedIn: 'root'
})
export class EmloyeeService {
  public employeeList: EmployeeInfo[] = [];

  ngOnInit(){
    this.employeeList = [
      { "emp_id": 1, "emp_name": "Roger Smith", "emp_code" : "ET0002334", "emp_mobile" : 9830098300, "emp_email": "[email protected]"},
      { "emp_id": 2, "emp_name": "Alex Bob", "emp_code" : "ET0002992", "emp_mobile" : 9830198301, "emp_email" : "[email protected]"},
      { "emp_id": 3, "emp_name": "Stephen Ken", "emp_code" : "ET0001675", "emp_mobile" : 88830098312, "emp_email" : "[email protected]"},
      ];
  }

  getEmployeeList()  {
    if (this.employeeList.length == 0 )
        this.ngOnInit();
    return this.employeeList;
  }

  initializeData(){
    this.getEmployeeList();
  }

  getEmployee(id : number){
    return this.employeeList.find(e=>e.emp_id == id);
  }

  addEmployeeInfo(emloyee : EmployeeInfo){
    this.employeeList.push(emloyee);
  }
}

Step 3. Now, add a new standalone component called app.employee.index.ts and add the below code –
import { Component, OnInit } from '@angular/core';
import { CommonModule } from '@angular/common';
import { Router } from '@angular/router';

import { EmployeeInfo } from './employee';
import { EmloyeeService } from './app.employee.service';

@Component({
  selector: 'app-employee-index',
  standalone: true,
  imports: [CommonModule],
  templateUrl: './app.employee.index.html'
})
export class EmployeeIndexComponent implements OnInit {
  public employeeList : EmployeeInfo[] = [] ;

  constructor(
    private _employeeService : EmloyeeService,
    private _route: Router) {

  }

  ngOnInit(){
    this.employeeList = this._employeeService.getEmployeeList();
  }

  navigateUrl(path:string, id:number){
    this._route.navigate([path, id]);
  }
}

Step 4. Now, open the HTML file called app.employee.index.html and add the below code –
<div class="container-fluid">
    <div class="row">

        <h2>Employee Records</h2>
        <div style="position: relative; width: fit-content; float: right;" class="text-right">
            <a class="btn btn-primary" href="/employee-add" role="button">Add Employee</a>
        </div>
        <div class="table-responsive">
            <table class="table table-striped table-sm">
                <thead>
                    <tr>
                        <th scope="col">S.No</th>
                        <th scope="col">Employee Code</th>
                        <th scope="col">Employee Name</th>
                        <th scope="col">Mobile No</th>
                        <th scope="col">Email Id</th>
                        <th></th>
                    </tr>
                </thead>
                <tbody>
                    <tr *ngFor='let emp_data of employeeList'>
                        <td>{{emp_data.emp_id}}</td>
                        <td>{{emp_data.emp_code}}</td>
                        <td>{{emp_data.emp_name}}</td>
                        <td>{{emp_data.emp_mobile}}</td>
                        <td>{{emp_data.emp_email}}</td>
                        <td>
                            <button type="button" class="btn btn-info" (click)="navigateUrl('/employee-view', emp_data.emp_id)">Info</button>
                        </td>
                    </tr>
                </tbody>
            </table>
        </div>
    </div>
</div>


Step 5. Now, open the app.component.ts file and import the EmployeeIndexComponent within that component imports array objects.
import { Component } from '@angular/core';
import { CommonModule } from '@angular/common';
import { provideRouter, RouterOutlet } from '@angular/router';
import { EmployeeIndexComponent } from './employees/app.employee.index';

@Component({
  selector: 'app-root',
  standalone: true,
  imports: [CommonModule, RouterOutlet, EmployeeIndexComponent],
  templateUrl: './app.component.html',
  styleUrls: ['./app.component.css']
})
export class AppComponent {
  title = 'Angular 16 Application - Standalone App Demo';

}


Routing with Standalone Component
Now, in the above employee index component, we create two buttons – Add Employee and another button for View Employee details. By using these two buttons, we will navigate to the related component with the help of the routes. Now, we will define how we can define routes in the application.

Step 1. Now, add another standalone component called app.employee.view.ts file and add the following code –
import { Component, OnInit } from '@angular/core';
import { FormsModule } from '@angular/forms';
import { CommonModule } from '@angular/common';
import { Router } from '@angular/router';

import { EmployeeInfo } from './employee';
import { EmloyeeService } from './app.employee.service';
import { last } from 'rxjs';

@Component({
  selector: 'app-employee-add',
  standalone: true,
  imports: [CommonModule, FormsModule],
  templateUrl: './app.employee.add.html'
})
export class EmployeeAddComponent implements OnInit {
  public employeeList : EmployeeInfo[] = [] ;
  public employee : any = {};

    constructor(
    private _employeeService : EmloyeeService,
    private _route: Router) {
  }

  ngOnInit(){
    this.employeeList = this._employeeService.getEmployeeList();
  }

  addRecord(){
    var lastNo = this.employeeList[this.employeeList.length-1].emp_id;
    if (lastNo == null)
      lastNo = 0;
    this.employee.emp_id = lastNo +1;
    this._employeeService.addEmployeeInfo(this.employee);
    this.navigateUrl();
  }

  navigateUrl(){
    this._route.navigate(['home']);
  }
}


Step 2. Now, open the app.employee.view.html file and add the following code –
<h2>Add Employee</h2>

<form>
    <div class="row mb-3">
        <div class="col-sm-4">
            <label>Employee Code</label>
        </div>
        <div class="col-sm-8">
            <input type="text" name="emp_code" [(ngModel)] ="employee.emp_code"/>
        </div>
    </div>
    <div class="row mb-3">
        <div class="col-sm-4">
            <label>Employee Name</label>
        </div>
        <div class="col-sm-8">
            <input type="text" name="emp_name" [(ngModel)] ="employee.emp_name"/>
        </div>
    </div>
    <div class="row mb-3">
        <div class="col-sm-4">
            <label>Email Id</label>
        </div>
        <div class="col-sm-8">
            <input type="email" name="emp_email" [(ngModel)] ="employee.emp_email"/>
        </div>
    </div>
    <div class="row mb-3">
        <div class="col-sm-4">
            <label>Mobile No</label>
        </div>
        <div class="col-sm-8">
            <input type="number" name="emp_mobile" [(ngModel)] ="employee.emp_mobile"/>
        </div>
    </div>
    <div class="row mb-3">
        <div class="col-sm-4">

        </div>
        <div class="col-sm-8">
            <input type="submit" value="Submit" class="btn-primary" (click)="addRecord()"/>
        </div>
    </div>
</form>

<a href="#">Back to Home</a>


Step 3. Now, add another standalone component called app.employee.add.ts file and add the following code –
import { Component, OnInit } from '@angular/core';
import { CommonModule } from '@angular/common';
import { ActivatedRoute, Params, Router } from '@angular/router';

import { EmployeeInfo } from './employee';
import { EmloyeeService } from './app.employee.service';

@Component({
  selector: 'app-employee-view',
  standalone: true,
  imports: [CommonModule],
  templateUrl: './app.employee.View.html'
})
export class EmployeeViewComponent implements OnInit {
  public employee : any = {};
  public employeeId : number = 0;

  constructor(private _employeeService : EmloyeeService,
    private router: Router,
    private route: ActivatedRoute) {
  }

  ngOnInit() {
    this.route.params.subscribe((params: Params)=> this.employeeId = params['id']);
    this.employee = this._employeeService.getEmployee(this.employeeId);
  }
}


Step 4. Now, open the app.employee.add.html and add the following code –

<h2>Employee Details</h2>

<div>
    <div class="row mb-3">
        <div class="col-sm-4">
            <label>Employee Id</label>
        </div>
        <div class="col-sm-8">
            <span>{{ employee.emp_id }}</span>
        </div>
    </div>
    <div class="row mb-3">
        <div class="col-sm-4">
            <label>Employee Code</label>
        </div>
        <div class="col-sm-8">
            <span>{{ employee.emp_code }}</span>
        </div>
    </div>
    <div class="row mb-3">
        <div class="col-sm-4">
            <label>Employee Name</label>
        </div>
        <div class="col-sm-8">
            <span>{{ employee.emp_name }}</span>
        </div>
    </div>
    <div class="row mb-3">
        <div class="col-sm-4">
            <label>Email Id</label>
        </div>
        <div class="col-sm-8">
            <span>{{ employee.emp_email }}</span>
        </div>
    </div>
    <div class="row mb-3">
        <div class="col-sm-4">
            <label>Mobile No</label>
        </div>
        <div class="col-sm-8">
            <span>{{ employee.emp_mobile }}</span>
        </div>
    </div>
</div>

<a href="/home">Back to Home</a>


Step 5. So, open the app.routes.ts file and add the below component –
import { Routes } from '@angular/router';

import { AppComponent } from './app.component';
import { EmployeeIndexComponent } from './employees/app.employee.index';
import { EmployeeAddComponent } from './employees/app.employee.add';
import { EmployeeViewComponent } from './employees/app.employee.view';

export const APP_ROUTES: Routes = [
    {
        path: '',
        pathMatch: 'full',
        redirectTo: 'home'
    },
    {
        path: 'home',
        component: EmployeeIndexComponent
    },
    {
        path:'employee-index',
        component:EmployeeIndexComponent
    },
    {
        path:'employee-add',
        component:EmployeeAddComponent
    },
    {
        path:'employee-view/:id',
        component:EmployeeViewComponent
    }
];


Now, we can run the application and test the route functionality.


Node.js Hosting Europe - HostForLIFE.eu :: How Do I Use Multer to Upload Multiple Files in Node.js?

clock July 21, 2023 08:46 by author Peter

This post will teach you how to upload numerous files in Node.js. In Node.js, we upload files using many libraries. In this article, we discuss a really basic and simple method for beginners, complete with examples. There is also a "rar" file attached to export your system and execute it properly.


Steps for Starting a Project
Step 1: Create a Node.js Project

Use my previous article "How to Upload File in Node.js" for Node.js setup. In this article, we discussed crucial Node.js commands for uploading files.

Step 2: Project Organization.
When step one is finished, it produces some directories such as node modules, package-lock.json, and package.json, but we still need to build some files listed below the image. When the project is executed, the 'upload' folder is automatically created, and all uploaded files are saved to the 'upload' folder.

In this file structure, node_modules, package-lock.json, and package.json these files is created while you set up a project. We created index.js and views folder. Below attached all files used in this project.

Step 3. Create an index.js file.
In this file, have the "/" route and other necessary code required to run the project below the file is attached.

index.js
const express = require('express');
const path = require('path');
const bodyParser = require('body-parser');
const { render } = require('ejs');
var fs = require("fs");
const multer = require('multer');
const app = express();

// Middleware setup
app.use(bodyParser.json());
app.use(bodyParser.urlencoded({ extended: true }));
app.set('views', path.join(__dirname, 'views'));
app.set('view engine', 'ejs');

// Set up static file serving for 'upload' folder
const uploadsPath = path.join(__dirname, 'upload');
app.use('/upload', express.static(uploadsPath));

// Route to render the 'first' view
/**
 * @route GET /
 * @description Render the 'first' view.
 */
app.get("/", function (req, res) {
    res.render('first');
});

// Set up multer storage and upload configuration
const storage1 = multer.diskStorage({
    destination: function (req, file, cb) {
        // Check the fieldname and store files accordingly
        if (file.fieldname === 'file1' || file.fieldname === 'file2' || file.fieldname === 'file3') {
            cb(null, path.join(__dirname, '/upload'));
        } else {
            cb(new Error('Invalid field name'));
        }
    },
    filename: (req, file, cb) => {
        cb(null, file.originalname); // Use the original file name
    }
});
const uploadd = multer({ storage: storage1 });

// Configure multer fields for file uploads
/**
 * @typedef {Object} MulterField
 * @property {string} name - The name of the field for file upload.
 * @property {number} maxCount - The maximum number of files allowed to be uploaded for this field.
 */

/**
 * @type {MulterField[]} fields - Multer fields configuration for file uploads.
 */
const cpUpload = uploadd.fields([
    { name: 'file1', maxCount: 1 },
    { name: 'file2', maxCount: 8 },
    { name: 'file3', maxCount: 8 }
]);

// Route to handle file upload
/**
 * @route POST /fileupload
 * @description Handle file upload.
 * @returns {void}
 * @throws {Error} If an invalid field name is provided.
 */
app.post('/fileupload', cpUpload, (req, res) => {
    res.redirect('/');
});

// Start the server
/**
 * @description Start the server and listen on port 3001.
 * @event
 */
app.listen(3001, () => {
    console.log('server is running on port http://localhost:3001');
});

A server that can handle file uploads is created with the Node.js Express code that is provided. Multer, a well-known middleware library, is used to control file uploads. To render views, EJS is used as the templating engine. For the fields with the names "file1," "file2," and "file3," the application accepts file uploads. The 'upload' folder on the server is where the uploaded files are kept. Other developers will find it simpler to comprehend the functions of various routes and middlewares thanks to the inclusion of JSDoc comments in the code documentation. The 'first' view is rendered by the server at the root route, which operates on port 3001. When a file is successfully uploaded, the server returns users to the home page.

Step 4. Create first.ejs file.
This file has simple HTML and CSS code.

first.ejs
<!DOCTYPE html>
<html>
<head>
  <title>File Upload</title>
  <style>
    /* CSS styles for the file upload form */

    body {
      font-family: Arial, sans-serif;
      margin: 0;
      padding: 20px;
    }

    .container {
      max-width: 400px;
      margin: 0 auto;
    }

    .form-group {
      margin-bottom: 20px;
    }

    label {
      display: block;
      margin-bottom: 5px;
      font-weight: bold;
    }

    input[type="file"] {
      padding: 5px;
      border: 1px solid #ccc;
      border-radius: 4px;
      width: 100%;
    }

    input[type="submit"] {
      background-color: #4CAF50;
      color: white;
      padding: 10px 15px;
      border: none;
      border-radius: 4px;
      cursor: pointer;
    }

    input[type="submit"]:hover {
      background-color: #45a049;
    }
  </style>
</head>
<body>
  <div class="container">
    <h2>File Upload</h2>
    <!-- File upload form -->
    <form action="/fileupload" method="post" enctype="multipart/form-data">
      <!-- File 1 input -->
      <div class="form-group">
        <label for="file1">File 1:</label>
        <input type="file" id="file1" name="file1">
      </div>
      <!-- File 2 input -->
      <div class="form-group">
        <label for="file2">File 2:</label>
        <input type="file" id="file2" name="file2">
      </div>
      <!-- File 3 input -->
      <div class="form-group">
        <label for="file3">File 3:</label>
        <input type="file" id="file3" name="file3">
      </div>
      <!-- Upload button -->
      <input type="submit" value="Upload">
    </form>
  </div>
</body>
</html>


Explanation

Three file input fields are created in a file upload form using the specified HTML code. Users can upload files by choosing them and submitting the form. The form gains visual components thanks to the CSS styles. The chosen files are sent to the "/fileupload" endpoint using the "post" method and "multipart/form-data" encoding when the form is submitted. The uploaded files are processed by the server, which manages the endpoint. Developers can better understand and manage the functioning of the form by using the HTML comments, which offer succinct explanations of the code's function and organization.

Output


AngularJS Hosting Europe - HostForLIFE.eu :: Routing in Angular

clock July 17, 2023 09:11 by author Peter

This article will discuss Angular routings and the various methods to render different components using routing.


Node Js Angular VS Code
What is Angular?
Popular open-source JavaScript framework for developing web applications is Angular. It was created by Google and is presently maintained by the Google Angular Team. Angular enables developers to create dynamic single-page applications (SPAs) and provides a structured method for constructing complex web applications.
What exactly is Routing?

In web development, routing refers to the process of determining how an application responds to a particular URL or path. It involves mapping URLs to various application components or views and displaying the appropriate content based on the requested URL.

Routing enables users to navigate between various views or pages in a client-side web application, such as a single-page application (SPA) built with Angular, without actually loading a new HTML page from the server. The application instead dynamically modifies the browser's content by loading the required components and data based on the requested route.
Advantages of Routing

Routing in web applications has numerous advantages. Here are several significant benefits of using routing:

  • Improved User Experience Routing enables a fluid and interactive user experience by allowing users to navigate between various views or pages within an application without reloading the entire page.
  • With routing, only the necessary components and data for the requested route are loaded, which results in quicker page transitions.
  • Routing promotes a modular structure for an application by segregating it into distinct views or components associated with specific routes. This facilitates code reuse, separation of concerns, and easier maintenance. Each route can have its own component, making it simpler to administer and independently update distinct sections of the application.
  • Conditional Rendering and Dynamic Content: Based on the current route, routing enables conditional rendering of components. This enables you to display or conceal specific application sections based on the user's navigation path.
  • Route Parameters and Query Parameters: Passing route parameters and query parameters is supported by routing. You can transmit dynamic values in the URL, such as an ID or a username, and retrieve them in the corresponding component using route parameters. Query parameters enable the URL to receive additional data for filtering, categorizing, and other purposes.
  • Route Guards and Security Angular routing includes route guards, which are mechanisms for controlling access to particular routes based on certain conditions. Route guardians can be used for authentication, authorization, and other purposes related to security. They aid in ensuring that users can only access routes or execute actions if they satisfy the required criteria.
  • Routing supports nested or subsidiary routes, enabling you to define a hierarchical navigation structure within an application. This is especially useful when dealing with complex applications with multiple navigation levels or sections that must be encapsulated and managed independently.

Routing has a significant impact on enhancing the user experience, enhancing performance, and facilitating modular and maintainable code structures in web applications.
Routing in Angular

In a client-side web application, such as a single-page application (SPA) developed with Angular, routing enables users to navigate between various views without loading a new HTML page. The application instead dynamically modifies the browser's content by loading the required components and data based on the requested route.

Angular routing typically comprises the following components:

  • Routes: Routes define the correspondence between the URL path and the components to be rendered. Each route is defined with a corresponding URL path and component that will be displayed when that path is accessed.
  • The router interprets the current URL and loads the appropriate components based on the defined routes. It monitors URL modifications and manages navigation within the application.
  • The router outlet is a placeholder within the application's template where the current route's content is rendered.
  • Links and Navigation for Routers: Links and navigation elements, such as anchor tags (a>) or buttons, are used to initiate navigation to various routes within an application. Angular allows these elements to be decorated with directives such as routerLink to specify the intended route.

Routing example in Angular
Step 1
Install NodeJS.

Step 2
Install Angular CLI using the following command.
    npm install -g @angular/cli

Step 3
Verify NodeJS and Angular CLI are installed or not using the following commands:
    node — version


    ng version

Create a new Angular Application.
    ng new RoutingDemo

Step 4
Open the Angular application in one of the editors, like VS Code, and install the bootstrap with the help of the following command:
    npm install bootstrap

next, add the bootstrap script inside the angular.json file inside the scripts and styles section
"styles": [
"src/styles.css",
"./node_modules/bootstrap/dist/css/bootstrap.min.css"
],
"scripts": [
"./node_modules/bootstrap/dist/js/bootstrap.min.js"
]


Step 5
Open your terminal or command prompt and navigate to your Angular project directory. Run the following commands to generate the components:
    ng generate component home
    ng generate component about
    ng generate component contact
    ng generate component feedback
    ng generate component product
    ng generate component product-offer
    ng generate component product-updates
    ng generate component rating


Step 6
Routing Configuration:
Open the app-routing.module.ts file in your project and update the route configuration to include the newly created components.
import { NgModule } from '@angular/core';
import { RouterModule, Routes } from '@angular/router';
import { HomeComponent } from './components/home/home.component';
import { ProductComponent } from './components/product/product.component';
import { AboutComponent } from './components/about/about.component';
import { ContactComponent } from './components/contact/contact.component';
import { ProductOfferComponent } from './components/product-offer/product-offer.component';
import { ProductUpdatesComponent } from './components/product-updates/product-updates.component';
import { RatingComponent } from './components/rating/rating.component';
import { FeedbackComponent } from './components/feedback/feedback.component';

const routes: Routes = [
  { path: '', redirectTo: 'home', pathMatch: 'full' }, //default route
  { path: 'home', component: HomeComponent },
  {
    path: 'product/:id', component: ProductComponent,
    children: [
      {path: '', redirectTo:'updates', pathMatch:'full'},
      { path: 'offers', component: ProductOfferComponent },
      { path: 'updates', component: ProductUpdatesComponent }
    ]
  },
  { path: 'about', component: AboutComponent,
    children: [
      {path: 'rating', outlet:'rate', component:RatingComponent},
      {path: 'feedback', outlet:'feed', component:FeedbackComponent}
    ]
  },
  { path: 'contact', component: ContactComponent },
  { path: '**', component: HomeComponent }
];

@NgModule({
  imports: [RouterModule.forRoot(routes)],
  exports: [RouterModule]
})
export class AppRoutingModule { }

This configuration maps the respective paths to their corresponding components.

In Angular, the RouterModule and Routes are key components used for configuring and managing routing in an application.

RouterModule

The RouterModule is an Angular module that provides the necessary directives, services, and functionality for implementing routing in an application.

Routes
Routes is an array that defines the routes and their configurations within the application. Each route object within the Routes array specifies the URL path and the corresponding component to be rendered when that path is accessed.

Line No. 13:
To define a default route in Angular, you can use an empty path ‘ ’ as the route path in the Routes array configuration. When the empty path is accessed, Angular will render the component associated with that route.

To redirect to a different route when the default route is accessed, you can use the redirectTo property with a target route path. Additionally, the pathMatch property can be used to define the matching strategy for the route.

Line 15 to 22:
To create a route with an id parameter for displaying product details, you can modify the routing configuration in Angular as follows:
path: 'product/:id', component: ProductComponent

In this example, we’ve added a route with the path ‘product/:id’ to represent the product details page. The :id part indicates a dynamic parameter that can be accessed in the ProductComponent.
import { Component, OnInit } from '@angular/core';
import { ActivatedRoute } from '@angular/router';
import { ProductsService } from '../../services/products.service';

@Component({
  selector: 'app-products',
  templateUrl: './product.component.html',
  styleUrls: ['./product.component.css']
})
export class ProductComponent implements OnInit {

  productDetail? : any;

  constructor(private route : ActivatedRoute,private productService : ProductsService){}

  ngOnInit(): void {
    let productId = this.route.snapshot.params['id'];
    this.getProductDetailById(productId)
  }

  getProductDetailById(id: number){
    this.productService.getProductDetailById(id).subscribe(res => {
      this.productDetail = res
      console.log(res)
    })
  }
}


In this code, we inject the ActivatedRoute service to access the current route’s parameters. In the ngOnInit() lifecycle hook, we retrieve the id parameter using this.route.snapshot.params[‘id’] and assign it to the productId property for later use in the component’s template.

Finally, you can navigate to the product details page by providing an id value in the URL. For example, if you have a product with an id of 123, you can navigate to http://localhost:4200/product/123 to see the product details.

The ProductComponent will be rendered with the corresponding id parameter retrieved from the URL, and you can use the productId property to display the relevant product information in the template.

To create child components, ProductOfferComponent and ProductUpdatesComponent, nested under the ProductComponent, you can modify the routing configuration in Angular as follows:

Update the Routes array in your routing module (e.g., app-routing.module.ts) to include the child routes under the ProductComponent:
{
  path: 'product/:id', component: ProductComponent,
  children: [
    {path: '', redirectTo:'updates', pathMatch:'full'},
    { path: 'offers', component: ProductOfferComponent },
    { path: 'updates', component: ProductUpdatesComponent }
  ]
}


In this updated example, we’ve added child routes to the ProductComponent. The empty path ‘ ’within the children routes corresponds to the ProductComponent as the default component to be rendered when accessing /product. The offers and updates paths map to the ProductOfferComponent and ProductUpdatesComponent, respectively.

Lines 23 to 28:

To create child components RatingComponent and FeedbackComponent nested under the AboutComponent, with named outlets for rating and feedback, you can modify the routing configuration in Angular as follows:

Update the Routes array in your routing module (e.g., app-routing.module.ts) to include the child routes under the AboutComponent with named outlets:
{
  path: 'about', component: AboutComponent,
  children: [
    {path: 'rating', outlet:'rate', component:RatingComponent},
    {path: 'feedback', outlet:'feed', component:FeedbackComponent}
  ]
}


In this updated example, we’ve added child routes to the AboutComponent and specified the named outlet's rate and feed for the RatingComponent and FeedbackComponent, respectively.

Implement the AboutComponent template (about.component.html) to include the named outlets’ placeholders. For example:
<p>Lorem ipsum dolor sit, amet consectetur adipisicing elit. Tenetur magni saepe sint, vel eaque veniam recusandae laboriosam numquam necessitatibus? Laborum mollitia excepturi qui. Modi corporis quasi ab minima eligendi numquam!</p>

<div class="row">
    <div class="col-md-6">
        <router-outlet name="rate"></router-outlet>
    </div>
    <div class="col-md-6">
        <router-outlet name="feed"></router-outlet>
    </div>
</div>


In this template, we’ve added two <router-outlet> placeholders with the name attribute set to ‘rate’ and ‘feed’. These placeholders will be used to render the RatingComponent and FeedbackComponent within the AboutComponent template.

Update the component files for RatingComponent and FeedbackComponent as needed.

Finally, you can navigate to the About and Child components using the named outlets. For example, to access the rating component, navigate to http://localhost:4200/about/(rate:rating//feed:feedback).

I have created an outer link, as I have shown below in the app component. But You can create a URL as per your requirement, and for that, you need appropriate router links with outlets.
<a class="nav-link" [routerLink]="['/about',{
  outlets:{
    'rate': ['rating'],
    'feed': ['feedback']
  }
}]">About</a>


Line No. 30:
In Angular, the double asterisk (**) route, also known as the wildcard route or catch-all route, is used to handle routes that do not match any predefined routes. It acts as a fallback route to handle unknown or invalid URLs within your application.

To define a wildcard route, you can add a route with the path: ‘**’ configuration at the end of your routes array. This route will be matched when no other route matches the requested URL.
{ path: '**', component: HomeComponent }

Step 7
Mention the router outlet in the app component view to conditionally render different components based on navigation.
<nav class="navbar navbar-expand-lg bg-body-tertiary">
  <div class="container-fluid">
    <a class="navbar-brand" href="#">
      <img src="../assets/logo/coder.png" class="navlogo"/> Product Application
    </a>
    <button class="navbar-toggler" type="button" data-bs-toggle="collapse" data-bs-target="#navbarNavAltMarkup" aria-controls="navbarNavAltMarkup" aria-expanded="false" aria-label="Toggle navigation">
      <span class="navbar-toggler-icon"></span>
    </button>
    <div class="collapse navbar-collapse" id="navbarNavAltMarkup">
      <div class="navbar-nav">
        <a class="nav-link" [routerLink]="['/about',{
          outlets:{
            'rate': ['rating'],
            'feed': ['feedback']
          }
        }]">About</a>
        <a class="nav-link" routerLink="/contact">Contact</a>
      </div>
    </div>
  </div>
</nav>

<router-outlet></router-outlet>


So, this is all about routing in Angular.


Node.js Hosting Europe - HostForLIFE.eu :: How To Use File Handling In Node.js?

clock July 14, 2023 07:53 by author Peter

This article covers fundamental file operations in node.js, including Reading, Writing, Updating, and Deleting files. Whether it involves accessing configuration files, processing user-uploaded files, or persisting data to disc, file management is an integral part of many applications. Node.js's "fs" (file system) module is indispensable for streamlining file-handling procedures. It provides a vast array of functions and methods for completing various file-related tasks.

Node.js operation using file management

  • Creating File Reading File
  • Modifying File
  • Delete File

How do you create a Node.js file?

Node.js offers a rapid and efficient method for creating files, which is a necessary task for many applications. In this post, we will examine a variety of synchronous and asynchronous Node.js file generation methods. We will discuss how to use the fs (file system) module, how to handle errors, and best practices for effective file creation. At the conclusion of this article, you will have a comprehensive comprehension of how to create and write files in Node.js, enabling you to handle file-related tasks competently.

Code

const fs = require('fs');

// Specify the file path and content
const filePath = 'path/to/newFile.txt';
const fileContent = 'This is the content of the new file.';

// Asynchronous file creation and writing
fs.writeFile(filePath, fileContent, 'utf8', (err) => {
  if (err) {
    console.error('Error creating  file:', err);
    return;
  }

  console.log('File is  created successfully.');
});

// Synchronous file creation and writing
try {
  fs.writeFileSync(filePath, fileContent, 'utf8');
  console.log('File created successfully.');
} catch (err) {
  console.error('Error creating  file:', err);
}

Explanation
Using the writeFile method, a file can be created asynchronously by providing the file path, the content, the encoding, and a callback function to manage success or failure. A try-catch block is used to manage errors when using the writeFileSync method to create and write a file synchronously.
How is a file read in Node.js?

Reading a file in Node.js involves obtaining access to and retrieving the file's contents from the file system. It necessitates reading file data using the asynchronous or synchronous readFile or readFileSync methods of the fs module. Asynchronous reading permits non-blocking I/O operations while synchronous reading prevents code execution. Error management is essential for addressing issues such as file not found and permissions errors. Applications that require file-based data processing, such as reading configuration files, parsing user uploads, or extracting data from databases, must have the capability to read files.

Code
const fs = require('fs');

// Specify the file path
const filePath = 'path/to/file.txt';

// Asynchronous file reading
fs.readFile(filePath, 'utf8', (err, data) => {
  if (err) {
    console.error('Error reading the file:', err);
    return;
  }

  console.log('File contents:', data);
});

// Synchronous file reading
try {
  const data = fs.readFileSync(filePath, 'utf8');
  console.log('File contents:', data);
} catch (err) {
  console.error('Error reading the file:', err);
}

Explanation
The code shows how to read files in Node.js. ReadFile is used for asynchronous reading, and a callback function is used for error handling. In a try-catch block, readFileSync is used for synchronous reading. If no errors happen, both techniques log file contents. While synchronous reading halts code execution until the file is read, asynchronous reading permits parallel tasks.

How to update a file in Node.js?
In the context of Node.js, updating a file is the act of editing or adding data to an already-existing file on the file system. It entails opening the file with the fs (file system) module, making the required adjustments, and then writing the revised content back into the file. A file can be updated by performing operations like replacing certain lines or entries, appending new data at the end, or replacing specific blocks of text. The usual procedure for this is to read the data in the file, update or add to it as necessary, and then write the updated data back into the file. Developers can dynamically update the contents of files, maintain data integrity, and reflect the most recent information in applications that rely on file-based data storage by updating files in Node.js.

Code
const fs = require('fs');

// Specify the file path
const filePath = 'path/to/file.txt';

// Specify the updated content
const updatedContent = 'This is the updated content of the file.';

// Asynchronous file updating
fs.writeFile(filePath, updatedContent, 'utf8', (err) => {
  if (err) {
    console.error('Error updating the file:', err);
    return;
  }

  console.log('File updated successfully.');
});

// Synchronous file updating
try {
  fs.writeFileSync(filePath, updatedContent, 'utf8');
  console.log('File updated successfully.');
} catch (err) {
  console.error('Error updating the file:', err);
}

Explanation
The file location, the modified content, and optional encoding are passed to the writeFile method, which is used to update the file asynchronously. The identical operation is carried out synchronously using the writeFileSync function. Try-catch blocks are used for error handling, and success or error messages are logged appropriately.

How to delete a file in Node.js?

The fs (file system) module is used in Node.js to delete files by deleting them from the file system. Applications frequently use it to perform resource cleanup, temporary file deletion, and file storage management. The fs.unlink method is offered by Node.js for asynchronous file deletion. This method runs a command using the file path as an argument function when the deletion is finished or if there is a problem. To handle situations when the file cannot be erased because of permissions or if the file doesn't exist, error handling is essential. Node.js has fs.unlinkSync for synchronous file deletion, but due to its blocking nature, it should only be used in extreme cases. Developers may effectively manage files, ensure that unwanted or superfluous files are removed from the file system, and maintain a tidy and organized file storage environment by utilizing Node.js's file deletion capabilities.

Code
const fs = require('fs');

// Specify the file path
const filePath = 'path/to/file.txt';

// Asynchronous file deletion
fs.unlink(filePath, (err) => {
  if (err) {
    console.error('Error deleting the file:', err);
    return;
  }

  console.log('File deleted successfully.');
});

// Synchronous file deletion
try {
  fs.unlinkSync(filePath);
  console.log('File deleted successfully.');
} catch (err) {
  console.error('Error deleting the file:', err);
}


Explanation
First, require("fs") is used to import the fs module. The file path and a callback function are passed to the unlink method as its first and second arguments, respectively, before the file is asynchronously deleted. Whenever something is finished or if there is an error, the callback function is called. The callback console is used for handling errors. By means of console.log(), success and errors are recorded.

The synchronous variant of unlink is the unlinkSync function. It utilizes identical inputs and deletes the file synchronously. A try-catch block is used to handle errors, and console.error() is used to log errors. Console.log() is used to record a successful deletion. The specified file will be eliminated from the file system after executing this code. Ensure that the location of the file you want to remove is substituted for "path/to/file.txt".
Conclusion

File handling in Node.js is an essential component of development since it makes it possible to manipulate files effectively. A complete collection of functions to read, write, update, and delete files are offered by the fs module. Developers can ensure non-blocking I/O and enhance application performance by utilizing asynchronous operations. For reliable file management, proper error handling is essential. Reliability and security are improved by adhering to best practices such as validating file paths, controlling permissions, and performance optimization. Developers may do a range of file-related operations with Node.js, from managing user uploads to working with configurations. Developers may create sophisticated applications with seamless file manipulation capabilities thanks to Node.js' effective file management.  

FAQs

Q. Can I read a file in Node.js synchronously?
A. Yes, you can read a file synchronously in Node.js using the fs.readFileSync method. However, it's generally recommended to use asynchronous file reading (fs.readFile) to avoid blocking the execution of other code.

Q. How can I handle errors while performing file operations in Node.js?
A. Error handling is essential in file operations. You can handle errors using try-catch blocks for synchronous operations or by providing a callback function that captures errors for asynchronous operations. Additionally, you can listen for error events emitted by file streams.

Q. How can I delete a file in Node.js?
A. You can delete a file in Node.js using the fs.unlink method for asynchronous deletion or fs.unlinkSync for synchronous deletion. Both methods require the file path as a parameter.

Q. What precautions should I take while handling files in Node.js?
A. When handling files, it's important to validate file paths to avoid security vulnerabilities. Ensure that you have proper file permissions to perform the desired operations. Additionally, consider using asynchronous operations to avoid blocking the event loop and optimize performance.

Q. Can I update a specific portion of a file in Node.js?
A. Yes, you can update specific portions of a file in Node.js. However, you would need to read the file, make the necessary modifications to the data, and then write the updated data back to the file.


AngularJS Hosting Europe - HostForLIFE.eu :: How to Deploy an Angular app to Firebase?

clock July 5, 2023 09:44 by author Peter

In this article, we are going to discuss a few things about Firebase and the deployment of Angular applications. Firebase is a mobile and web development platform that provides a wide range of tools and services to help developers build high-quality applications. It was originally developed by Firebase Inc., a startup founded in 2011, and was later acquired by Google in 2014.


Features of Firebase

  • Real-time Database: Firebase provides a cloud-hosted NoSQL database that allows developers to store and sync data in real-time across multiple clients. It uses a JSON-based data model and provides powerful querying capabilities.
  • Authentication: Firebase offers authentication services, enabling developers to easily add user authentication to their applications using email and password, social media logins (such as Google, Facebook, and Twitter), and other identity providers.
  • Cloud Functions: Firebase allows developers to write and deploy serverless functions that run in response to events triggered by Firebase services or HTTP requests. This feature enables developers to extend the functionality of their applications without managing servers.
  • Cloud Storage: Firebase provides secure and scalable cloud storage for developers to store and serve user-generated content like images, videos, and other files. It offers simple APIs for uploading, downloading, and managing files.
  • Hosting: Firebase Hosting allows developers to deploy and host their web applications quickly and securely. It provides a global content delivery network (CDN) to deliver static assets and dynamic content to users with low latency.
  • Analytics: Firebase Analytics provides detailed insights into user behavior and app usage. It helps developers track key metrics, understand user engagement, and make data-driven decisions to optimize their applications.
  • Performance Monitoring: Firebase Performance Monitoring helps developers gain insights into the performance of their applications. It provides real-time monitoring, tracks network requests, and identifies performance bottlenecks.

Register an Application on Firebase

Step 1
Open the following Firebase URL:
https://console.firebase.google.com/u/0/

Step 2
Add a new project.

Step 3
Configure the project name and Google Analytics with some default settings.

Step 3
Configure the project name and Google Analytics with some default settings.


Step 4
Register your application after clicking on the web symbol and copying the project ID that we need for deployment.


Create an Angular Demo Application

Step 1
Create a new angular application.
    ng new angular-firebase-deployment

Step 2
Build and run the application.
    ng serve

Step 3
Install the Firebase tool.
    npm install -g firebase-tools

Step 4
Login to the Firebase.
    firebase login

Step 5
Initialize the firebase in your current application.
    firebase init

Firebase CLI will ask you a few questions.

Which Firebase CLI features do you want to set up for this folder?
Press space to select the required feature, then enter to confirm your choices.
Select a default Firebase project for this directory: angular-demo-5658b
Here I selected angular-demo-5658b, which I created earlier.
What do you want to use as your public directory? (public) dist/angular-firebase-deployment
configure as a single-page app (rewrite all URLs to /index.html)? (y/N) Yes
The File dist/angular-firebase-deployment/index.html already exists. Overwrite? Yes
If you select Configure files for Firebase Hosting and (optionally) set up the GitHub Action Deploy option from the list at the initial level, then you need to have a repository on GitHub, and then only you can set up and configure workflow after giving access to that particular repository.


Create a production build using the following command:
    ng build –aot

It will create one dist folder in your project solution. dist/angular-firebase-deployment

Step 7
Execute the following command to deploy your Angular application on Firebase:
    Firebase deploy

Step 8
Finally, open the browser and open the hosting URL.


About HostForLIFE.eu

HostForLIFE.eu is European Windows Hosting Provider which focuses on Windows Platform only. We deliver on-demand hosting solutions including Shared hosting, Reseller Hosting, Cloud Hosting, Dedicated Servers, and IT as a Service for companies of all sizes.

We have offered the latest Windows 2016 Hosting, ASP.NET Core 2.2.1 Hosting, ASP.NET MVC 6 Hosting and SQL 2017 Hosting.


Tag cloud

Sign in