Full Trust European Hosting

BLOG about Full Trust Hosting and Its Technology - Dedicated to European Windows Hosting Customer

AngularJS Hosting Europe - HostForLIFE.eu :: View Encapsulation in Angular

clock August 29, 2023 08:16 by author Peter

Angular is a popular and capable framework for developing online apps. View Encapsulation is one of its core characteristics, and it is essential for regulating component styling and behavior. In this article, we'll look into View Encapsulation in Angular, why it's important, and how it works.

What exactly is View Encapsulation?
View Encapsulation is a key notion in Angular that helps to keep styles and behaviors isolated for specific components. It ensures that styles defined in one component do not have an impact on other components in the application. This encapsulation protects your code from unforeseen side effects and encourages modularity and reusability.

View Encapsulation Types
View Encapsulation in Angular comes in three flavors.
Emulated (Default): This is Angular's default behavior. The styles defined in a component's CSS are scoped to that component's view in Emulated View Encapsulation. Angular accomplishes this by adding unique properties to the component's HTML elements. To guarantee that the styles only apply to the component's view, these characteristics are utilized as selectors in the resulting CSS.

/* Component CSS */ .my-component { color: red; }

<!-- Generated HTML -->
<div _ngcontent-c1 class="my-component">Hello, World!</div>

Shadow DOM: Angular uses the browser's native Shadow DOM encapsulation in this mode. Each component is assigned its own Shadow DOM, which separates the component's styling and DOM structure from the rest of the page. This approach offers a high level of encapsulation, but it may be incompatible with outdated browsers.
None: When you select None, Angular does not apply any encapsulation, and the styles defined in a component's CSS file influence the entire application. While this mode is useful in some situations, it should be utilized with caution to avoid unwanted consequences.

How Do I Select the Best Encapsulation Mode?
Choosing the Correct View Encapsulation mode is determined by the requirements and goals of your project:
Emulated: This is the preferred mode for most applications. It strikes a decent compromise between encapsulation and compatibility, and it works effectively in most cases.
Shadow DOM: Use this option if you need a greater level of encapsulation and are developing a modern application for browsers that support Shadow DOM.
None: Use None only when absolutely necessary, such as for global styles that must apply to the entire application. When utilizing this option, be cautious because it can cause style conflicts and maintenance issues.

How Do You Define View Encapsulation?
The View Encapsulation mode for a component can be specified using the encapsulation attribute in the component's metadata. As an example:

@Component({
  selector: 'app-my-component',
  templateUrl: './my-component.component.html',
  styleUrls: ['./my-component.component.css'],
  encapsulation: ViewEncapsulation.Emulated
})
export class MyComponent {}

Conclusion
View Encapsulation is an important feature of Angular that helps maintain clean, modular, and reusable code by segregating component styles and actions. It gives developers the freedom to select the level of encapsulation that best meets the needs of their project. Whether you use Emulated, Shadow DOM, or None, understanding and skillfully employing View Encapsulation will help your Angular applications succeed by fostering clean and maintainable code.

Good luck with your studies :)


AngularJS Hosting Europe - HostForLIFE :: Data Sharing from a Child to a Parent in Angular

clock August 22, 2023 12:06 by author Peter

The @Output decorator is used in this article to share data from child to parent components in Angular. We'll go through the fundamental ideas underlying this technique, show how it works in practice using examples, and explain its benefits in terms of code organization, reusability, and maintainability. By the end of this article, you'll have a solid grasp of how to use the @Output decorator to add efficient data flow methods to your Angular apps.

Understanding Interaction of Components
Components are the building blocks of the user interface in Angular apps. They can be organized hierarchically, with parent components encapsulating child components.

These components frequently need to communicate with one another, transmitting data back and forth. While data sharing between parent and child components is very simple using input attributes, data sharing between child and parent components requires a different technique.

The @Output Decorator is a feature of Angular that allows communication between child and parent components to be more efficient. To emit custom events from the child component, it is used in conjunction with Angular's EventEmitter class. The parent component is aware of these events and can respond appropriately.
Step-by-Step Instructions

Let's go over how to use @Output in Angular to implement data sharing from child to parent components step by step.

Step 1: Make a Child Component

Create the child component first.
ng generate component child

In the child component HTML file (child.component.html), include a button to trigger the data emission.
<button (click)="sendData()">Send Data</button>

In the child component TypeScript file (child.component.ts), import the necessary modules, and create an @Output property and an instance of EventEmitter to emit the data.
import { Component, EventEmitter, Output } from '@angular/core';

@Component({
  selector: 'app-child',
  templateUrl: './child.component.html'
})
export class ChildComponent {
  @Output() dataEvent = new EventEmitter<string>();

  sendData() {
    this.dataEvent.emit('Hello from child!');
  }
}


Step 2. Use the Child Component in the Parent

Now, use the child component in the parent component HTML file (parent.component.html).
<app-child (dataEvent)="receiveData($event)"></app-child>
<div>{{ receivedData }}</div>


In the parent component TypeScript file (parent.component.ts), define the method to handle the emitted event.
import { Component } from '@angular/core';

@Component({
  selector: 'app-parent',
  templateUrl: './parent.component.html'
})
export class ParentComponent {
  receivedData: string = '';

  receiveData(data: string) {
    this.receivedData = data;
  }
}

In conjunction with EventEmitter, Angular's @Output decorator provides a strong mechanism for passing data from child to parent components. You can enable effective communication and interaction between different portions of your program by broadcasting custom events from child components. By fostering a clear separation of concerns, this strategy improves the modularity and maintainability of your system.

This pattern remains a core strategy for component interaction in Angular. Developers may create more dynamic and responsive user interfaces in their Angular applications by mastering the art of exchanging data with @Output.


AngularJS Hosting Europe - HostForLIFE :: Using @Input(), Angular Allows Data to be Shared from Parent to Child Components

clock August 16, 2023 08:08 by author Peter

In this post, we will look at how to use the @Input() decorator in Angular to share data from a parent component to a child component.

Recognizing the @Input() Decorator
The @Input() decorator allows you to transmit data from a parent component to a child component in Angular. It effectively establishes an input property on the child component that may be tied to a value in the template of the parent component. When the value of the input property in the parent component changes, the child component is automatically updated with the new value.

Configuring the Parent Component
Let's begin with a simple example. Consider the following scenario: we have a parent component that displays a user's name, and we wish to pass this name to a child component for display.

Using the Angular CLI, create a new parent component:
ng generate component parent

Open the parent.component.ts file and add the @Input() decorator to the following property:
import { Component } from '@angular/core';

@Component({
  selector: 'app-parent',
  template: `
    <h1>Hello, {{ userName }}!</h1>
    <app-child [inputName]="userName"></app-child>
  `,
})
export class ParentComponent {
  userName = 'Tahir Ansari';
}


Creating the Child Component

Now, let's create the child component that will receive and display the user's name.

Generate a child component using the Angular CLI:
ng generate component child

In the child.component.ts file, use the @Input() decorator to define an input property:
import { Component, Input } from '@angular/core';

@Component({
  selector: 'app-child',
  template: `
    <p>Received name from parent: {{ receivedName }}</p>
  `,
})
export class ChildComponent {
  @Input() inputName: string;

  get receivedName() {
    return this.inputName;
  }
}


Wiring Up the Module
ensure that you declare both the parent and child components in your module:
import { NgModule } from '@angular/core';
import { BrowserModule } from '@angular/platform-browser';

import { ParentComponent } from './parent.component';
import { ChildComponent } from './child.component';

@NgModule({
  imports: [BrowserModule],
  declarations: [ParentComponent, ChildComponent],
  bootstrap: [ParentComponent],
})
export class AppModule {}


Conclusion
In this article, we've seen how to pass data from a parent component to a child component in Angular using the @Input() decorator. This feature allows for seamless communication between components and enables dynamic updates whenever the data in the parent component changes.

Angular's component-based architecture, combined with features like @Input(), empowers developers to build modular and maintainable applications by promoting the separation of concerns and reusability of components.


AngularJS Hosting Europe - HostForLIFE.eu :: HTTP Interceptors in Angular

clock August 14, 2023 08:28 by author Peter

In this tutorial, we will go through the fundamentals of HTTP Interceptors in Angular and provide some examples using Angular 15.


What exactly is Angular?
Angular is a popular open-source JavaScript web application framework. It was created by Google and is presently maintained by the Google Angular Team. Angular enables developers to create dynamic, single-page applications (SPAs) and offers a disciplined way to developing complicated online apps.

What exactly is an HTTP Interceptor?

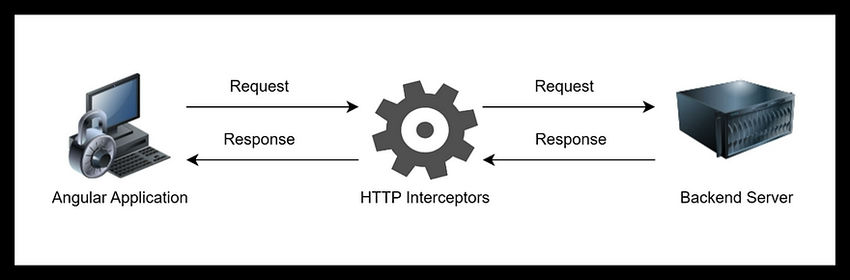
HTTP Interceptors are a type of notion in web development and server-side programming that is commonly connected with web frameworks and tools.

These interceptors enable developers to intercept and manage HTTP requests and answers at the application level.

  • They can be used to perform various tasks related to HTTP requests and responses, such as adding headers, handling errors, modifying the request or response data, logging, authentication, etc.
  • HttpInterceptor defines a single method called intercept, which takes two parameters: the HttpRequest and the HttpHandler.

Benefits of HTTP Interceptors
Following are some of the key benefits of using HTTP Interceptors in Angular:
Testability and reusability: Interceptors are easy to test in isolation, allowing you to ensure that each interceptor behaves correctly
Centralized code for cross-cutting concerns: HTTP Interceptors allow you to define logic for common tasks, such as authentication, logging, error handling, or adding headers, in a centralized location.
Global application-level modifications: Interceptors operate globally, intercepting all HTTP requests and responses made by the Angular application. This means you can apply changes or perform actions consistently across multiple API calls without having to modify each individual request or response manually.

Error handling and logging: Interceptors can be utilized to handle errors globally, providing a consistent approach to error reporting and handling throughout the application.

Caching and request/response manipulation: HTTP Interceptors can be leveraged to implement caching mechanisms, reducing redundant requests and optimizing the application’s performance.

Separation of concerns: By using HTTP Interceptors, you can keep concerns related to data fetching and communication (HTTP) separate from the business logic of your components and services.

Security and authentication: Interceptors are commonly used for adding authorization headers or authentication tokens to outgoing requests. This ensures that the user’s authentication status is automatically included in API calls without the need to explicitly set headers in every request.

Easy integration with third-party libraries: Interceptors can be used to integrate with third-party libraries or APIs seamlessly. For example, you can apply a specific format to API responses that are expected by a charting library or a data visualization tool.

Practical Implementation

Let’s start with practical implementation; for that, we need to create a new Angular application using the following command.
ng new angular-http-interceptor-demo

Now, we are going to create different interceptors one-by-one with the help of angular.

1. Logging Interceptor

In Angular, logging interceptors can be used for audit log purposes. If we want to log different incoming and outgoing requests with request and response objects, we can do so with the help of a logging interceptor.

Step 1
Create a new logging interceptor with the help of the following command.
ng g interceptor logging

This command will create the logging interface with a default implementation. So, modify the same as I have shown below.
import { Injectable } from '@angular/core';
import {
  HttpEvent,
  HttpInterceptor,
  HttpHandler,
  HttpRequest,
  HttpResponse,
} from '@angular/common/http';
import { Observable, tap } from 'rxjs';

@Injectable()
export class LoggingInterceptor implements HttpInterceptor {
  constructor() {}

  intercept(
    request: HttpRequest<any>,
    next: HttpHandler
  ): Observable<HttpEvent<any>> {
    console.log('Outgoing HTTP request', request);
    return next.handle(request).pipe(
      tap((event: HttpEvent<any>) => {
        console.log('Incoming HTTP response', event);
      })
    );
  }
}


Here, we import the necessary modules and classes from Angular’s HTTP package.

The HttpInterceptor interface allows us to create our custom interceptor, and HttpRequest, HttpHandler, and HttpEvent are classes used for handling HTTP requests and responses.

We also import Observable and Tap from the RxJS library, which is used for handling asynchronous operations.
We call next.handle(request) to pass the request to the next interceptor in the chain or the backend server.
Then, we use the pipe method along with the tap operator to intercept the incoming response.
The tap operator allows us to execute a side effect (in this case, log the response) without modifying the response itself.

Step 2
Provide an interceptor in the app module.
import { LoggingInterceptor  } from './interceptors/logging.interceptor'

 providers: [
    {
      provide: HTTP_INTERCEPTORS, useClass: LoggingInterceptor, multi: true
    }
  ]

In the AppModule, we provide the LoggingInterceptor class as an interceptor using the HTTP_INTERCEPTORS token. The multi: true option ensures that the interceptor is appended to the existing array of interceptors rather than replacing them.

When you make an HTTP request, it will get logged with the following request and response.

In a real-time scenario, you can log this response in a third-party service as per need and requirement.

2. Adding Headers to Requests

In Angular, we can modify HTTP Requests and add some extra value to the request header with the help of an interceptor.

Step 1
Create a new header interceptor with the help of the following command.
ng g interceptor headers

import { Injectable } from '@angular/core';
import {
  HttpRequest,
  HttpHandler,
  HttpEvent,
  HttpInterceptor
} from '@angular/common/http';
import { Observable } from 'rxjs';

@Injectable()
export class HeadersInterceptor implements HttpInterceptor {

  constructor() {}

  intercept(request: HttpRequest<unknown>, next: HttpHandler): Observable<HttpEvent<unknown>> {
    console.log(request)
    const GUID = 'f4179b26-21ac-432c-bcd8-cb4bc6e50981'
    const modifiedRequest = request.clone({
      setHeaders:{
        GUID
      }
    })
    return next.handle(modifiedRequest);
  }
}


Here we first hardcode one GUID that we are going to set inside the header. So, first, we need to clone that HTTP request and use the set headers property to set the value in the request header.

Step 2
Provide an interceptor in the app module.
import { HeadersInterceptor  } from './interceptors/headers.interceptor'

providers: [
    {
      provide: HTTP_INTERCEPTORS, useClass: HeadersInterceptor, multi: true
    }
  ]

In the AppModule, we provide the HeadersInterceptor class as an interceptor using the HTTP_INTERCEPTORS token. The multi: true option ensures that the interceptor is appended to the existing array of interceptors rather than replacing them.

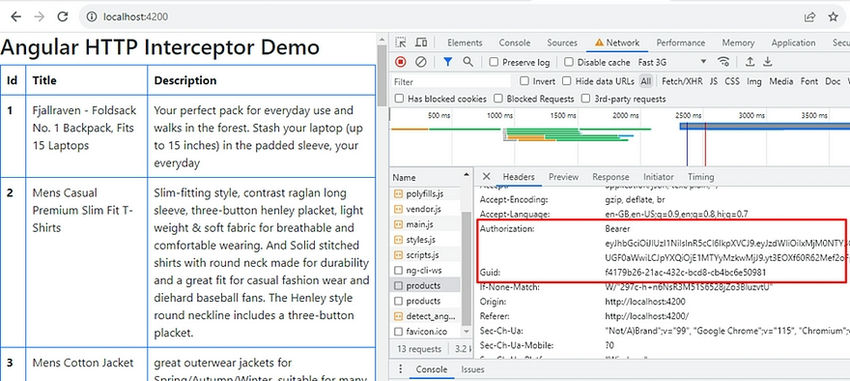
In a real-time scenario, you can use these header values for further processing, like validating requests, and in many other cases.

3. Error Handling Interceptor
In Angular, The Error interceptor is an HTTP interceptor that allows you to handle HTTP errors globally within your application.
When you make HTTP requests to a server, there might be scenarios where the server responds with an error status code, such as 404 or 500.
Handling these errors in each individual HTTP request can be tedious and repetitive.

The Error Interceptor helps you centralize the error-handling logic and provides a consistent way to manage errors across your application.

Step 1
Create a new error interceptor with the help of the following command.
ng g interceptor error

import { Injectable } from '@angular/core';
import {
  HttpRequest,
  HttpHandler,
  HttpEvent,
  HttpInterceptor,
  HttpErrorResponse
} from '@angular/common/http';
import { Observable, catchError, throwError } from 'rxjs';

@Injectable()
export class ErrorInterceptor implements HttpInterceptor {

  constructor() {}

  intercept(request: HttpRequest<any>, next: HttpHandler): Observable<HttpEvent<any>> {
    return next.handle(request).pipe(
      catchError((error: HttpErrorResponse) => {
        // Handle the error here
        console.error('error occurred:', error);
        //throw error as per requirement
        return throwError(error);
      })
    );
  }
}


Inside the intercept() method, you can use the catchError operator from RxJS to catch any errors that occur during the HTTP request or response handling.
This operator allows you to intercept the error, handle it as needed, and optionally re-throw the error to propagate it further up the observable chain.

Step 2
Provide interceptor in the app module:
import { ErrorInterceptor } from './interceptors/error.interceptor';

  providers: [
    {
      provide: HTTP_INTERCEPTORS, useClass: ErrorInterceptor, multi: true
    }
  ]

In the AppModule, we provide the HeadersInterceptor class as an interceptor using the HTTP_INTERCEPTORS token. The multi: true option ensures that the interceptor is appended to the existing array of interceptors rather than replacing them.

4. Authentication Interceptor
In Angular, an authentication interceptor can be used to add authentication tokens or headers to every outgoing HTTP request. This is helpful when you need to ensure that all API requests are authenticated.

Step 1
Create a new authentication interceptor with the help of the following command.
ng g interceptor auth

import { Injectable } from '@angular/core';
import {
  HttpEvent,
  HttpInterceptor,
  HttpHandler,
  HttpRequest,
} from '@angular/common/http';
import { Observable } from 'rxjs';
//import { AuthService } from './auth.service';

@Injectable()
export class AuthInterceptor implements HttpInterceptor {
  constructor(/*private authService: AuthService*/) {}

  intercept(
    req: HttpRequest<any>,
    next: HttpHandler
  ): Observable<HttpEvent<any>> {
    const authToken = "eyJhbGciOiJIUzI1NiIsInR5cCI6IkpXVCJ9.eyJzdWIiOiIxMjM0NTY3ODkwIiwibmFtZSI6IkpheWRlZXAgUGF0aWwiLCJpYXQiOjE1MTYyMzkwMjJ9.yt3EOXf60R62Mef2oFpbFh2ihkP5qZ4fM8bjVnF8YhA";//his.authService.getToken();

    if (authToken) {
      // Clone the request and attach the token
      const authReq = req.clone({
        setHeaders: {
          Authorization: `Bearer ${authToken}`
        }
      });

      return next.handle(authReq);
    }

    // If there is no token, pass the original request
    return next.handle(req);
  }
}


Here we first hardcode one token that we are going to set inside the header. So, for that, first, we need to clone that HTTP request and need to use the set headers property to set the value in the request header.

Step 2
Provide an interceptor in the app module:
import { AuthInterceptor } from './interceptors/auth.interceptor';

  providers: [
    {
      provide: HTTP_INTERCEPTORS, useClass: AuthInterceptor, multi: true
    }


In the AppModule, we provide the HeadersInterceptor class as an interceptor using the HTTP_INTERCEPTORS token. The multi: true option ensures that the interceptor is appended to the existing array of interceptors rather than replacing them.

When you make an HTTP request, it will set a token inside the header, as shown below.


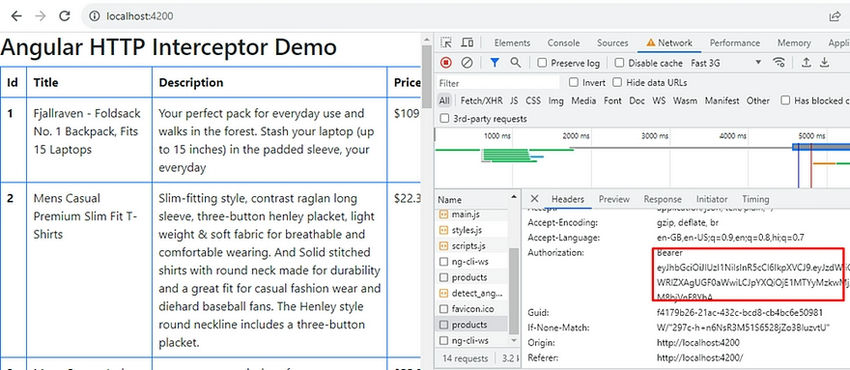
As you can see, we set one bearer token that you can use for further processing as per requirement.


AngularJS Hosting Europe - HostForLIFE.eu :: A Fresh Method for Creating Angular Applications

clock August 4, 2023 09:02 by author Peter

The Angular team has been primarily focused on the removal of the Angular Framework legacy code block and rendering pipeline in recent releases. These actions are primarily carried out with the goal of improving performance. As part of this endeavor, the Angular team developed a new idea of defining the component, Standalone Component, in Angular 14. We can easily develop any application without using the NgModel with the aid of this idea. This technique allows developers to complete Angular application development considerably faster, and most significantly, they do not need to grasp or consider the concept of NgModule within the application at all.


As a result, in this article, we will go through the concept of a Standalone Component in any angular application.

An Overview of Standalone Component
From Angular 14 onwards, the angular team introduced the concept of the Standalone component. The standalone component is nothing but a simple component that will not be a part of any Angular module. Before Angular 14, whenever we define any component in the Angular application, we need to first declare that component within the Angular module declaration array objects. If we forgot to do that task, then the Angular compiler throws the error. But, from Angular 14 onwards, these steps are not mandatory. Because, now, we can create any component which can not be a part of any component. And that’s why it is called a Standalone component. Just like standalone components, we can also create pipes and directives as well as Standalone. This type of standalone component can be used anywhere in the application like -

  • Within any module-based component
  • Within any other Standalone component as a child component
  • Within route
  • Can use as a lady-loading component.

In Angular 14, this standalone component concept is released as a part of the developer preview. Now, in the latest version of Angular, i.e. Angular 16, we can use the Standalone Component in full swing with full work support for everything like HttpClient, Router, Angular Element, and many more.

Benefits of using a Standalone Component

As a developer, when we plan to start development work for any Angular-based application now, then we first need to decide whether we will use the legacy NgModule-based application or we will need to use the Standalone component-based architecture. So, before making this decision, we first need to understand the benefits of using a Standalone component. Some of the key benefits which we can achieve by using standalone components are as follows -

  • One of the major reasons for the Standalone component is Reusability. We can use this type of component throughout the application event in different applications. In this way, we can save development time and can reduce the chances of code duplication.
  • As the Standalone component is independent and does not dependent on any modules, so, we can perform unit testing of this component very easily.
  • In the Standalone component, we can perform encapsulation in the concept of the component’s styles and templates. It reduces interference with different components and helps us to maintain a clean codebase.
  • The concept of the Standalone component encourages us to follow modular development. We can break the large application into smaller and manageable modules and can develop those parts then.
  • Another reason for using a standalone component is the isolated state of the component. It means every standalone component can maintain its state, which is isolated from the other parts of the application.

Create An Angular Application as a Standalone
Now, in this section, we will discuss how we can create an Angular application as a Standalone component based on using the Angular CLI command. So, when we want to create any angular application as a Standalone, then we just need to add the --standalone prefix at the end of the Angular CLI command. Same logic we can use also while we create the Standalone component, directives, or pipes.
ng new angular-standalone-component-demo --standalone

Once the application is created, then it will create the project structure as below.

If we notice, we can find that in the create application structure, there is no app.module.ts file. It is because we already created this application as a standalone application. Now, if we open the app.component.ts file, we can find out the below code -
import { Component } from '@angular/core';
import { CommonModule } from '@angular/common';
import { RouterOutlet } from '@angular/router';

@Component({
  selector: 'app-root',
  standalone: true,
  imports: [CommonModule, RouterOutlet],
  templateUrl: './app.component.html',
  styleUrls: ['./app.component.css']
})
export class AppComponent {
  title = 'angular-standalone-component-demo';
}

In the above example, we can see that standalone attribute under the @Component metadata, which indicates that this component will act as a standalone component. As it is a standalone component, so, we don’t have any NgModule for bootstrapping the component. Now, in the case of a Standalone application, one Standalone component will be treated as a root component and that component we need to bootstrap within the main.ts file as below -

import { bootstrapApplication } from '@angular/platform-browser';
import { appConfig } from './app/app.config';
import { AppComponent } from './app/app.component';

bootstrapApplication(AppComponent, appConfig)
  .catch((err) => console. Error(err));

Create and Use a Standalone Component

Now, we have already created the Angular Standalone component-based application. In this demonstration, we will create one basic employee list which will display the employee list and also, and we can add the employee data to that list. For this purpose, we first create an employee list component that will display the list of employees. In this demo, whatever component we will create, all components will be a standalone components. Once we will create that component, the output will be as below


About HostForLIFE.eu

HostForLIFE.eu is European Windows Hosting Provider which focuses on Windows Platform only. We deliver on-demand hosting solutions including Shared hosting, Reseller Hosting, Cloud Hosting, Dedicated Servers, and IT as a Service for companies of all sizes.

We have offered the latest Windows 2016 Hosting, ASP.NET Core 2.2.1 Hosting, ASP.NET MVC 6 Hosting and SQL 2017 Hosting.


Tag cloud

Sign in