This post will teach you how to upload numerous files in Node.js. In Node.js, we upload files using many libraries. In this article, we discuss a really basic and simple method for beginners, complete with examples. There is also a "rar" file attached to export your system and execute it properly.

Steps for Starting a Project
Step 1: Create a Node.js Project
Use my previous article "How to Upload File in Node.js" for Node.js setup. In this article, we discussed crucial Node.js commands for uploading files.
Step 2: Project Organization.
When step one is finished, it produces some directories such as node modules, package-lock.json, and package.json, but we still need to build some files listed below the image. When the project is executed, the 'upload' folder is automatically created, and all uploaded files are saved to the 'upload' folder.
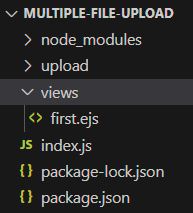
In this file structure, node_modules, package-lock.json, and package.json these files is created while you set up a project. We created index.js and views folder. Below attached all files used in this project.
Step 3. Create an index.js file.
In this file, have the "/" route and other necessary code required to run the project below the file is attached.
index.js
const express = require('express');
const path = require('path');
const bodyParser = require('body-parser');
const { render } = require('ejs');
var fs = require("fs");
const multer = require('multer');
const app = express();
// Middleware setup
app.use(bodyParser.json());
app.use(bodyParser.urlencoded({ extended: true }));
app.set('views', path.join(__dirname, 'views'));
app.set('view engine', 'ejs');
// Set up static file serving for 'upload' folder
const uploadsPath = path.join(__dirname, 'upload');
app.use('/upload', express.static(uploadsPath));
// Route to render the 'first' view
/**
* @route GET /
* @description Render the 'first' view.
*/
app.get("/", function (req, res) {
res.render('first');
});
// Set up multer storage and upload configuration
const storage1 = multer.diskStorage({
destination: function (req, file, cb) {
// Check the fieldname and store files accordingly
if (file.fieldname === 'file1' || file.fieldname === 'file2' || file.fieldname === 'file3') {
cb(null, path.join(__dirname, '/upload'));
} else {
cb(new Error('Invalid field name'));
}
},
filename: (req, file, cb) => {
cb(null, file.originalname); // Use the original file name
}
});
const uploadd = multer({ storage: storage1 });
// Configure multer fields for file uploads
/**
* @typedef {Object} MulterField
* @property {string} name - The name of the field for file upload.
* @property {number} maxCount - The maximum number of files allowed to be uploaded for this field.
*/
/**
* @type {MulterField[]} fields - Multer fields configuration for file uploads.
*/
const cpUpload = uploadd.fields([
{ name: 'file1', maxCount: 1 },
{ name: 'file2', maxCount: 8 },
{ name: 'file3', maxCount: 8 }
]);
// Route to handle file upload
/**
* @route POST /fileupload
* @description Handle file upload.
* @returns {void}
* @throws {Error} If an invalid field name is provided.
*/
app.post('/fileupload', cpUpload, (req, res) => {
res.redirect('/');
});
// Start the server
/**
* @description Start the server and listen on port 3001.
* @event
*/
app.listen(3001, () => {
console.log('server is running on port http://localhost:3001');
});
A server that can handle file uploads is created with the Node.js Express code that is provided. Multer, a well-known middleware library, is used to control file uploads. To render views, EJS is used as the templating engine. For the fields with the names "file1," "file2," and "file3," the application accepts file uploads. The 'upload' folder on the server is where the uploaded files are kept. Other developers will find it simpler to comprehend the functions of various routes and middlewares thanks to the inclusion of JSDoc comments in the code documentation. The 'first' view is rendered by the server at the root route, which operates on port 3001. When a file is successfully uploaded, the server returns users to the home page.
Step 4. Create first.ejs file.
This file has simple HTML and CSS code.
first.ejs
<!DOCTYPE html>
<html>
<head>
<title>File Upload</title>
<style>
/* CSS styles for the file upload form */
body {
font-family: Arial, sans-serif;
margin: 0;
padding: 20px;
}
.container {
max-width: 400px;
margin: 0 auto;
}
.form-group {
margin-bottom: 20px;
}
label {
display: block;
margin-bottom: 5px;
font-weight: bold;
}
input[type="file"] {
padding: 5px;
border: 1px solid #ccc;
border-radius: 4px;
width: 100%;
}
input[type="submit"] {
background-color: #4CAF50;
color: white;
padding: 10px 15px;
border: none;
border-radius: 4px;
cursor: pointer;
}
input[type="submit"]:hover {
background-color: #45a049;
}
</style>
</head>
<body>
<div class="container">
<h2>File Upload</h2>
<!-- File upload form -->
<form action="/fileupload" method="post" enctype="multipart/form-data">
<!-- File 1 input -->
<div class="form-group">
<label for="file1">File 1:</label>
<input type="file" id="file1" name="file1">
</div>
<!-- File 2 input -->
<div class="form-group">
<label for="file2">File 2:</label>
<input type="file" id="file2" name="file2">
</div>
<!-- File 3 input -->
<div class="form-group">
<label for="file3">File 3:</label>
<input type="file" id="file3" name="file3">
</div>
<!-- Upload button -->
<input type="submit" value="Upload">
</form>
</div>
</body>
</html>
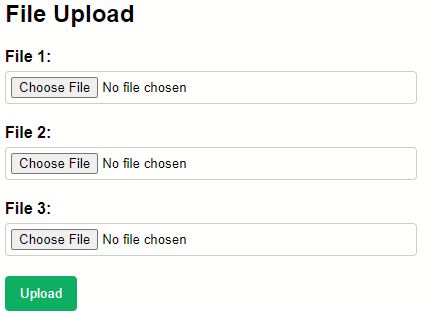
Explanation
Three file input fields are created in a file upload form using the specified HTML code. Users can upload files by choosing them and submitting the form. The form gains visual components thanks to the CSS styles. The chosen files are sent to the "/fileupload" endpoint using the "post" method and "multipart/form-data" encoding when the form is submitted. The uploaded files are processed by the server, which manages the endpoint. Developers can better understand and manage the functioning of the form by using the HTML comments, which offer succinct explanations of the code's function and organization.
Output