Full Trust European Hosting

BLOG about Full Trust Hosting and Its Technology - Dedicated to European Windows Hosting Customer

Node.js Hosting Europe - HostForLIFE.eu :: How To Use File Handling In Node.js?

clock July 14, 2023 07:53 by author Peter

This article covers fundamental file operations in node.js, including Reading, Writing, Updating, and Deleting files. Whether it involves accessing configuration files, processing user-uploaded files, or persisting data to disc, file management is an integral part of many applications. Node.js's "fs" (file system) module is indispensable for streamlining file-handling procedures. It provides a vast array of functions and methods for completing various file-related tasks.

Node.js operation using file management

  • Creating File Reading File
  • Modifying File
  • Delete File

How do you create a Node.js file?

Node.js offers a rapid and efficient method for creating files, which is a necessary task for many applications. In this post, we will examine a variety of synchronous and asynchronous Node.js file generation methods. We will discuss how to use the fs (file system) module, how to handle errors, and best practices for effective file creation. At the conclusion of this article, you will have a comprehensive comprehension of how to create and write files in Node.js, enabling you to handle file-related tasks competently.

Code

const fs = require('fs');

// Specify the file path and content
const filePath = 'path/to/newFile.txt';
const fileContent = 'This is the content of the new file.';

// Asynchronous file creation and writing
fs.writeFile(filePath, fileContent, 'utf8', (err) => {
  if (err) {
    console.error('Error creating  file:', err);
    return;
  }

  console.log('File is  created successfully.');
});

// Synchronous file creation and writing
try {
  fs.writeFileSync(filePath, fileContent, 'utf8');
  console.log('File created successfully.');
} catch (err) {
  console.error('Error creating  file:', err);
}

Explanation
Using the writeFile method, a file can be created asynchronously by providing the file path, the content, the encoding, and a callback function to manage success or failure. A try-catch block is used to manage errors when using the writeFileSync method to create and write a file synchronously.
How is a file read in Node.js?

Reading a file in Node.js involves obtaining access to and retrieving the file's contents from the file system. It necessitates reading file data using the asynchronous or synchronous readFile or readFileSync methods of the fs module. Asynchronous reading permits non-blocking I/O operations while synchronous reading prevents code execution. Error management is essential for addressing issues such as file not found and permissions errors. Applications that require file-based data processing, such as reading configuration files, parsing user uploads, or extracting data from databases, must have the capability to read files.

Code
const fs = require('fs');

// Specify the file path
const filePath = 'path/to/file.txt';

// Asynchronous file reading
fs.readFile(filePath, 'utf8', (err, data) => {
  if (err) {
    console.error('Error reading the file:', err);
    return;
  }

  console.log('File contents:', data);
});

// Synchronous file reading
try {
  const data = fs.readFileSync(filePath, 'utf8');
  console.log('File contents:', data);
} catch (err) {
  console.error('Error reading the file:', err);
}

Explanation
The code shows how to read files in Node.js. ReadFile is used for asynchronous reading, and a callback function is used for error handling. In a try-catch block, readFileSync is used for synchronous reading. If no errors happen, both techniques log file contents. While synchronous reading halts code execution until the file is read, asynchronous reading permits parallel tasks.

How to update a file in Node.js?
In the context of Node.js, updating a file is the act of editing or adding data to an already-existing file on the file system. It entails opening the file with the fs (file system) module, making the required adjustments, and then writing the revised content back into the file. A file can be updated by performing operations like replacing certain lines or entries, appending new data at the end, or replacing specific blocks of text. The usual procedure for this is to read the data in the file, update or add to it as necessary, and then write the updated data back into the file. Developers can dynamically update the contents of files, maintain data integrity, and reflect the most recent information in applications that rely on file-based data storage by updating files in Node.js.

Code
const fs = require('fs');

// Specify the file path
const filePath = 'path/to/file.txt';

// Specify the updated content
const updatedContent = 'This is the updated content of the file.';

// Asynchronous file updating
fs.writeFile(filePath, updatedContent, 'utf8', (err) => {
  if (err) {
    console.error('Error updating the file:', err);
    return;
  }

  console.log('File updated successfully.');
});

// Synchronous file updating
try {
  fs.writeFileSync(filePath, updatedContent, 'utf8');
  console.log('File updated successfully.');
} catch (err) {
  console.error('Error updating the file:', err);
}

Explanation
The file location, the modified content, and optional encoding are passed to the writeFile method, which is used to update the file asynchronously. The identical operation is carried out synchronously using the writeFileSync function. Try-catch blocks are used for error handling, and success or error messages are logged appropriately.

How to delete a file in Node.js?

The fs (file system) module is used in Node.js to delete files by deleting them from the file system. Applications frequently use it to perform resource cleanup, temporary file deletion, and file storage management. The fs.unlink method is offered by Node.js for asynchronous file deletion. This method runs a command using the file path as an argument function when the deletion is finished or if there is a problem. To handle situations when the file cannot be erased because of permissions or if the file doesn't exist, error handling is essential. Node.js has fs.unlinkSync for synchronous file deletion, but due to its blocking nature, it should only be used in extreme cases. Developers may effectively manage files, ensure that unwanted or superfluous files are removed from the file system, and maintain a tidy and organized file storage environment by utilizing Node.js's file deletion capabilities.

Code
const fs = require('fs');

// Specify the file path
const filePath = 'path/to/file.txt';

// Asynchronous file deletion
fs.unlink(filePath, (err) => {
  if (err) {
    console.error('Error deleting the file:', err);
    return;
  }

  console.log('File deleted successfully.');
});

// Synchronous file deletion
try {
  fs.unlinkSync(filePath);
  console.log('File deleted successfully.');
} catch (err) {
  console.error('Error deleting the file:', err);
}


Explanation
First, require("fs") is used to import the fs module. The file path and a callback function are passed to the unlink method as its first and second arguments, respectively, before the file is asynchronously deleted. Whenever something is finished or if there is an error, the callback function is called. The callback console is used for handling errors. By means of console.log(), success and errors are recorded.

The synchronous variant of unlink is the unlinkSync function. It utilizes identical inputs and deletes the file synchronously. A try-catch block is used to handle errors, and console.error() is used to log errors. Console.log() is used to record a successful deletion. The specified file will be eliminated from the file system after executing this code. Ensure that the location of the file you want to remove is substituted for "path/to/file.txt".
Conclusion

File handling in Node.js is an essential component of development since it makes it possible to manipulate files effectively. A complete collection of functions to read, write, update, and delete files are offered by the fs module. Developers can ensure non-blocking I/O and enhance application performance by utilizing asynchronous operations. For reliable file management, proper error handling is essential. Reliability and security are improved by adhering to best practices such as validating file paths, controlling permissions, and performance optimization. Developers may do a range of file-related operations with Node.js, from managing user uploads to working with configurations. Developers may create sophisticated applications with seamless file manipulation capabilities thanks to Node.js' effective file management.  

FAQs

Q. Can I read a file in Node.js synchronously?
A. Yes, you can read a file synchronously in Node.js using the fs.readFileSync method. However, it's generally recommended to use asynchronous file reading (fs.readFile) to avoid blocking the execution of other code.

Q. How can I handle errors while performing file operations in Node.js?
A. Error handling is essential in file operations. You can handle errors using try-catch blocks for synchronous operations or by providing a callback function that captures errors for asynchronous operations. Additionally, you can listen for error events emitted by file streams.

Q. How can I delete a file in Node.js?
A. You can delete a file in Node.js using the fs.unlink method for asynchronous deletion or fs.unlinkSync for synchronous deletion. Both methods require the file path as a parameter.

Q. What precautions should I take while handling files in Node.js?
A. When handling files, it's important to validate file paths to avoid security vulnerabilities. Ensure that you have proper file permissions to perform the desired operations. Additionally, consider using asynchronous operations to avoid blocking the event loop and optimize performance.

Q. Can I update a specific portion of a file in Node.js?
A. Yes, you can update specific portions of a file in Node.js. However, you would need to read the file, make the necessary modifications to the data, and then write the updated data back to the file.


AngularJS Hosting Europe - HostForLIFE.eu :: How to Deploy an Angular app to Firebase?

clock July 5, 2023 09:44 by author Peter

In this article, we are going to discuss a few things about Firebase and the deployment of Angular applications. Firebase is a mobile and web development platform that provides a wide range of tools and services to help developers build high-quality applications. It was originally developed by Firebase Inc., a startup founded in 2011, and was later acquired by Google in 2014.


Features of Firebase

  • Real-time Database: Firebase provides a cloud-hosted NoSQL database that allows developers to store and sync data in real-time across multiple clients. It uses a JSON-based data model and provides powerful querying capabilities.
  • Authentication: Firebase offers authentication services, enabling developers to easily add user authentication to their applications using email and password, social media logins (such as Google, Facebook, and Twitter), and other identity providers.
  • Cloud Functions: Firebase allows developers to write and deploy serverless functions that run in response to events triggered by Firebase services or HTTP requests. This feature enables developers to extend the functionality of their applications without managing servers.
  • Cloud Storage: Firebase provides secure and scalable cloud storage for developers to store and serve user-generated content like images, videos, and other files. It offers simple APIs for uploading, downloading, and managing files.
  • Hosting: Firebase Hosting allows developers to deploy and host their web applications quickly and securely. It provides a global content delivery network (CDN) to deliver static assets and dynamic content to users with low latency.
  • Analytics: Firebase Analytics provides detailed insights into user behavior and app usage. It helps developers track key metrics, understand user engagement, and make data-driven decisions to optimize their applications.
  • Performance Monitoring: Firebase Performance Monitoring helps developers gain insights into the performance of their applications. It provides real-time monitoring, tracks network requests, and identifies performance bottlenecks.

Register an Application on Firebase

Step 1
Open the following Firebase URL:
https://console.firebase.google.com/u/0/

Step 2
Add a new project.

Step 3
Configure the project name and Google Analytics with some default settings.

Step 3
Configure the project name and Google Analytics with some default settings.


Step 4
Register your application after clicking on the web symbol and copying the project ID that we need for deployment.


Create an Angular Demo Application

Step 1
Create a new angular application.
    ng new angular-firebase-deployment

Step 2
Build and run the application.
    ng serve

Step 3
Install the Firebase tool.
    npm install -g firebase-tools

Step 4
Login to the Firebase.
    firebase login

Step 5
Initialize the firebase in your current application.
    firebase init

Firebase CLI will ask you a few questions.

Which Firebase CLI features do you want to set up for this folder?
Press space to select the required feature, then enter to confirm your choices.
Select a default Firebase project for this directory: angular-demo-5658b
Here I selected angular-demo-5658b, which I created earlier.
What do you want to use as your public directory? (public) dist/angular-firebase-deployment
configure as a single-page app (rewrite all URLs to /index.html)? (y/N) Yes
The File dist/angular-firebase-deployment/index.html already exists. Overwrite? Yes
If you select Configure files for Firebase Hosting and (optionally) set up the GitHub Action Deploy option from the list at the initial level, then you need to have a repository on GitHub, and then only you can set up and configure workflow after giving access to that particular repository.


Create a production build using the following command:
    ng build –aot

It will create one dist folder in your project solution. dist/angular-firebase-deployment

Step 7
Execute the following command to deploy your Angular application on Firebase:
    Firebase deploy

Step 8
Finally, open the browser and open the hosting URL.


AngularJS Hosting Europe - HostForLIFE.eu :: Simplifying Usage of trackBy in Angular Directives for Effective Item Tracking

clock June 20, 2023 10:23 by author Peter

When working with lists and data rendering in Angular, it is essential to efficiently maintain track of the rendered items. A common challenge is maintaining the integrity of the rendered objects while dynamically updating the list. By utilizing the trackBy directive, Angular provides us with syntax sugar that simplifies this endeavor. This article will examine how to leverage the power of trackBy to efficiently keep track of rendered items.

Knowledge of the trackBy Directive
Essential to Angular, the trackBy directive optimizes rendering by associating a unique identifier with each list item. Using the trackBy directive, Angular can efficiently detect changes and update only the required DOM elements, resulting in enhanced performance.

Syntax and Usage

To use trackBy, please follow these steps:

Step 1. Define a Unique Identifier: Ensure that each list item in your component has a unique identifier. This is possible by incorporating an id property into your data objects.

export interface Item {
  id: number;
  // Other properties
}

// Example data
items: Item[] = [
  { id: 1, name: 'Item 1' },
  { id: 2, name: 'Item 2' },
  // Additional items
];

Step 2. Specify the trackBy Function: Next, create a method in your component that acts as the trackBy function. This function will be responsible for returning the unique identifier for each item.
trackByFn(index: number, item: Item): number {
  return item.id;
}

Step 3.  Apply trackBy in Template: In your HTML template, apply the trackBy directive by binding it to the ngFor loop.
<ng-container *ngFor="let item of items; trackBy: trackByFn">
  <!-- Render item here -->
</ng-container>

The benefits of using the trackBy Directive offer
Improved Performance: By associating a unique identifier with each item, Angular can efficiently track changes and update only the affected elements, resulting in optimized rendering performance.

Reduced DOM Manipulation: With trackBy, Angular avoids unnecessary DOM manipulations by reusing existing elements when the data changes, leading to a smoother user experience.

Simplified Syntax: The syntax sugar provided by the trackBy directive simplifies the usage and implementation of item tracking in Angular, making the code more readable and maintainable.

By utilizing the syntax sugar of Angular directives, specifically the trackBy directive, we can easily maintain good track of rendered items in our Angular applications. By following the steps outlined in this article, you can optimize performance, reduce unnecessary DOM manipulations, and simplify the codebase. Leveraging the power of trackBy, you can build responsive and efficient Angular applications with ease.


AngularJS Hosting Europe - HostForLIFE.eu :: Sorting Based on Selection in Check Box using Pipe

clock June 8, 2023 09:58 by author Peter

To sort an array of objects by a checkbox selection in a column using a custom pipe in Angular, you can modify the checkbox-selection.pipe.ts file as follow
Custom Pipe (checkbox-selection.pipe.ts)


To generate pipe, use the following comment.

ng g p CheckboxSelectionPipe
    g- stands for generate
    p- stands for pipe

CheckboxSelectionPipe - use your custom pipe name instead of [checkboxslectionpipe]

In Pipe declaration, we can define the filter's name (pipe); when the pipe is true, the pipe is pure, meaning that the transform() method is invoked only when its input arguments change. Pipes are pure by default.

In the transform() method, we can pass the array which needs to be filtered.

Code Explanation
In the SelectedItems array, we will filter the collection based on the selected property in the collection. If the selected property was setted to true means, it will filter into SelectedItems.
In the UnSelectedItems array, we will filter the collection based on the selected property in the collection. If the selected property was setted to false means, it will filter into UnSelectedItems.

Here I have used the spread operator (...) that will allow us to quickly copy all or part of an existing array or object into another array or object.

While returning, it will merge Selected and unselected items.
@Pipe({
  name: 'orderByCheckboxSelection',
  pure:false

})
export class CheckboxSelectionPipe implements PipeTransform {

  transform(list: any): any {
    if (!list) {
      return [];
    }

    // Sort the items based on whether they are selected or not
    let selectedItems = list.filter(item => item.selected);
    let unselectedItems = list.filter(item => !item.selected);

    return [...selectedItems, ...unselectedItems];
  }

}


App.Module.ts for a particular module
Register the custom pipe in the module where you want to use it. For example, open the app.module.ts file and import and add CheckboxSelectionPipe to the declarations array.
@NgModule({
  declarations: [....,....],
  imports: [
    CheckboxSelectionPipe
  ],
  providers: [ ....]


App.Component.html
By providing the CheckBoxSelection pipe to the array needed to sort, you can sort the array based on that property's checkbox selection.
<div *ngFor="let date of collection | orderByCheckboxSelection ">
 ....
....
</div>


European Visual Studio 2017 Hosting - HostForLIFE :: Test HTTP API Endpoint without Postman using Visual Studio

clock June 5, 2023 09:46 by author Peter

You can now test our API endpoints using Visual Studio 17.5 with the aid of Visual Studio. Let's begin with an implementation example.


Step 1
Create a new Web API project using.NET Core.

Step 2

Create one API controller and multiple endpoints within the new project, which will be tested using an HTTP file.
using Microsoft.AspNetCore.Mvc;
using RudderStackDemo.Entities;
using RudderStackDemo.Repositories;

namespace RudderStackDemo.Controllers
{
    [Route("api/[controller]")]
    [ApiController]
    public class ProductsController : ControllerBase
    {
        private readonly IProductService _productService;

        public ProductsController(IProductService productService)
        {
            _productService = productService;
        }

        /// <summary>
        /// Product List
        /// </summary>
        /// <returns></returns>
        [HttpGet]
        public async Task<IActionResult> ProductListAsync()
        {
            var productList = await _productService.ProductListAsync();
            if (productList != null)
            {
                return Ok(productList);
            }
            else
            {
                return NoContent();
            }
        }

        /// <summary>
        /// Get Product By Id
        /// </summary>
        /// <param name="productId"></param>
        /// <returns></returns>
        [HttpGet("{productId}")]
        public async Task<IActionResult> GetProductDetailsByIdAsync(int productId)
        {
            var productDetails = await _productService.GetProductDetailByIdAsync(productId);
            if (productDetails != null)
            {
                return Ok(productDetails);
            }
            else
            {
                return NotFound();
            }
        }

        /// <summary>
        /// Add a new product
        /// </summary>
        /// <param name="productDetails"></param>
        /// <returns></returns>
        [HttpPost]
        public async Task<IActionResult> AddProductAsync(ProductDetails productDetails)
        {
            var isProductInserted = await _productService.AddProductAsync(productDetails);
            if (isProductInserted)
            {
                return Ok(isProductInserted);
            }
            else
            {
                return BadRequest();
            }
        }

        /// <summary>
        /// Update product details
        /// </summary>
        /// <param name="productDetails"></param>
        /// <returns></returns>
        [HttpPut]
        public async Task<IActionResult> UpdateProductAsync(ProductDetails productDetails)
        {
            var isProductUpdated = await _productService.UpdateProductAsync(productDetails);
            if (isProductUpdated)
            {
                return Ok(isProductUpdated);
            }
            else
            {
                return BadRequest();
            }
        }

        /// <summary>
        /// Delete product by id
        /// </summary>
        /// <param name="productId"></param>
        /// <returns></returns>
        [HttpDelete]
        public async Task<IActionResult> DeleteProductAsync(int productId)
        {
            var isProductDeleted = await _productService.DeleteProductAsync(productId);
            if (isProductDeleted)
            {
                return Ok(isProductDeleted);
            }
            else
            {
                return BadRequest();
            }
        }
    }
}

Step 3
Right-click on the project name in the solution and add the API-Test.http file inside your project.

Step 4
Add different HTTP endpoint requests inside the HTTP file.

GET https://localhost:7178/api/Products

###

@productId = 2
GET https://localhost:7178/api/Products/{{productId}}

###

POST https://localhost:7178/api/Products
Content-Type application/json

{
  "id": 3,
  "productName": "Laptop",
  "productDescription": "HP Pavilion",
  "productPrice": 80000,
  "productStock": 10
}

###

PUT https://localhost:7178/api/Products
Content-Type application/json

{
  "id": 3,
  "productName": "Laptop",
  "productDescription": "DELL",
  "productPrice": 80000,
  "productStock": 10
}

###

DELETE https://localhost:7178/api/Products?productId=1


Step 5
Now you can execute the individual API endpoint after clicking on the run button corresponding to each request as shown below.


AngularJS Hosting Europe - HostForLIFE.eu :: Dynamic JSON Data Handling in Angular

clock May 30, 2023 09:16 by author Peter

You can take the following actions to handle the provided JSON example dynamically in an Angular application:
"Data": ["confidence": 0.9983, "label": "height", "value": "5 FT 7 IN"; "confidence": 0.9971, "label": "squad", "value": "Team A"

Step 1
Create an Angular component: Run the ng produce component dynamicHandling command to create a new component using the Angular CLI.

Step 2
Import the HttpClientModule from @angular/common/http in the app.module.ts file to initiate HTTP queries.
'@angular/common/http' import HttpClientModule;

export class AppModule @NgModule("imports: [ HttpClientModule ], //...")

Step 3
To retrieve the JSON data, send an HTTP request: Import the HttpClient and issue an HTTP GET request to the component's TypeScript file (dynamic-handling.component.ts) to obtain the JSON data.

Component, OnInit, import from '@Angular/core';
'@angular/common/http' import HttpClient;

@Component('app-dynamic-handling', './dynamic-handling.component.html', and './dynamic-handling.component.css') export class DynamicHandlingComponent implements OnInit with the following parameters: jsonData: any;

  private http: HttpClient constructor

  This.http.getany>('your_api_endpoint') in ngOnInit() returns void.(data => subscribe) this.jsonData = data.Data; ); ;


Step 4
To loop through the JSON data in the template, use ngFor: Utilize the ngFor directive in the component's HTML file (dynamic-handling.component.html) to cycle through the jsonData array and dynamically display the results.

"let item of jsonData" in the div *ngFor attribute.'item.label': 'item.value' '/p' '/div'

Step 5
Include the element in the primary template: To display the dynamic handling component, include the app-dynamic-handling> and /app-dynamic-handling> tags in the app.component.html file.
App-dynamic-handling in div, app-dynamic-handling out of div.

The real API endpoint from which you may obtain the JSON data should be substituted for "your_api_endpoint" in Step 3.

As indicated in Steps 2 and 5, be sure to import the HttpClientModule into the app.module.ts file and include the dynamic handling component in the app.component.html main template.

Once the component and template have been configured, the Angular application will issue an HTTP request to retrieve the JSON data and use the ngFor directive in the template to dynamically display the information.


AngularJS Hosting Europe - HostForLIFE.eu :: How to Sort Column (Orderby) Based on Date in Angular 13 using Pipe?

clock May 25, 2023 13:02 by author Peter

To sort an array of objects by a particular date column in ascending or descending order using a custom pipe in Angular, you can modify the date-sort.pipe.ts file as follows:
Custom Pipe (date-sort.pipe.ts)


In Pipe declaration, we can define the name of the filter (pipe), When pipe is true, the pipe is pure, meaning that the transform() method is invoked only when its input arguments change. Pipes are pure by default.

In the transform() method, we can pass the array which needs to be filtered. Property parameter can as based on which date column we need to sort; ordering 'asc' | 'desc' can be also passed.

@Pipe({
  name: 'orderByDate',
  pure:false

})
export class OrderByDatePipe implements PipeTransform {

  transform(array: any[], property: string, order: 'asc' | 'desc'): any[] {
    if (!Array.isArray(array) || !property) {
      return array;
    }

    array.sort((a, b) => {
      const dateA = new Date(a[property]);
      const dateB = new Date(b[property]);

      if (order === 'asc') {
        return dateA.getTime() - dateB.getTime();
      } else {
        return dateB.getTime() - dateA.getTime();
      }
    });

    return array;
  }
}


App.Module.ts for a particular module

Register the custom pipe in the module where you want to use it. For example, open the app.module.ts file and import and add OrderByDatePipe to the declarations array:
@NgModule({
  declarations: [....,....],
  imports: [
    OrderByDatePipe
  ],
  providers: [ ....]


For use across Application

1. We can use Share.Module.ts, Register the custom pipe in share module,
@NgModule({
  declarations: [
    OrderByDatePipe
  ],
  imports: [
    CommonModule
  ]
  ,exports:[
   OrderByDatePipe

  ]
})


2. We can import ShareModule in whether we want to use it inside any module.
@NgModule({
  declarations: [...,.... ],
  imports: [
    .....
    SharedModule,
    ....
  ],
  providers: [ .....]


App.Component.html
    In your component's template, pass the desired date column and order ('asc' or 'desc') as parameters to the OrderByDatePipe :
    Make sure to replace 'scheduleStartDate' with the actual name of the date column in your array of objects.

By providing the specific property/column to the orderByDate pipe, you can sort the array based on that property's date values in either ascending or descending order.
<div *ngFor="let schedule of CurrentSchedule | orderByDate:'scheduleStartDate':'asc'">
 ....
....
</div>
 <div *ngFor="let schedule of CurrentSchedule | orderByDate:'scheduleStartDate':'desc'">
 ....
....
</div>


AngularJS Hosting Europe - HostForLIFE.eu :: Real-Time Communication Made Simple: Angular Demonstrating Web Sockets

clock May 23, 2023 07:12 by author Peter

Web Sockets
Web sockets are a protocol that facilitates bidirectional, full-duplex communication between clients and servers over a single, persistent connection. In contrast to conventional HTTP requests, which are stateless and request-response based, web sockets enable event-driven communication in real time. They are especially useful for applications requiring real-time updates, such as messaging applications, collaborative tools, and real-time dashboards.

Setting Up an Angular Project
To begin using web sockets in Angular, we must create a new project. Let's utilize the Angular CLI to scaffold the application's structure and install any necessary dependencies. Open your terminal or command prompt and proceed as follows:

Install Angular CLI if it is not already installed.

npm install -g @angular/cli

Step 2. Create a new Angular project.
ng new websocket-demo
cd websocket-demo


Establishing a Web Socket Connection
Now that we have our Angular project set up let's establish a web socket connection. We'll create a service that wraps the WebSocket API and handles the connection lifecycle. Open the terminal/command prompt and navigate to the project's root directory. Then, follow these steps.

1. Generate a WebSocket service.
ng generate service websocket

2. Open the newly generated service file (websocket.service.ts) and replace its content with the following code.
import { Injectable } from '@angular/core';

@Injectable({
  providedIn: 'root'
})
export class WebsocketService {
  private socket: WebSocket;

  constructor() { }

  connect(): void {
    this.socket = new WebSocket('wss://your-websocket-url');

    this.socket.onopen = () => {
      console.log('WebSocket connection established.');
    };

    this.socket.onmessage = (event) => {
      console.log('Received message:', event.data);
    };

    this.socket.onclose = (event) => {
      console.log('WebSocket connection closed:', event);
    };

    this.socket.onerror = (error) => {
      console.error('WebSocket error:', error);
    };
  }

  sendMessage(message: string): void {
    this.socket.send(message);
  }

  closeConnection(): void {
    this.socket.close();
  }
}


3. Replace 'wss://your-websocket-url' in the connect() the method with the actual WebSocket URL you want to connect to.

Sending and Receiving Data

With our web socket service in place, we can now send and receive data between the client and server. Open the component where you want to use the web socket service (e.g., app.component.ts) and follow these steps.

Import the WebSocket service
import { Component } from '@angular/core';
import { WebsocketService } from './websocket.service';

@Component({
  selector: 'app-root',
  template: `
    <button (click)="sendMessage()">Send Message</button>
  `
})
export class AppComponent {
  constructor(private websocketService: WebsocketService) {}

  sendMessage(): void {
    const message = 'Hello, WebSocket!';
    this.websocketService.sendMessage(message);
  }
}

In the same component file (e.g., app.component.ts), add the following code to receive messages from the server.
@Component({
  // Component configuration...
})
export class AppComponent implements OnInit {
  receivedMessages: string[] = [];

  constructor(private websocketService: WebsocketService) {}

  ngOnInit(): void {
    this.websocketService.connect();
    this.websocketService.messageReceived.subscribe((message: string) => {
      this.receivedMessages.push(message);
    });
  }

  sendMessage(): void {
    const message = 'Hello, WebSocket!';
    this.websocketService.sendMessage(message);
  }
}

In the component template (app.component.html), display the received messages.
<button (click)="sendMessage()">Send Message</button>

<ul>
  <li *ngFor="let message of receivedMessages">{{ message }}</li>
</ul>

Now, when the sendMessage() the method is called, it will send a message to the server using the web socket service. The received messages from the server are stored in the receivedMessages array and displayed in the component template.

Handling Errors and Disconnections

To handle errors and disconnections gracefully, let's make some modifications to our existing code. Open the websocket.service.ts file and follow these steps,

-  Import the Subject class from RxJS to handle the stream of received messages. Add the following line at the top of the file after the existing imports.
import { Subject } from 'rxjs';

-  Inside the WebsocketService class, declare a new messageReceived property of type Subject<string>. This will be used to emit and subscribe to the received messages:
messageReceived: Subject<string> = new Subject<string>();

-  In the onmessage event handler, modify the code to emit the received message through the messageReceived subject.
this.socket.onmessage = (event) => {
  const message = event.data;
  console.log('Received message:', message);
  this.messageReceived.next(message);
};


By implementing these changes, we are now using the messageReceived subject to emit and subscribe to the received messages in our Angular component. This allows us to handle and display the messages in real time.

In this article, we have explored how to implement web sockets in an Angular project to enable real-time communication between clients and servers. We covered the fundamentals of web sockets, including setting up an Angular project, establishing a web socket connection, sending and receiving data, and handling errors and disconnections.


European Visual Studio 2017 Hosting - HostForLIFE :: Helpful Tips To Increase Productivity In Visual Studio

clock January 18, 2023 07:23 by author Peter

In this article, I'll show you some Visual Studio features that have greatly boosted developers' efficiency and productivity in their day-to-day development.


Introduction
Visual Studio is an IDE made by Microsoft and used for different types of software development such as computer programs, websites, web apps, web services, and mobile apps. It is used by many developers all over the world every day. It's a fantastic tool with lots of important features that will make the life of a developer much simpler.

Visual Studio supports 36 different programming languages. Several well-known languages that are supported by Visual Studio are C#, F#, Visual Basics, C, C++, Python, JavaScript, etc.

Let’s see how we can speed up development work with some Visual Studio built-in features.

1. Code Snippets
The Code snippets are pre-written templates that enable us to write code for our project more quickly. That can be inserted in a code file using a context menu command or a combination of hotkeys. It is used to add repeating code patterns, such as properties, loops, or conditional statements. Visual Studio has a lot of inbuilt code snippets. We are going to show a few of them which are often used while programming.

Snippets for Properties
To add an auto-implemented property, we have to type the prop key and then press TAB key twice. That will generate the following.

public <TYPE> MyProperty { get; set; } //TYPE can be int, string, bool.. etc.
//Default it will generate int type of propery as below:
public int MyProperty { get; set; }

The TAB key is used to switch between fields, EX: If we want to jump from TYPE to MyProperty or Vice versa, then we can use the TAB key.

Then we can change “TYPE” and "MyProperty":
public string Name { get; set; }

Similarly, if we want to add a full property along with its private variable, we can type propfull.

Other useful Code snippets or shortcuts. Please remember, you have to type <Snippet> TAB + TAB (hit the Tab key twice) to generate code templates.

 if  Generate if statement
 else  Generate else statement
 try  Generate try and catch statement
 tryf  Generate try and finally statement
 for  Generates a for loop
 foreach  Generates a foreach loop
 cw  Generate Console.WriteLine() statement

In Visual Studio, there are numerous built-in code snippets, You can find them all by pressing CTRL+K+X. As shown below image.

2. Code Editor Split
We can split the code editor vertically or horizontally. This is quite helpful If we need to simultaneously edit several related file's code at the same time. To add a new vertical tab group. Open the file in the editor and use the keyboard shortcut Alt + W, V. It will open the file like below.

We can spit files horizontally too. It is useful when we need to compare the same file content, To spit files horizontally use Menu Window ⇾ Split option.

Or You simply use the small drag arrows icon in the top right corner of your file window, as shown in the following screenshots.

The result will be.

3. Navigation Through the Active Windows and Tabs
To navigate between the active windows in VS. We are using the mouse to go from one window to another.
But, while doing coding, we want to quickly complete any side tasks without taking our hands off the keyboard. Therefore, we can use the CTRL+TAB combination rather than a mouse. Then, using the arrow keys, we can choose the necessary active window:

We can navigate through the active tabs in the same way that we do with the active windows. So for that, we need to press the CTRL+TAB keys and navigate with arrow keys. If we don't want to use the arrow key, then we just press the TAB key to navigate through the active tabs.

The same result can also be obtained by using CTRL+F6 or, for reverse navigation, use CTRL+SHIFT+F6.

4. Immediate Window
The Immediate window is used to debug and evaluate expressions, execute statements, and print variable values. It allows you to enter expressions to be evaluated or executed by the development language during debugging. We can write additional code that can add to or alter the current code execution.

To display the Immediate window, open a project, and then choose Debug > Windows > Immediate or press Ctrl+Alt+I.


5. Shortcuts
There are a huge number of keyboard shortcuts available in Visual Studio that let you do everything from code navigation to code generation, refactoring, debugging, and more. The most effective method for enhancing Visual Studio productivity and accelerating the coding process is to use keyboard shortcuts.


AngularJS Hosting Europe - HostForLIFE.eu :: Implementing Different Chart Types In Angular

clock August 1, 2022 09:36 by author Peter

In current day, data is everywhere and is an important part of our lives. We collect, send, analyse, and do lots of other things with data. Data in itself is not visually appealing, but we can make it beautiful. Chart is one such thing that can make data look beautiful & easier to understand / analyse. We can use different chart types to show data depending on the type of data we are showing. In this article, we will see how to add, configure and use different chart types in Angular using CanvasJS angular charts.

Adding CanvasJS angular chart to project
Let's start by adding CanvasJS angular chart component to the project. Download the component from the official download page. Copy the chart component files to the project. Generally, these files are kept under assets directory. Once it's copied, import & register the modules.
import { NgModule } from '@angular/core';
import { BrowserModule } from '@angular/platform-browser';
import { AppComponent } from './app.component';

import * as CanvasJSAngularChart from './assets/canvasjs.angular.component';
var CanvasJSChart = CanvasJSAngularChart.CanvasJSChart;

@NgModule({
  declarations: [
    AppComponent,
    CanvasJSChart
  ],
  imports: [
    BrowserModule
  ],
  providers: [],
  bootstrap: [AppComponent]
})
export class AppModule { }


As the modules are registered, you can start creating chart. Let's create & display simple column chart in angular.
import { Component } from '@angular/core';

@Component({
  selector: 'app-root',
  template: '<canvasjs-chart [options]="chartOptions"></canvasjs-chart>'
})
export class AppComponent {
    chartOptions = {
      title: {
          text: "Angular Column Chart"
      },
      data: [{
        type: "column",
        dataPoints: [
            { label: "apple",  y: 10  },
            { label: "orange", y: 15  },
            { label: "banana", y: 25  },
            { label: "mango",  y: 30  },
            { label: "grape",  y: 28  }
        ]
      }]
    }
}

Here we first imported the CanvasJS chart component & then define the options for the chart. CanvasJS takes data to be plotted along with other chart element customization options as 'chart-options'. In the above example, you can observe labels are passed to each datapoint which are shown below every bar (vertical bar charts are called as column chart). The same can be changed to horizontal bar or line or pie by just changing type property. The data is an array of objects where each dataseries is an object - this means if you pass multiple objects, it creates chart with multiple series.

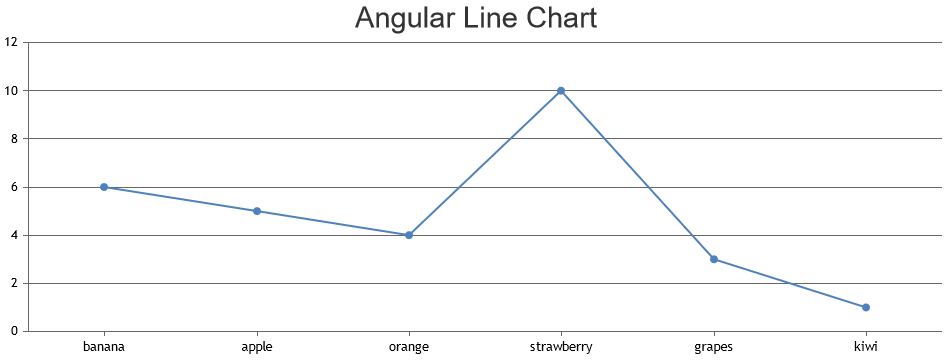
Line Chart

Line chart is a way to represent data in the form of line. Often they are used to show the trend or to compare two different data sets. In the above simple chart that you created, just change type property to 'line' & that should create a line chart instead of column. CanvasJS has different kinds of lines - regular line, spline (similar to line except that the line is smooth), step-line (similar to line but line is in the form of steps/staircase).
chartOptions = {
  title: {
      text: "Angular Line Chart"
  },
  data: [{
    type: "line",
    dataPoints: [
        { label: "apple",  y: 10  },
        { label: "orange", y: 15  },
        { label: "banana", y: 25  },
        { label: "mango",  y: 30  },
        { label: "grape",  y: 28  }
    ]
  }]
}
Just by filling the region between the base and the datapoints value, it create area chart. Component supports different area forms like area, range area, stacked area & gets clubbed with different types of line to create more combinations.

Bar Chart
In bar chart, data is represented in the form of rectangles - vertical bars / horizontal bars. Syntax is same as line but type field takes different value. Bars can be vertical called column chart or horizontal called bar chart. CanvasJS angular component has different kinds of bar charts like bar, range bar, stacked bar, stacked bar 100%, column, range column, stacked column, stacked column 100% & waterfall.
chartOptions = {
  title: {
    text: "Angular Bar Chart"
  },
  data: [{
  type: "bar",
  dataPoints: [
    { label: "apple",  y: 10  },
    { label: "orange", y: 15  },
    { label: "banana", y: 25  },
    { label: "mango",  y: 30  },
    { label: "grape",  y: 28  }
  ]
  }]
}

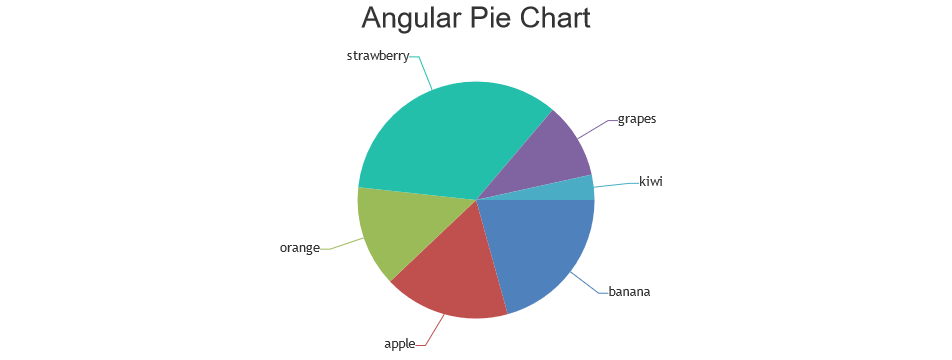
Pie Chart
Pie chart is probably the most commonly used chart where datapoint is represented as slices of the pie. Each slice will show the relational proportion between the data. Pie chart can further be modified to have a hollow space in the centre making it look like a donut & hence this type of chart is called doughnut / donut chart.
chartOptions = {
  title: {
    text: "Angular Pie Chart"
  },
  data: [{
  type: "pie",
  dataPoints: [
    { label: "apple",  y: 10  },
    { label: "orange", y: 15  },
    { label: "banana", y: 25  },
    { label: "mango",  y: 30  },
    { label: "grape",  y: 28  }
  ]
  }]
}


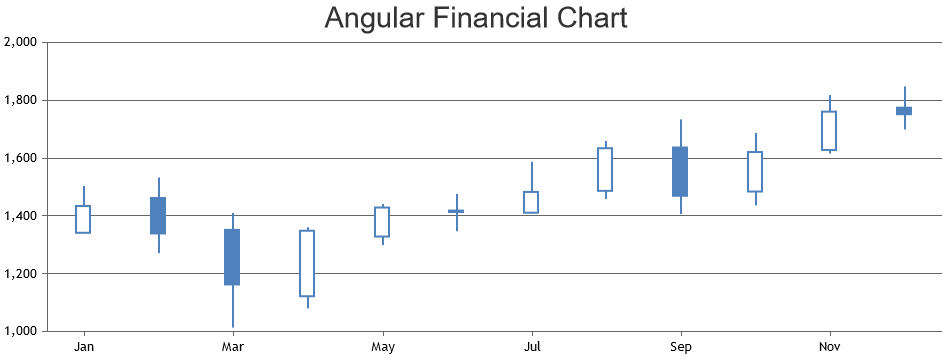
Financial Chart
Financial chart is generally used to show the stock data / trades. These are most commonly used chart type in stock, forex, shares, etc. These charts will generally be dynamic charts - keeps updating latest data automatically by fetching data from some API.
chartOptions = {
  title: {
    text: "Angular Financial Chart"
  },
  data: [{
  type: "candlestick",
  dataPoints: [
    { label: "Jan", y: [1341.55, 1503.21, 1341.55, 1434.22] },
    { label: "Feb", y: [1462.00, 1532.10, 1271.00, 1339.32] },
    { label: "Mar", y: [1351.60, 1410.15, 1013.53, 1162.81] },
    { label: "Apr", y: [1122.00, 1359.98, 1079.81, 1348.66] },
    { label: "May", y: [1328.50, 1441.00, 1299.00, 1428.92] },
    { label: "Jun", y: [1418.39, 1475.94, 1347.01, 1413.60] },
    { label: "Jul", y: [1411.09, 1586.98, 1409.81, 1482.95] },
    { label: "Aug", y: [1486.64, 1659.21, 1458.65, 1634.18] },
    { label: "Sep", y: [1636.63, 1733.18, 1406.55, 1469.59] },
    { label: "Oct", y: [1484.27, 1687.00, 1436.00, 1621.01] },
    { label: "Nov", y: [1628.16, 1818.06, 1616.03, 1760.73] },
    { label: "Dec", y: [1774.36, 1847.19, 1699.00, 1751.88] }
  ]
  }]
}

More Chart Types & Additional Examples
You can check out CanvasJS angular charts gallery page where more working examples are shown with varieties of use-cases & customization. Also complete customization options can be found on CanvasJS's documentation section.

Conclusion
CanvasJS angular chart component makes it easy to showcase varieties of chart types in your application and dashboard. It also supports dynamic charts making it easier to automate to show latest data always.


About HostForLIFE.eu

HostForLIFE.eu is European Windows Hosting Provider which focuses on Windows Platform only. We deliver on-demand hosting solutions including Shared hosting, Reseller Hosting, Cloud Hosting, Dedicated Servers, and IT as a Service for companies of all sizes.

We have offered the latest Windows 2016 Hosting, ASP.NET Core 2.2.1 Hosting, ASP.NET MVC 6 Hosting and SQL 2017 Hosting.


Tag cloud

Sign in