Dependency Injection (DI) is a core Angular design pattern that aids in the management of dependencies as well as the flow of data and services inside an application. It allows for loose coupling between components, which makes your code more modular, maintainable, and testable.

Why are We using Dependency Injection and without dependency using what problem in real-life example?
Real-Life Example: A Car Factory
Imagine you're managing a car manufacturing factory. In your factory, you have various assembly lines responsible for different parts of the car, such as the engine, chassis, electronics, and tires. Each assembly line relies on specific tools and materials to complete its tasks.
Now, think about how you might manage these dependencies in your car factory.
- No Dependency Injection (DI): Without dependency injection, each assembly line would have to manage its own dependencies. For example:
- The engine assembly line would need to procure and maintain its own inventory of engines, tools, and spare parts.
- The electronics assembly line would need to do the same for electronic components.
- The tire assembly line would need its own inventory of tires and tire-related equipment.
- This approach would lead to several problems.
- Duplication of effort: Each assembly line would have to manage its dependencies separately, resulting in duplicated resources and potential inconsistencies.
- Maintenance nightmare: If a tool or part needed to be updated or replaced, every assembly line using that tool or part would need to be individually updated.
- Lack of flexibility: Changing or upgrading components or tools across multiple assembly lines would be challenging and error-prone.
- Dependency Injection (DI) in the Car Factory: Now, let's introduce dependency injection into the car factory.
- You create a central inventory management system (akin to Angular's dependency injection container).
- Each assembly line declares its dependencies on the central system.
- When an assembly line needs an engine, electronics, or tires, it requests them from the central inventory system (dependency injection).
- The central system ensures that each assembly line gets the correct parts and tools.
- Benefits of this approach.
- Centralized control: You have a single point of control for managing all dependencies, making it easier to update, replace, or upgrade tools and components.
- Consistency: All assembly lines use the same source for their dependencies, ensuring consistency and reducing errors.
- Flexibility: You can easily switch out components or tools across the factory by updating the central inventory system.
In Angular
In Angular applications, components, services, and other parts of the application often have dependencies. Dependency injection works similarly to the car factory example:
Angular's DI container manages dependencies and ensures that each component or service gets the correct instances of the dependencies it needs.
This promotes modularity, maintainability, and testability in your Angular application, as you can easily swap out components or services without modifying each dependent part individually.
So, in both the car factory and Angular, dependency injection simplifies management, promotes consistency, and makes it easier to adapt to changes in the dependencies, ultimately leading to more efficient and maintainable systems.
In Angular How to Achieve!
In Angular, dependency injection is achieved through the built-in dependency injection system. Here's how you can achieve dependency injection in Angular.
Step 1. Create Service in your Application
First, you need to create a service that provides the functionality or data you want to inject into other components. Services are classes annotated with the @Injectable decorator. What are the services using this Application? All the functionalities of the service to implemented in the servicefile.
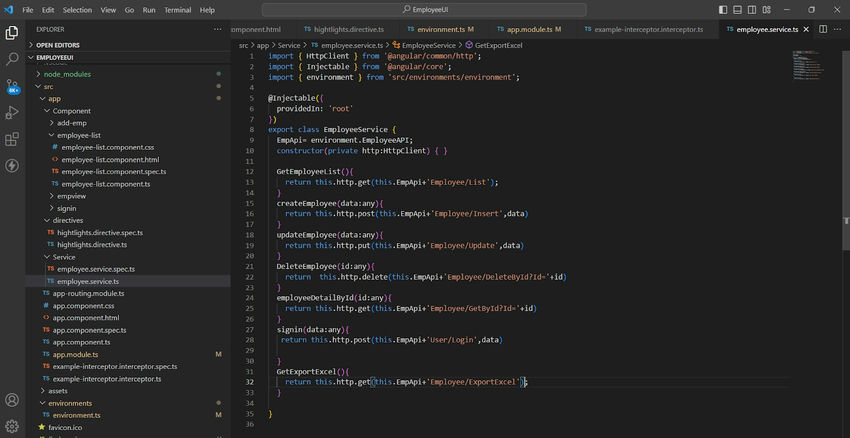
import { HttpClient } from '@angular/common/http';
import { Injectable } from '@angular/core';
import { environment } from 'src/environments/environment';
@Injectable({
providedIn: 'root'
})
export class EmployeeService {
EmpApi= environment.EmployeeAPI;
constructor(private http:HttpClient) { }
GetEmployeeList(){
return this.http.get(this.EmpApi+'Employee/List');
}
}
Step 2. Inject Service into Components
Next, you inject the service into the components or other services where you need it. You can do this by including the service as a parameter in the constructor of the component or service that requires it. Angular's dependency injection system will take care of providing an instance of the service automatically.
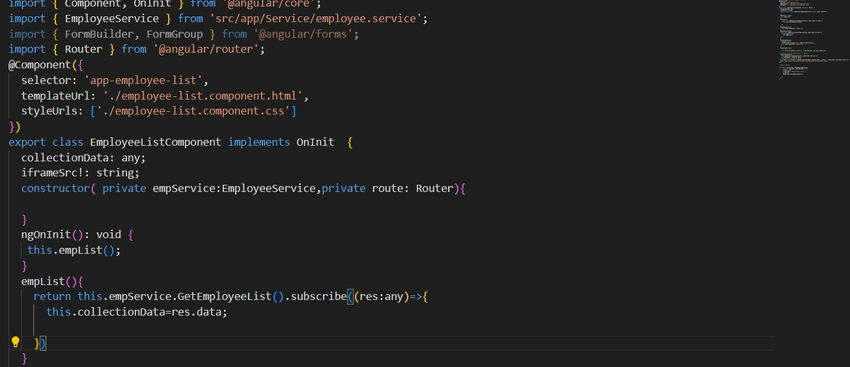
import { Component, OnInit } from '@angular/core';
import { EmployeeService } from 'src/app/Service/employee.service';
import { FormBuilder, FormGroup } from '@angular/forms';
import { Router } from '@angular/router';
@Component({
selector: 'app-employee-list',
templateUrl: './employee-list.component.html',
styleUrls: ['./employee-list.component.css']
})
export class EmployeeListComponent implements OnInit {
collectionData: any;
iframeSrc!: string;
constructor( private empService:EmployeeService,private route: Router){
}
ngOnInit(): void {
this.empList();
}
empList(){
return this.empService.GetEmployeeList().subscribe((res:any)=>{
this.collectionData=res.data;
})
}
}
Conclusion
That's it! With these steps, you've achieved dependency injection in Angular. The Angular framework will take care of creating and managing the service instances and injecting them where needed, promoting modularity and maintainability in your application.