June 20, 2023 10:23 by
 Peter
PeterWhen working with lists and data rendering in Angular, it is essential to efficiently maintain track of the rendered items. A common challenge is maintaining the integrity of the rendered objects while dynamically updating the list. By utilizing the trackBy directive, Angular provides us with syntax sugar that simplifies this endeavor. This article will examine how to leverage the power of trackBy to efficiently keep track of rendered items.

Knowledge of the trackBy Directive
Essential to Angular, the trackBy directive optimizes rendering by associating a unique identifier with each list item. Using the trackBy directive, Angular can efficiently detect changes and update only the required DOM elements, resulting in enhanced performance.
Syntax and Usage
To use trackBy, please follow these steps:
Step 1. Define a Unique Identifier: Ensure that each list item in your component has a unique identifier. This is possible by incorporating an id property into your data objects.
export interface Item {
id: number;
// Other properties
}
// Example data
items: Item[] = [
{ id: 1, name: 'Item 1' },
{ id: 2, name: 'Item 2' },
// Additional items
];
Step 2. Specify the trackBy Function: Next, create a method in your component that acts as the trackBy function. This function will be responsible for returning the unique identifier for each item.
trackByFn(index: number, item: Item): number {
return item.id;
}
Step 3. Apply trackBy in Template: In your HTML template, apply the trackBy directive by binding it to the ngFor loop.
<ng-container *ngFor="let item of items; trackBy: trackByFn">
<!-- Render item here -->
</ng-container>
The benefits of using the trackBy Directive offer
Improved Performance: By associating a unique identifier with each item, Angular can efficiently track changes and update only the affected elements, resulting in optimized rendering performance.
Reduced DOM Manipulation: With trackBy, Angular avoids unnecessary DOM manipulations by reusing existing elements when the data changes, leading to a smoother user experience.
Simplified Syntax: The syntax sugar provided by the trackBy directive simplifies the usage and implementation of item tracking in Angular, making the code more readable and maintainable.
By utilizing the syntax sugar of Angular directives, specifically the trackBy directive, we can easily maintain good track of rendered items in our Angular applications. By following the steps outlined in this article, you can optimize performance, reduce unnecessary DOM manipulations, and simplify the codebase. Leveraging the power of trackBy, you can build responsive and efficient Angular applications with ease.
June 8, 2023 09:58 by
PeterTo sort an array of objects by a checkbox selection in a column using a custom pipe in Angular, you can modify the checkbox-selection.pipe.ts file as follow
Custom Pipe (checkbox-selection.pipe.ts)
To generate pipe, use the following comment.
ng g p CheckboxSelectionPipe
g- stands for generate
p- stands for pipe
CheckboxSelectionPipe - use your custom pipe name instead of [checkboxslectionpipe]
In Pipe declaration, we can define the filter's name (pipe); when the pipe is true, the pipe is pure, meaning that the transform() method is invoked only when its input arguments change. Pipes are pure by default.
In the transform() method, we can pass the array which needs to be filtered.
Code Explanation
In the SelectedItems array, we will filter the collection based on the selected property in the collection. If the selected property was setted to true means, it will filter into SelectedItems.
In the UnSelectedItems array, we will filter the collection based on the selected property in the collection. If the selected property was setted to false means, it will filter into UnSelectedItems.
Here I have used the spread operator (...) that will allow us to quickly copy all or part of an existing array or object into another array or object.
While returning, it will merge Selected and unselected items.
@Pipe({
name: 'orderByCheckboxSelection',
pure:false
})
export class CheckboxSelectionPipe implements PipeTransform {
transform(list: any): any {
if (!list) {
return [];
}
// Sort the items based on whether they are selected or not
let selectedItems = list.filter(item => item.selected);
let unselectedItems = list.filter(item => !item.selected);
return [...selectedItems, ...unselectedItems];
}
}
App.Module.ts for a particular module
Register the custom pipe in the module where you want to use it. For example, open the app.module.ts file and import and add CheckboxSelectionPipe to the declarations array.
@NgModule({
declarations: [....,....],
imports: [
CheckboxSelectionPipe
],
providers: [ ....]
App.Component.html
By providing the CheckBoxSelection pipe to the array needed to sort, you can sort the array based on that property's checkbox selection.
<div *ngFor="let date of collection | orderByCheckboxSelection ">
....
....
</div>
June 5, 2023 09:46 by
PeterYou can now test our API endpoints using Visual Studio 17.5 with the aid of Visual Studio. Let's begin with an implementation example.

Step 1
Create a new Web API project using.NET Core.
Step 2
Create one API controller and multiple endpoints within the new project, which will be tested using an HTTP file.
using Microsoft.AspNetCore.Mvc;
using RudderStackDemo.Entities;
using RudderStackDemo.Repositories;
namespace RudderStackDemo.Controllers
{
[Route("api/[controller]")]
[ApiController]
public class ProductsController : ControllerBase
{
private readonly IProductService _productService;
public ProductsController(IProductService productService)
{
_productService = productService;
}
/// <summary>
/// Product List
/// </summary>
/// <returns></returns>
[HttpGet]
public async Task<IActionResult> ProductListAsync()
{
var productList = await _productService.ProductListAsync();
if (productList != null)
{
return Ok(productList);
}
else
{
return NoContent();
}
}
/// <summary>
/// Get Product By Id
/// </summary>
/// <param name="productId"></param>
/// <returns></returns>
[HttpGet("{productId}")]
public async Task<IActionResult> GetProductDetailsByIdAsync(int productId)
{
var productDetails = await _productService.GetProductDetailByIdAsync(productId);
if (productDetails != null)
{
return Ok(productDetails);
}
else
{
return NotFound();
}
}
/// <summary>
/// Add a new product
/// </summary>
/// <param name="productDetails"></param>
/// <returns></returns>
[HttpPost]
public async Task<IActionResult> AddProductAsync(ProductDetails productDetails)
{
var isProductInserted = await _productService.AddProductAsync(productDetails);
if (isProductInserted)
{
return Ok(isProductInserted);
}
else
{
return BadRequest();
}
}
/// <summary>
/// Update product details
/// </summary>
/// <param name="productDetails"></param>
/// <returns></returns>
[HttpPut]
public async Task<IActionResult> UpdateProductAsync(ProductDetails productDetails)
{
var isProductUpdated = await _productService.UpdateProductAsync(productDetails);
if (isProductUpdated)
{
return Ok(isProductUpdated);
}
else
{
return BadRequest();
}
}
/// <summary>
/// Delete product by id
/// </summary>
/// <param name="productId"></param>
/// <returns></returns>
[HttpDelete]
public async Task<IActionResult> DeleteProductAsync(int productId)
{
var isProductDeleted = await _productService.DeleteProductAsync(productId);
if (isProductDeleted)
{
return Ok(isProductDeleted);
}
else
{
return BadRequest();
}
}
}
}
Step 3
Right-click on the project name in the solution and add the API-Test.http file inside your project.
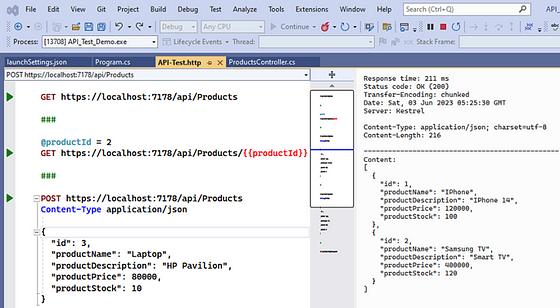
Step 4
Add different HTTP endpoint requests inside the HTTP file.
GET https://localhost:7178/api/Products
###
@productId = 2
GET https://localhost:7178/api/Products/{{productId}}
###
POST https://localhost:7178/api/Products
Content-Type application/json
{
"id": 3,
"productName": "Laptop",
"productDescription": "HP Pavilion",
"productPrice": 80000,
"productStock": 10
}
###
PUT https://localhost:7178/api/Products
Content-Type application/json
{
"id": 3,
"productName": "Laptop",
"productDescription": "DELL",
"productPrice": 80000,
"productStock": 10
}
###
DELETE https://localhost:7178/api/Products?productId=1
Step 5
Now you can execute the individual API endpoint after clicking on the run button corresponding to each request as shown below.