Full Trust European Hosting

BLOG about Full Trust Hosting and Its Technology - Dedicated to European Windows Hosting Customer

AngularJS Hosting Europe - HostForLIFE.eu :: Learn HTTP Interceptors in Angular

clock March 27, 2025 07:39 by author Peter

The HttpClient module in Angular has a feature called an HTTP Interceptor that enables developers to examine and modify HTTP requests and answers globally before application logic handles them.  Tasks including adding authorization tokens to headers, logging, resolving failures, and altering requests and answers are all frequently performed by interceptors.

Key Features of HTTP Interceptors

  • Middleware for HTTP Requests and Responses: Interceptors sit between the application and the backend, processing all HTTP requests and responses.
  • Global Scope: Once an interceptor is configured, it applies to all HTTP requests and responses in the application.
  • Chaining: Multiple interceptors can be implemented, and they are executed in the order they are provided.

Benefits of HTTP Interceptors
Following are some of the key benefits of using HTTP Interceptors in Angular.

  • Testability and reusability: Interceptors are easy to test in isolation, allowing you to ensure that each interceptor behaves correctly
  • Centralized code for cross-cutting concerns: HTTP Interceptors allow you to define logic for common tasks, such as authentication, logging, error handling, or adding headers, in a centralized location.
  • Global application-level modifications: Interceptors operate globally, intercepting all HTTP requests and responses made by the Angular application. This means you can apply changes or perform actions consistently across multiple API calls without having to modify each individual request or response manually.
  • Error handling and logging: Interceptors can be utilized to handle errors globally, providing a consistent approach to error reporting and handling throughout the application.
  • Caching and request/response manipulation: HTTP Interceptors can be leveraged to implement caching mechanisms, reducing redundant requests and optimizing the application’s performance.
  • Separation of concerns: By using HTTP Interceptors, you can keep concerns related to data fetching and communication (HTTP) separate from the business logic of your components and services.
  • Security and authentication: Interceptors are commonly used to add authorization headers or authentication tokens to outgoing requests. This ensures that the user’s authentication status is automatically included in API calls without the need to explicitly set headers in every request.
  • Easy integration with third-party libraries: Interceptors can be used to integrate with third-party libraries or APIs seamlessly. For example, you can apply a specific format to API responses that are expected by a charting library or a data visualization tool.

Logging Interceptor

import { Injectable } from '@angular/core';
import {
  HttpEvent,
  HttpInterceptor,
  HttpHandler,
  HttpRequest,
  HttpResponse,
} from '@angular/common/http';
import { Observable, tap } from 'rxjs';

@Injectable()
export class LoggingInterceptor implements HttpInterceptor {
  constructor() {}

  intercept(
    request: HttpRequest<any>,
    next: HttpHandler
  ): Observable<HttpEvent<any>> {
    console.log('Outgoing HTTP request', request);
    return next.handle(request).pipe(
      tap((event: HttpEvent<any>) => {
        console.log('Incoming HTTP response', event);
      })
    );
  }
}


Provide an interceptor in the app module.
import { LoggingInterceptor } from './interceptors/logging.interceptor';

providers: [
  {
    provide: HTTP_INTERCEPTORS,
    useClass: LoggingInterceptor,
    multi: true,
  },
];

Adding Headers to Requests

import { Injectable } from '@angular/core';
import {
  HttpRequest,
  HttpHandler,
  HttpEvent,
  HttpInterceptor
} from '@angular/common/http';
import { Observable } from 'rxjs';

@Injectable()
export class HeadersInterceptor implements HttpInterceptor {
  constructor() {}

  intercept(
    request: HttpRequest<unknown>,
    next: HttpHandler
  ): Observable<HttpEvent<unknown>> {
    console.log(request);
    const GUID = 'f4189b26-01af-432c-bcd8-cb4bc7e90980';
    const modifiedRequest = request.clone({
      setHeaders: {
        GUID,
      },
    });
    return next.handle(modifiedRequest);
  }
}


Provide an interceptor in the app module.
import { HeadersInterceptor  } from './interceptors/headers.interceptor'

providers: [
    {
      provide: HTTP_INTERCEPTORS, useClass: HeadersInterceptor, multi: true
    }
  ]

Error Handling Interceptor

import { Injectable } from '@angular/core';
import {
  HttpRequest,
  HttpHandler,
  HttpEvent,
  HttpInterceptor,
  HttpErrorResponse,
} from '@angular/common/http';
import { Observable, catchError, throwError } from 'rxjs';

@Injectable()
export class ErrorInterceptor implements HttpInterceptor {
  constructor() {}

  intercept(
    request: HttpRequest<any>,
    next: HttpHandler
  ): Observable<HttpEvent<any>> {
    return next.handle(request).pipe(
      catchError((error: HttpErrorResponse) => {
        // Handle the error here
        console.error('error occurred:', error);
        // throw error as per requirement
        return throwError(error);
      })
    );
  }
}

Provide an interceptor in the app module.
import { ErrorInterceptor } from './interceptors/error.interceptor';

  providers: [
    {
      provide: HTTP_INTERCEPTORS, useClass: ErrorInterceptor, multi: true
    }
  ]

Authentication Interceptor
CLI command: ng generate interceptor auth.
import { Injectable } from '@angular/core';
import { HttpEvent, HttpHandler, HttpInterceptor, HttpRequest } from '@angular/common/http';
import { Observable } from 'rxjs';
import { AuthService } from './auth.service'; // Service to get the token

@Injectable()
export class AuthInterceptor implements HttpInterceptor {
  constructor(private authService: AuthService) {}

  intercept(req: HttpRequest<any>, next: HttpHandler): Observable<HttpEvent<any>> {
    // Get the token from the AuthService
    const authToken = this.authService.getToken();

    // Clone the request and add the Authorization header
    const authReq = authToken
      ? req.clone({
          headers: req.headers.set('Authorization', `Bearer ${authToken}`),
        })
      : req;

    return next.handle(authReq);
  }
}


Create the AuthService
import { Injectable } from '@angular/core';

@Injectable({
  providedIn: 'root',
})
export class AuthService {
  private token: string | null = null;

  // Simulate storing and retrieving the token
  setToken(token: string): void {
    this.token = token;
  }

  getToken(): string | null {
    return this.token;
  }

  clearToken(): void {
    this.token = null;
  }
}


Register the Interceptor

import { NgModule } from '@angular/core';
import { HTTP_INTERCEPTORS } from '@angular/common/http';
import { AuthInterceptor } from './auth.interceptor';

@NgModule({
  providers: [
    {
      provide: HTTP_INTERCEPTORS,
      useClass: AuthInterceptor,
      multi: true, // Allow multiple interceptors
    },
  ],
})
export class AppModule {}


Handle Token Expiration

import { Router } from '@angular/router';
import { catchError } from 'rxjs/operators';
import { throwError } from 'rxjs';

@Injectable()
export class AuthInterceptor implements HttpInterceptor {
  constructor(private authService: AuthService, private router: Router) {}

  intercept(req: HttpRequest<any>, next: HttpHandler): Observable<HttpEvent<any>> {
    const authToken = this.authService.getToken();

    const authReq = authToken
      ? req.clone({
          headers: req.headers.set('Authorization', `Bearer ${authToken}`),
        })
      : req;

    return next.handle(authReq).pipe(
      catchError((error) => {
        if (error.status === 401) {
          // Redirect to login page on unauthorized response
          this.authService.clearToken();
          this.router.navigate(['/login']);
        }
        return throwError(error);
      })
    );
  }
}


AngularJS Hosting Europe - HostForLIFE.eu :: Using Angular to Create an Eye Catching Dashboard

clock March 17, 2025 07:29 by author Peter

With this post, we'll use Recharts with an Angular frontend and a Node.js backend to build a dashboard with stunning charts.

To concentrate on the UI for the time being, we will use hardcoded data. Real data can be connected later.

1.1 Install Angular CLI
Make sure you have Node.js installed. Then install Angular CLI globally:
npm install -g @angular/cli

1.2 Create a New Angular Project
ng new dashboard-app
cd dashboard-app

1.3  Create the Dashboard Component
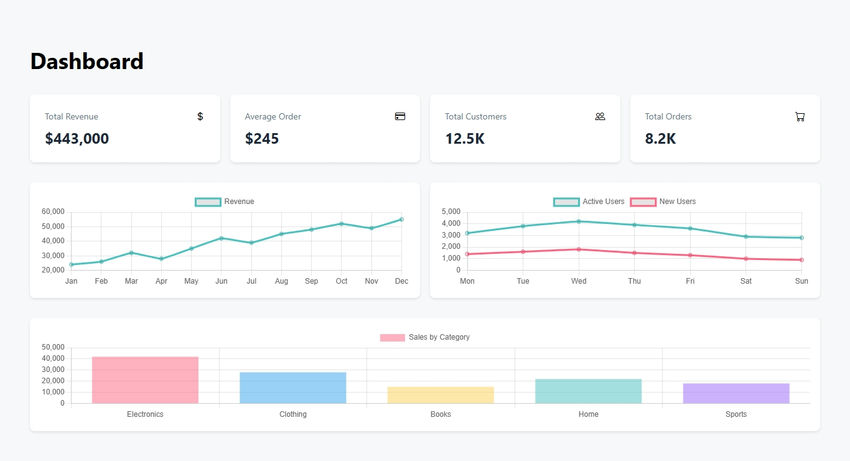
We’ll create a DashboardComponent with hardcoded data for revenue, user activity, and sales. The component uses Chart.js to render three charts: a line chart for revenue, a line chart for user activity, and a bar chart for sales by category.

Here’s the code for dashboard.component.ts:
import { Component, OnInit } from '@angular/core';
import { CommonModule } from '@angular/common';
import { Chart } from 'chart.js/auto';

interface ChartData {
  month: string;
  revenue: number;
}

@Component({
  selector: 'app-dashboard',
  standalone: true,
  imports: [CommonModule],
  template: `
    <div class="dashboard-container p-8">
      <h1 class="text-4xl font-bold mb-8">Dashboard</h1>

      <!-- Stats Grid -->
      <div class="stats-grid mb-8">
        <div class="stat-card" *ngFor="let stat of stats">
          <div class="stat-header">
            <span class="stat-title">{{stat.title}}</span>
            <i class="stat-icon" [class]="stat.icon"></i>
          </div>
          <div class="stat-value">{{stat.value}}</div>
        </div>
      </div>

      <!-- Charts -->
      <div class="charts-grid mb-8">
        <div class="chart-container">
          <canvas id="revenueChart"></canvas>
        </div>
        <div class="chart-container">
          <canvas id="userActivityChart"></canvas>
        </div>
      </div>

      <div class="chart-container">
        <canvas id="salesChart"></canvas>
      </div>
    </div>
  `,
  styles: [`
    .dashboard-container {
      max-width: 1400px;
      margin: 0 auto;
    }

    .stats-grid {
      display: grid;
      grid-template-columns: repeat(auto-fit, minmax(250px, 1fr));
      gap: 1rem;
    }

    .stat-card {
      background: white;
      padding: 1.5rem;
      border-radius: 8px;
      box-shadow: 0 2px 4px rgba(0,0,0,0.1);
    }

    .stat-header {
      display: flex;
      justify-content: space-between;
      align-items: center;
      margin-bottom: 0.5rem;
    }

    .stat-title {
      font-size: 0.875rem;
      color: #64748b;
    }

    .stat-value {
      font-size: 1.5rem;
      font-weight: bold;
      color: #1e293b;
    }

    .charts-grid {
      display: grid;
      grid-template-columns: repeat(auto-fit, minmax(400px, 1fr));
      gap: 1rem;
    }

    .chart-container {
      background: white;
      padding: 1rem;
      border-radius: 8px;
      box-shadow: 0 2px 4px rgba(0,0,0,0.1);
    }
  `]
})
export class DashboardComponent implements OnInit {
  stats = [
    { title: 'Total Revenue', value: '$443,000', icon: 'bi bi-currency-dollar' },
    { title: 'Average Order', value: '$245', icon: 'bi bi-credit-card' },
    { title: 'Total Customers', value: '12.5K', icon: 'bi bi-people' },
    { title: 'Total Orders', value: '8.2K', icon: 'bi bi-cart' }
  ];

  revenueData = {
    labels: ['Jan', 'Feb', 'Mar', 'Apr', 'May', 'Jun', 'Jul', 'Aug', 'Sep', 'Oct', 'Nov', 'Dec'],
    datasets: [{
      label: 'Revenue',
      data: [24000, 26000, 32000, 28000, 35000, 42000, 39000, 45000, 48000, 52000, 49000, 55000],
      borderColor: 'rgb(75, 192, 192)',
      tension: 0.1
    }]
  };

  userActivityData = {
    labels: ['Mon', 'Tue', 'Wed', 'Thu', 'Fri', 'Sat', 'Sun'],
    datasets: [
      {
        label: 'Active Users',
        data: [3200, 3800, 4200, 3900, 3600, 2900, 2800],
        borderColor: 'rgb(75, 192, 192)',
        tension: 0.1
      },
      {
        label: 'New Users',
        data: [1400, 1600, 1800, 1500, 1300, 1000, 900],
        borderColor: 'rgb(255, 99, 132)',
        tension: 0.1
      }
    ]
  };

  salesData = {
    labels: ['Electronics', 'Clothing', 'Books', 'Home', 'Sports'],
    datasets: [{
      label: 'Sales by Category',
      data: [42000, 28000, 15000, 22000, 18000],
      backgroundColor: [
        'rgba(255, 99, 132, 0.5)',
        'rgba(54, 162, 235, 0.5)',
        'rgba(255, 206, 86, 0.5)',
        'rgba(75, 192, 192, 0.5)',
        'rgba(153, 102, 255, 0.5)'
      ]
    }]
  };

  constructor() {}

  ngOnInit(): void {
    this.createCharts();
  }

  private createCharts(): void {
    // Revenue Chart
    new Chart('revenueChart', {
      type: 'line',
      data: this.revenueData,
      options: {
        responsive: true,
        maintainAspectRatio: false
      }
    });

    // User Activity Chart
    new Chart('userActivityChart', {
      type: 'line',
      data: this.userActivityData,
      options: {
        responsive: true,
        maintainAspectRatio: false
      }
    });

    // Sales Chart
    new Chart('salesChart', {
      type: 'bar',
      data: this.salesData,
      options: {
        responsive: true,
        maintainAspectRatio: false
      }
    });
  }
}


Code in app.component.ts

import { Component } from '@angular/core';
import { RouterOutlet } from '@angular/router';
import { CommonModule } from '@angular/common';

@Component({
  selector: 'app-root',
  standalone: true,
  imports: [RouterOutlet, CommonModule],
  template: `
    <div class="app-container">
      <router-outlet></router-outlet>
    </div>
  `,
  styles: [`
    .app-container {
      min-height: 100vh;
      background-color: #f8f9fa;
      padding: 1rem;
    }
  `]
})
export class AppComponent {
  title = 'dashboard';
}


Code for not-found.component.ts
import { Component } from '@angular/core';
import { CommonModule } from '@angular/common';

@Component({
  selector: 'app-not-found',
  standalone: true,
  imports: [CommonModule],
  template: `
    <div class="not-found-container">
      <div class="error-card">
        <div class="error-header">
          <i class="bi bi-exclamation-circle text-red-500"></i>
          <h1>404 Page Not Found</h1>
        </div>
        <p>The page you're looking for doesn't exist.</p>
      </div>
    </div>
  `,
  styles: [`
    .not-found-container {
      min-height: 100vh;
      display: flex;
      align-items: center;
      justify-content: center;
      background-color: #f8f9fa;
      padding: 1rem;
    }

    .error-card {
      background: white;
      padding: 2rem;
      border-radius: 8px;
      box-shadow: 0 2px 4px rgba(0,0,0,0.1);
      max-width: 400px;
      width: 100%;
    }

    .error-header {
      display: flex;
      align-items: center;
      gap: 0.5rem;
      margin-bottom: 1rem;
    }

    h1 {
      font-size: 1.5rem;
      font-weight: bold;
      color: #1e293b;
    }

    p {
      color: #64748b;
    }
  `]
})
export class NotFoundComponent {}

import { Routes } from '@angular/router';

export const routes: Routes = [
  {
    path: '',
    loadComponent: () => import('./dashboard/dashboard.component')
      .then(m => m.DashboardComponent)
  },
  {
    path: '**',
    loadComponent: () => import('./not-found/not-found.component')
      .then(m => m.NotFoundComponent)
  }
];

Server Side code - index.js
import express, { type Request, Response, NextFunction } from "express";
import { registerRoutes } from "./routes";
import path from "path";
import { fileURLToPath } from "url";
import { dirname } from "path";

const __filename = fileURLToPath(import.meta.url);
const __dirname = dirname(__filename);

const app = express();
app.use(express.json());
app.use(express.urlencoded({ extended: false }));

// Logging middleware
app.use((req, res, next) => {
  const start = Date.now();
  const path = req.path;
  let capturedJsonResponse: Record<string, any> | undefined = undefined;

  const originalResJson = res.json;
  res.json = function (bodyJson, ...args) {
    capturedJsonResponse = bodyJson;
    return originalResJson.apply(res, [bodyJson, ...args]);
  };

  res.on("finish", () => {
    const duration = Date.now() - start;
    if (path.startsWith("/api")) {
      let logLine = `${req.method} ${path} ${res.statusCode} in ${duration}ms`;
      if (capturedJsonResponse) {
        logLine += ` :: ${JSON.stringify(capturedJsonResponse)}`;
      }

      if (logLine.length > 80) {
        logLine = logLine.slice(0, 79) + "…";
      }

      console.log(`${new Date().toLocaleTimeString()} [express] ${logLine}`);
    }
  });

  next();
});

(async () => {
  const server = await registerRoutes(app);

  app.use((err: any, _req: Request, res: Response, _next: NextFunction) => {
    const status = err.status || err.statusCode || 500;
    const message = err.message || "Internal Server Error";
    res.status(status).json({ message });
    throw err;
  });

  // Serve static files from the Angular build output directory
  const distPath = path.resolve(__dirname, "..", "dist", "public");
  app.use(express.static(distPath));

  // Always return index.html for any non-API routes (Angular routing)
  app.get("*", (_req, res) => {
    res.sendFile(path.join(distPath, "index.html"));
  });

  const port = 5000;
  server.listen({
    port,
    host: "0.0.0.0",
    reusePort: true,
  }, () => {
    console.log(`${new Date().toLocaleTimeString()} [express] serving on port ${port}`);
  });
})();

angular.json file
{
  "$schema": "./node_modules/@angular/cli/lib/config/schema.json",
  "version": 1,
  "newProjectRoot": "projects",
  "projects": {
    "dashboard": {
      "projectType": "application",
      "schematics": {},
      "root": "client",
      "sourceRoot": "client/src",
      "prefix": "app",
      "architect": {
        "build": {
          "builder": "@angular-devkit/build-angular:browser",
          "options": {
            "outputPath": "dist/public",
            "index": "client/src/index.html",
            "main": "client/src/main.ts",
            "polyfills": ["zone.js"],
            "tsConfig": "tsconfig.json",
            "assets": [
              "client/src/favicon.ico",
              "client/src/assets"
            ],
            "styles": [
              "client/src/styles.css",
              "node_modules/bootstrap-icons/font/bootstrap-icons.css"
            ],
            "scripts": []
          },
          "configurations": {
            "production": {
              "budgets": [
                {
                  "type": "initial",
                  "maximumWarning": "500kb",
                  "maximumError": "1mb"
                },
                {
                  "type": "anyComponentStyle",
                  "maximumWarning": "2kb",
                  "maximumError": "4kb"
                }
              ],
              "fileReplacements": [
                {
                  "replace": "client/src/environments/environment.ts",
                  "with": "client/src/environments/environment.prod.ts"
                }
              ],
              "outputHashing": "all"
            },
            "development": {
              "buildOptimizer": false,
              "optimization": false,
              "vendorChunk": true,
              "extractLicenses": false,
              "sourceMap": true,
              "namedChunks": true
            }
          },
          "defaultConfiguration": "production"
        },
        "serve": {
          "builder": "@angular-devkit/build-angular:dev-server",
          "configurations": {
            "production": {
              "browserTarget": "dashboard:build:production"
            },
            "development": {
              "browserTarget": "dashboard:build:development"
            }
          },
          "defaultConfiguration": "development"
        }
      }
    }
  }
}

This post showed how to use Angular and Node.js to create an eye-catching dashboard. We produced adaptable and interactive charts that make data come to life by utilizing Chart.js. This stack is perfect for creating scalable apps because of Angular's modular design and Node.js's speed. Additional charts, authentication, and the integration of real-time data sources are possible future enhancements. You may design dashboards of expert quality that meet your demands with this base.


AngularJS Hosting Europe - HostForLIFE.eu :: Feature-Rich User Management System in Angular

clock March 12, 2025 08:56 by author Peter

In this comprehensive guide, we'll build a modern User Management System using Angular. This application showcases several advanced features including theme switching, undo/redo functionality, and robust data management.


Table of Contents

Project Overview

  • Architecture and Design
  • Core Features Implementation
  • Services Implementation
  • Component Development
  • Advanced Features
  • Best Practices and Tips

Project Overview
Our User Management System includes the following features.

  • Modern, responsive design with light/dark theme support
  • Interactive data grid with in-place editing
  • Complete CRUD operations with validation
  • Undo/Redo functionality
  • Data export capabilities (Excel, PDF, PNG)
  • Loading placeholders
  • Enhanced user experience with tooltips
  • Form validation with error messages
  • Duplicate entry prevention
  • Confirmation dialogs
  • Local storage persistence
  • Reusable components

Architecture and Design
Project Structure
src/
├── app/
│   ├── components/
│   │   ├── user-grid/
│   │   └── shared/
│   ├── services/
│   │   ├── user.service.ts
│   │   ├── theme.service.ts
│   │   └── data.service.ts
│   └── models/
│       └── user.model.ts

Core Models

// user.model.ts
export interface User {
    id?: number;
    name: string;
    userName: string;
    email: string;
    phone: string;
    website: string;
}
export interface UserState {
    users: User[];
    undoStack: User[][];
    redoStack: User[][];
}


Core Features Implementation
Theme Service: The theme service manages application-wide theme switching.
    @Injectable({
      providedIn: 'root'
    })
    export class ThemeService {
      private isDarkTheme = new BehaviorSubject<boolean>(false);
      isDarkTheme$ = this.isDarkTheme.asObservable();
      constructor() {
        const savedTheme = localStorage.getItem('theme');
        if (savedTheme) {
          this.setDarkTheme(savedTheme === 'dark');
        }
      }
      setDarkTheme(isDark: boolean) {
        this.isDarkTheme.next(isDark);
        localStorage.setItem('theme', isDark ? 'dark' : 'light');
        document.body.classList.toggle('dark-theme', isDark);
      }
    }


User Service: The User Service handles all data operations with undo/redo support.
@Injectable({
  providedIn: 'root'
})
export class UserService {
  private readonly STORAGE_KEY = 'user_data';

  private state: UserState = {
    users: [],
    undoStack: [],
    redoStack: []
  };

  private usersSubject = new BehaviorSubject<User[]>([]);
  users$ = this.usersSubject.asObservable();

  // CRUD Operations with Undo/Redo Support
  addUser(user: User): boolean {
    if (this.isDuplicate(user)) return false;

    this.pushToUndoStack();
    user.id = this.getNextId();
    this.state.users.push(user);
    this.updateState();

    return true;
  }

  // Additional methods for update, delete, undo, redo
}

Data Grid Component: The main grid component implements the user interface.
@Component({
  selector: 'app-user-grid',
  template: `
    <div class="user-grid-container" [class.dark-theme]="isDarkTheme$ | async">
      <div class="header">
        <h2>User Management</h2>
        <div class="actions">
          <app-button (click)="addNewUser()">Add User</app-button>
          <app-button (click)="toggleTheme()">Toggle Theme</app-button>
        </div>
      </div>
      <!-- Grid implementation -->
    </div>
  `
})
export class UserGridComponent implements OnInit {
  users$ = this.userService.getUsers();
  isDarkTheme$ = this.themeService.isDarkTheme$;

  constructor(
    private userService: UserService,
    private themeService: ThemeService
  ) {}
}


Advanced Features
Export Functionality

export class ExportService {
  exportToExcel(data: User[]) {
    const worksheet = XLSX.utils.json_to_sheet(data);
    const workbook = XLSX.utils.book_new();
    XLSX.utils.book_append_sheet(workbook, worksheet, 'Users');
    XLSX.writeFile(workbook, 'users.xlsx');
  }
  // Similar methods for PDF and PNG export
}


Loading Placeholders
<ng-container *ngIf="loading$ | async; else userGrid">
  <div class="placeholder-grid">
    <div class="placeholder-row" *ngFor="let i of [1, 2, 3, 4, 5]">
      <!-- Placeholder content -->
    </div>
  </div>
</ng-container>

Form Validation
export class UserFormComponent {
  userForm = this.fb.group({
    name: ['', [Validators.required, Validators.minLength(2)]],
    email: ['', [Validators.required, Validators.email]],
    userName: ['', [Validators.required, Validators.pattern('[a-zA-Z0-9_-]*')]],
    // Additional form controls
  });
}

Tips

  • State Management
    • Use BehaviorSubject for reactive state management
    • Implement undo/redo using stack data structures
    • Persist state changes to localStorage
  • Performance Optimization
    • Use OnPush change detection strategy
    • Implement trackBy functions for ngFor loops
    • Lazy load features when possible
  • Error Handling
    • Implement comprehensive error handling
    • Use toast notifications for user feedback
    • Log errors appropriately

This User Management System demonstrates several Angular best practices and advanced features. Key takeaways include.

  • Proper service architecture for state management
  • Implementing complex features like undo/redo
  • Creating reusable components
  • Managing application themes
  • Handling data persistence
  • Form validation and error handling


AngularJS Hosting Europe - HostForLIFE.eu :: Scalable Apps' Invisible Architects of Dependency and Services

clock March 7, 2025 06:33 by author Peter

Have you ever wondered how Angular apps seem to handle intricate dependencies and logic with ease? The magic that happens behind the scenes with services and dependency injection (DI) is frequently the key. These Angular features are the unsung heroes that drive the scalability and maintainability of your app, despite the fact that they might sound like catchphrases.

In-depth discussions of services, their creation and usage, and how Angular's DI system may help you manage dependencies more efficiently will all be covered in this article. Consider this your backstage ticket to learning the architecture of Angular, where we will unravel the intricacies of DI and demonstrate how to use it to improve the modularity, testability, and—above all—efficiency of your application.

Let's get started and discover Angular's services and DI capability!

Services
For an easier understanding, we will use the analogy of a remote control.
You do not need to go up to the TV to change channels, adjust the volume, or turn it on and off. You just use the remote (service), which is always there, to perform these actions from a distance.

In Angular, services are like this remote. Components don’t need to directly handle or interact with complex logic or data—they just "press a button" (call a service method), and the service handles the rest. It simplifies things and keeps everything within easy reach.

Another important aspect is reusability. With a universal remote control, you can control multiple devices. Instead of having to adjust each device manually or have a separate remote for each, the universal remote lets you control all these devices with just one tool.

In Angular, a service is a reusable piece of code that you can "call" from any component in your app. Whether it is fetching data, performing a calculation, or handling complex logic, you don’t have to rewrite the same functionality in multiple components. You simply "press the button" (call the service) wherever it is needed, and the service does the job, ensuring that your app remains clean, DRY (Don’t Repeat Yourself), and easy to maintain.

Services maximize reusability and provide a better code structure for your project.

When to use a service?

In Angular, a service should be used when you need to:

  • Share data or logic across components: Services provide a central place where data or business logic can be shared across multiple components, so you don't have to duplicate code in each component.
  • Encapsulate business logic: If you have complex logic or operations that don’t belong directly in a component, putting them in service makes your code cleaner and more maintainable.
  • Make HTTP requests: Services are commonly used for interacting with back-end APIs. Instead of having HTTP requests directly inside components, you use services to handle all the communication with the server.
  • Manage state: Services can manage the state of your application, like keeping track of user authentication, settings, or preferences, and can keep this state consistent across components.
  • Improve testability: By separating business logic into services, you can more easily write unit tests for that logic. It also allows mocking or stubbing services in tests to isolate components.

Creating a service

  • Create your angular project
  • Create the service you need using the following command

ng generate service <<name of the service>>

If you need to create the service in a specific file, you can modify the command slightly as follows:
ng generate service <<folder-path/name_of_the_service>>

For our demo, we will create our service in the ‘my-services-folder’ folder and call it ‘my-first-service’. We will use this command: ng generate service my-services-folder/my-first-service

Once the command is successfully executed, you will see the following:

The project will include the following:

When you open the service.ts file, you will see the following file already created for you:

You can start writing your functions under the constructor [as from line 9].

Note. A common practice is to have API calls in services. For the sake of simplicity, a function returning a welcome note is used in our example.

At this point, we have successfully created a service.

Inject and use a service

Think of it like this: if you are building a car, instead of the car having to make its own engine, wheels, and seats, someone (like a supplier) gives those parts to the car so it can assemble them.

Dependency injection (DI) is a way to provide components with access to services and other resources.

In our example, we will inject our ‘MyFirstService’ in the ‘app component’ and use the getGreeting function. This will allow us to reuse the function. Remember that, the same steps apply to any component you would want to inject the service.

Open the component you want to inject the service and pass the service in the constructor.
In our case, we will do it in the app.component.ts

Create a function that will call the required function from the service. You can also call it from the ngOnInit as well. It all depends on your use cases.

Create the html template to get and display the information and trigger the function call.
In our case, we will create in the app.component.html

Note. On line 2, we are using [(ngModel)]. This is called 2-way binding.
When using it, you need to add ‘FormsModule’ under ‘imports’ in the component’s module file; in our case, app.module.ts.


Below is what the end result looks like:


Conclusion
Angular's core ideas of services and dependency injection aid in organizing your application in a way that is modular, testable, and manageable. Dependency injection makes sure that these services are delivered in a flexible and effective way, while services allow you to encapsulate reusable functionality and communicate data across many components. Correct DI setup enables loose connection between services and components, which facilitates code scalability and modification as your application expands. You can write code that follows best practices in Angular development and is cleaner and easier to maintain if you have a firm grasp of services and DI.


About HostForLIFE.eu

HostForLIFE.eu is European Windows Hosting Provider which focuses on Windows Platform only. We deliver on-demand hosting solutions including Shared hosting, Reseller Hosting, Cloud Hosting, Dedicated Servers, and IT as a Service for companies of all sizes.

We have offered the latest Windows 2016 Hosting, ASP.NET Core 2.2.1 Hosting, ASP.NET MVC 6 Hosting and SQL 2017 Hosting.


Tag cloud

Sign in