Full Trust European Hosting

BLOG about Full Trust Hosting and Its Technology - Dedicated to European Windows Hosting Customer

Node.js Hosting Europe - HostForLIFE.eu :: npm vs yarn vs pnpm

clock September 20, 2023 08:39 by author Peter

Let's look at the differences between npm, yarn, and pnpm in this blog. Package managers such as npm, yarn, and pnpm are extensively used in the JavaScript ecosystem to manage dependencies and packages for Node.js projects. They take different approaches and have distinct features, which can affect how they manage packages and interact with your project.

npm

npm is the default package manager for Node.js and is included with the installation of Node.js. It has a lengthy history and is frequently used in the JavaScript ecosystem. To store and distribute packages, npm makes use of a centralized package registry known as the npm registry. It adds a "node_modules" directory to your project and installs all project dependencies there.

// Install a package
npm install package-name

//Update a package
npm update package-name

// Remove a package
npm uninstall package-name


yarn

// Install a package
yarn add package-name

// update a package
yarn upgrade package-name

// Remove a package
yarn remove package-name


pnpm

pnpm is another package manager for Node.js projects. It aims to solve the issue of disk space usage by using a unique approach. Instead of creating a separate "node_modules" directory for each project, pnpm uses a single global package store and creates symlinks to the required packages in each project's "node_modules" directory. This can significantly reduce the amount of disk space used by your projects.

// Install a package
pnpm add package-name

// update a package
pnpm update package-name

//Remove a package
pnpm remove package-name


HostForLIFE.eu Node.js Hosting
HostForLIFE.eu is European Windows Hosting Provider which focuses on Windows Platform only. We deliver on-demand hosting solutions including Shared hosting, Reseller Hosting, Cloud Hosting, Dedicated Servers, and IT as a Service for companies of all sizes. We have customers from around the globe, spread across every continent. We serve the hosting needs of the business and professional, government and nonprofit, entertainment and personal use market segments.


AngularJS Hosting Europe - HostForLIFE.eu :: What is Angular Dependency Injection?

clock September 15, 2023 09:16 by author Peter

Dependency Injection (DI) is a core Angular design pattern that aids in the management of dependencies as well as the flow of data and services inside an application. It allows for loose coupling between components, which makes your code more modular, maintainable, and testable.

Why are We using Dependency Injection and without dependency using what problem in real-life example?

Real-Life Example: A Car Factory
Imagine you're managing a car manufacturing factory. In your factory, you have various assembly lines responsible for different parts of the car, such as the engine, chassis, electronics, and tires. Each assembly line relies on specific tools and materials to complete its tasks.

Now, think about how you might manage these dependencies in your car factory.

  • No Dependency Injection (DI): Without dependency injection, each assembly line would have to manage its own dependencies. For example:
    • The engine assembly line would need to procure and maintain its own inventory of engines, tools, and spare parts.
    • The electronics assembly line would need to do the same for electronic components.
    • The tire assembly line would need its own inventory of tires and tire-related equipment.
  • This approach would lead to several problems.
    • Duplication of effort: Each assembly line would have to manage its dependencies separately, resulting in duplicated resources and potential inconsistencies.
    • Maintenance nightmare: If a tool or part needed to be updated or replaced, every assembly line using that tool or part would need to be individually updated.
    • Lack of flexibility: Changing or upgrading components or tools across multiple assembly lines would be challenging and error-prone.
  • Dependency Injection (DI) in the Car Factory: Now, let's introduce dependency injection into the car factory.
    • You create a central inventory management system (akin to Angular's dependency injection container).
    • Each assembly line declares its dependencies on the central system.
    • When an assembly line needs an engine, electronics, or tires, it requests them from the central inventory system (dependency injection).
    • The central system ensures that each assembly line gets the correct parts and tools.
  • Benefits of this approach.
    • Centralized control: You have a single point of control for managing all dependencies, making it easier to update, replace, or upgrade tools and components.
    • Consistency: All assembly lines use the same source for their dependencies, ensuring consistency and reducing errors.
    • Flexibility: You can easily switch out components or tools across the factory by updating the central inventory system.

In Angular
In Angular applications, components, services, and other parts of the application often have dependencies. Dependency injection works similarly to the car factory example:

Angular's DI container manages dependencies and ensures that each component or service gets the correct instances of the dependencies it needs.
This promotes modularity, maintainability, and testability in your Angular application, as you can easily swap out components or services without modifying each dependent part individually.

So, in both the car factory and Angular, dependency injection simplifies management, promotes consistency, and makes it easier to adapt to changes in the dependencies, ultimately leading to more efficient and maintainable systems.

In Angular How to Achieve!
In Angular, dependency injection is achieved through the built-in dependency injection system. Here's how you can achieve dependency injection in Angular.

Step 1. Create Service in your Application
First, you need to create a service that provides the functionality or data you want to inject into other components. Services are classes annotated with the @Injectable decorator. What are the services using this Application? All the functionalities of the service to implemented in the servicefile.

import { HttpClient } from '@angular/common/http';
import { Injectable } from '@angular/core';
import { environment } from 'src/environments/environment';

@Injectable({
  providedIn: 'root'
})

export class EmployeeService {

  EmpApi= environment.EmployeeAPI;
  constructor(private http:HttpClient) { }

  GetEmployeeList(){
    return this.http.get(this.EmpApi+'Employee/List');
  }
}

Step 2. Inject Service into Components
Next, you inject the service into the components or other services where you need it. You can do this by including the service as a parameter in the constructor of the component or service that requires it. Angular's dependency injection system will take care of providing an instance of the service automatically.


import { Component, OnInit } from '@angular/core';
import { EmployeeService } from 'src/app/Service/employee.service';
import { FormBuilder, FormGroup } from '@angular/forms';
import { Router } from '@angular/router';

@Component({

  selector: 'app-employee-list',
  templateUrl: './employee-list.component.html',
  styleUrls: ['./employee-list.component.css']

})

export class EmployeeListComponent implements OnInit  {

  collectionData: any;
  iframeSrc!: string;
  constructor( private empService:EmployeeService,private route: Router){

  }

  ngOnInit(): void {
   this.empList();
  }

  empList(){
    return this.empService.GetEmployeeList().subscribe((res:any)=>{
      this.collectionData=res.data;

    })
  }
}

Conclusion
That's it! With these steps, you've achieved dependency injection in Angular. The Angular framework will take care of creating and managing the service instances and injecting them where needed, promoting modularity and maintainability in your application.


European Visual Studio Hosting - HostForLIFE :: Boosting Your Productivity with .NET Core CLI Commands

clock September 12, 2023 09:47 by author Peter

In this post, I'll show you how to increase your productivity using.NET Core CLI Commands and how to use.NET Core CLI (Command Line Interface) commands to assist developers speed up their work with a few tips and tricks. We can create, build, add packages, restore packages, run apps, and deploy Core applications using the.Net CLI. I'll go over basic operations like establishing new projects, compiling and running programs, managing dependencies, and working with NuGet packages.

Increasing Productivity with the Command Line Interface in Visual Studio
When we develop a new application in Visual Studio, we use.Net CLI commands internally to create, build, add packages, launch, and deploy apps.

When you install the.NET Core SDK, the.NET Core CLI is also installed by default. As a result, no additional installation is required.CLI for Net Core.
How can I tell if.Net CLI is installed or not?

Open Run and type CMD.

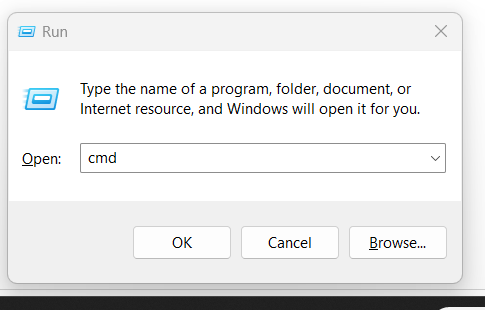
When the command prompt appears, type dotnet and press enter.

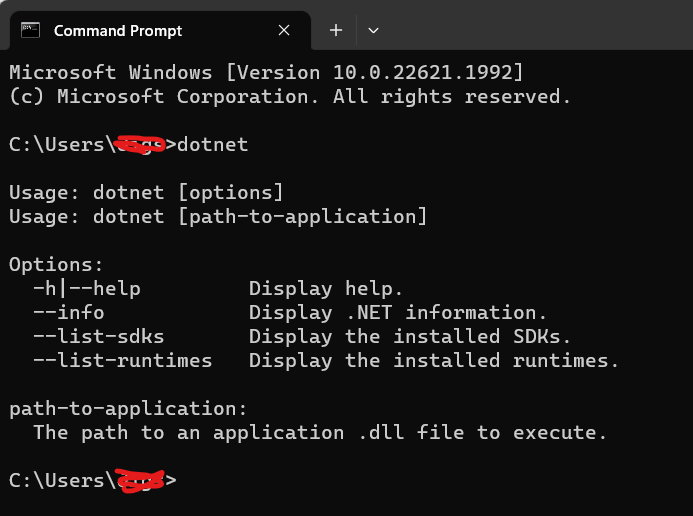
CLI Command Syntax: dotnet command> argument> option>
Take note that all commands begin with dotnet. The syntax shown above will assist developers in executing essential instructions from the command-line interface. Let's use the first command (dotnet help) to get help for all commands.

How do I obtain a complete list of all.Net Core commands?


List of all .Net Core commands

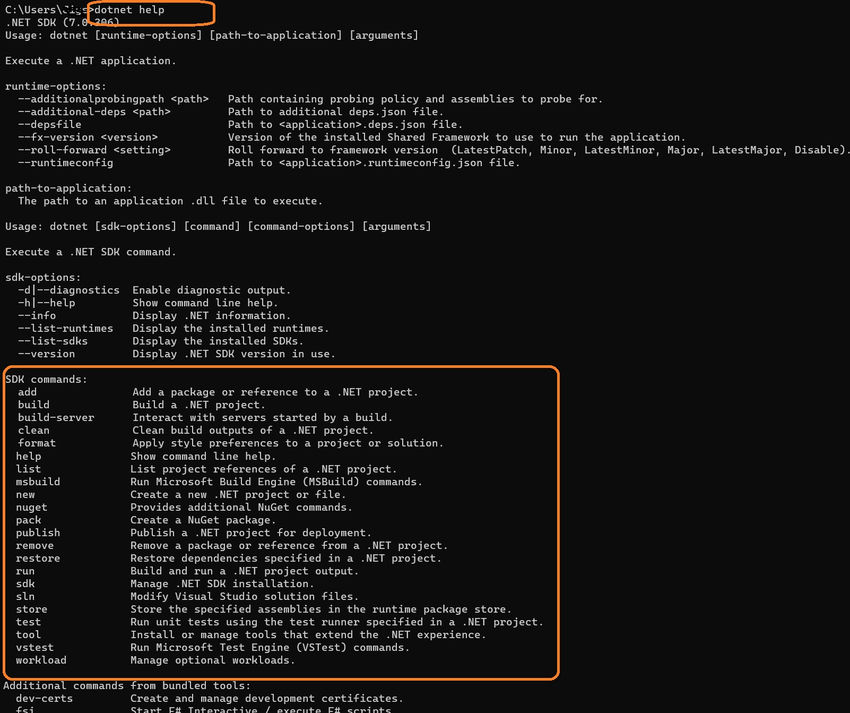
Below is a list of all .Net core commands that will appear once we run the "dotnet help" command. Let's list down all commands as below with a short description of what each does.

SDK commands

  • add:  Add a package or reference to a .NET project
  • build: Build a .NET project
  • build-server: Interact with servers started by a build
  • clean: Clean build outputs of a .NET project
  • format: Apply style preferences to a project or solution
  • help: Show command line help
  • list: List project references of a .NET project
  • msbuild: Run Microsoft Build Engine (MSBuild) commands.
  • new: Create a new .NET project or file.
  • NuGet: Provides additional NuGet commands.
  • pack: Create a NuGet package.
  • publish: Publish a .NET project for deployment
  • remove: Remove a package or reference from a .NET project.
  • restore: Restore dependencies specified in a .NET project.
  • run: Build and run a .NET project output.
  • SDK: Manage .NET SDK installation.
  • sln: Modify Visual Studio solution files.
  • store: Store the specified assemblies in the runtime package store.
  • test: Run unit tests using the test runner specified in a .NET project.
  • tool: Install or manage tools that extend the .NET experience.
  • vstest:  Run Microsoft Test Engine (VSTest) commands.
  • workload: Manage optional workloads.

How to create a new console project?
Let's create a new console project using the "dotnet new" Command.
dotnet new console -n MyConsoleAppUsingCLI -o C:\Users\XXXXX\projects\MyConsoleAppUsingCli

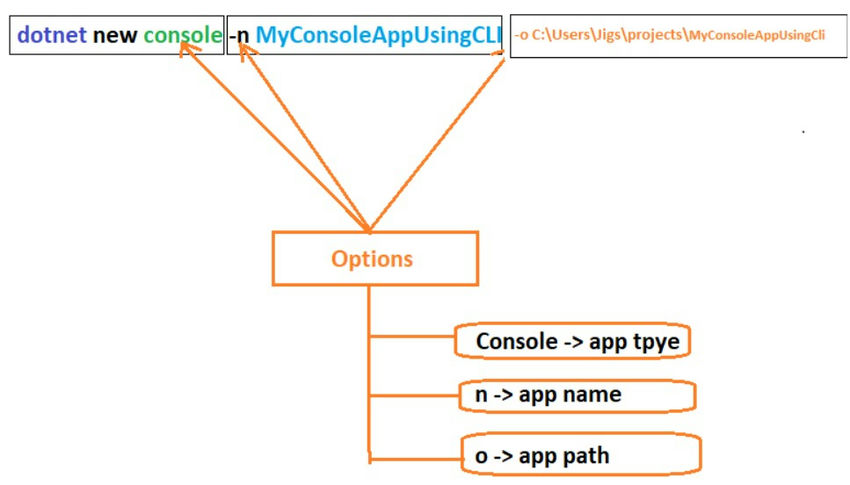
Once the above Command runs successfully, We are able to create a console application with the name "MyConsoleAppUsingCli" at the given path "C:\Users\XXXXX\projects\". Let's build the newly created project using the build command.

Build Command: dotnet build C:\Users\peter\projects\MyConsoleAppUsingCli\

Once we run the build command, As per the above screen, the project build succeeded.

How to add a package reference to the new console application?
Let's add a package reference to the new console application using the add package CLI command.


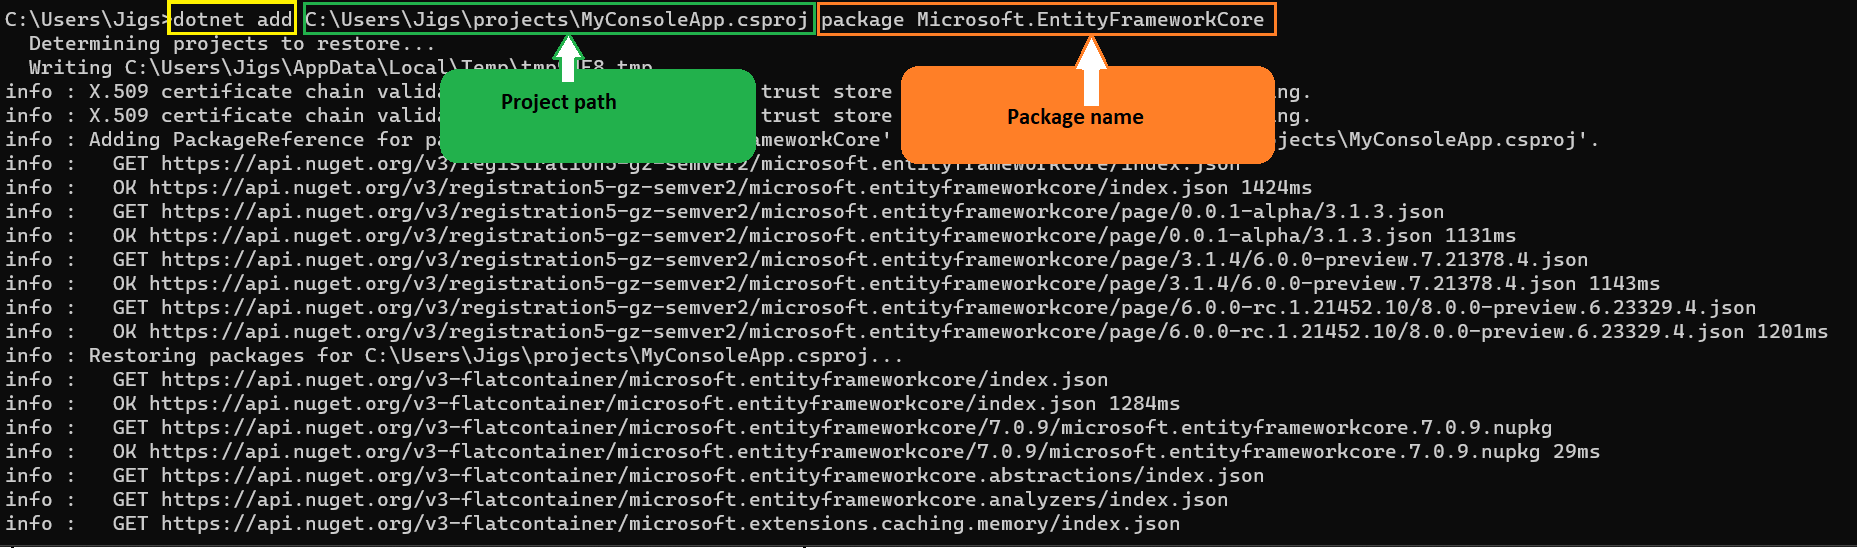
We have added the package "Microsoft.EntityFrameworkCore" to our project. Let's open our console app in Visual Studio and check the newly added package reference in the solution.

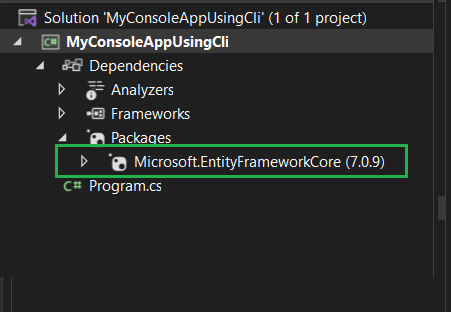
As per the above screen, We are able to see Microsoft.EntityFrameworkCore package reference was added successfully.

Run the project using Run CLI Command

Run project using Run CLI Command: dotnet run --project C:\Users\peter\projects\MyConsoleAppUsingCli\MyConsoleAppUsingCli.csproj

In this article, I have demonstrated how to boost productivity with Visual Studio's command-line interface. CLI is very powerful and is used for developing, running, and publishing applications. We have covered essential commands like creating new projects, compiling and running applications, managing dependencies, and handling NuGet packages in console applications. Here I have explained the basic commands required to set up a project and run the new project, but you can explore more on other commands and leverage the power of the.NET Core CLI for streamlined and productive development projects.


Node.js Hosting Europe - HostForLIFE.eu :: Using Immer to Navigate State Management in JavaScript

clock September 6, 2023 09:48 by author Peter

Wrangling application state is a vital skill in the dynamic arena of web development. Keeping code tidy and predictable can be difficult, but the introduction of tools like Immer has provided a breath of fresh air in this sector. Immer has won the hearts of developers all over the world with its ease of use and efficiency in dealing with state changes. This essay will take you on a journey into the world of Immer, looking into its practical implementation, benefits, and how it makes the sometimes difficult chore of state management in JavaScript a lot easier.

Immer, lovingly created by Michel Weststrate, is a library that changes the way we deal with data immutability. It enables us to write code that appears to modify state directly while actually orchestrating the construction of new, immutable state structures.1. Starting Out: InstallationLet's begin your Immer trip by installing the library with npm or yarn.
npm install immer

2. Basic Usage
At the core of Immer is a function called produce. It's the magic wand that takes your current state and a function containing your desired changes and works its enchantment.

import produce from 'immer';

const initialState = { count: 0 };

const nextState = produce(initialState, draftState => {
  draftState.count += 1;
});


3. Taming Nesting
Now comes the pièce de résistance. Immer's prowess shines when dealing with deeply nested objects and arrays. It simplifies complex state structures with ease.
const complexState = {
  user: {
    name: 'Alice',
    address: {
      city: 'Wonderland'
    }
  }
};

const newState = produce(complexState, draftState => {
  draftState.user.name = 'Bob';
  draftState.user.address.city = 'Dreamland';
});


Benefits
    Crystal Clarity: Immer brings lucidity to your code. Instead of fretting about cloning and immutability, you can focus on the changes you wish to make.
    Performance Star: The magic of Immer not only simplifies your code but optimizes performance by reducing memory overhead and avoiding redundant copying.
    Readable Harmony: Code created with Immer mirrors traditional mutable code, fostering understanding and maintainability.

Conclusion

Immer has reimagined the landscape of state management in JavaScript applications. Its knack for handling immutable updates effortlessly, coupled with an approachable syntax, is nothing short of revolutionary. By streamlining the intricate dance of cloning and immutability checks, Immer reduces error risks and transforms the development experience.

In the ever-evolving world of web development, where efficiency and maintainability are paramount, Immer emerges as a steadfast ally. Whether you're working on a modest project or an intricate application, incorporating Immer into your state management arsenal offers cleaner, bug-free code and boosts developer productivity.

So, as you embark on your coding escapades, remember that Immer isn't just a library; it's a compass that guides you through the labyrinth of state management, making your journey more delightful and your code more enchanting.


About HostForLIFE.eu

HostForLIFE.eu is European Windows Hosting Provider which focuses on Windows Platform only. We deliver on-demand hosting solutions including Shared hosting, Reseller Hosting, Cloud Hosting, Dedicated Servers, and IT as a Service for companies of all sizes.

We have offered the latest Windows 2016 Hosting, ASP.NET Core 2.2.1 Hosting, ASP.NET MVC 6 Hosting and SQL 2017 Hosting.


Tag cloud

Sign in