Full Trust European Hosting

BLOG about Full Trust Hosting and Its Technology - Dedicated to European Windows Hosting Customer

AngularJS Hosting - HostForLIFE.eu :: How to Filtering and Sorting HTML Table Data With AngularJS?

clock May 27, 2015 08:08 by author Peter

Now, I am going to tell you about How to Filtering and Sorting HTML Table Data With AngularJS. There should be three cascading dropdowns to filter the data in the table. You should also be able to sort the table. And here is the following code:

    angular.module('tableApp', []) 
    .controller('tableCtrl', ['$scope', '$http', '$timeout',function($scope, $http)  
    {                
         $http.get('tableData/practionerData.json').success(function(data) 
         { 
             $scope.practionerData = data;                        
         } 
         ); 
         $http.get('tableData/practionerType.json').success(function(practionerdata) 
         { 
              $scope.practionerType = practionerdata;      
         }           
         );
         $http.get('tableData/practionersByType.json').success(function(practionersByType) 
         { 
               $scope.practionersByType = practionersByType;       
         }           
         );
         $http.get('tableData/OrganizationByPractioners.json').success(function(OrganizationByPractioners) 
         { 
               $scope.OrganizationByPractioners = OrganizationByPractioners;                
         }  
         ); 
      }   
    ]) 


Next step, I am going to populating the data in $scope with the JSON file. I can do it with the web service also. I can also post the scope data to the server with the web service. And here is the HTML page code:
    <!DOCTYPE html> 
    <html lang='en' ng-app='tableApp'> 
    <head>      
    <title>Table Example</title>     
        <script src='https://ajax.googleapis.com/ajax/libs/angularjs/1.2.9/angular.js'></script>     
        <script src='js/controller.js' type='text/javascript'></script> 
        <link href='style.css' type='text/css' rel='stylesheet' /> 
    </head>    
    <body ng-controller='tableCtrl'>   

   <div id="content">     
    <table id='practitioner_table'  > 
                       <tr> 
                <th colspan="7" style="text-align:right">         
                        <i class="fa fa-search">search  
                           <select ng-model="searchObj.practitionerType" ng-options="item.practitionerTypeID as item.practitionerTypeID for item in practitionerType"> 
                        <option value="">--Select--</option> 
                    </select> 
                              <select ng-disabled="!searchObj.practitionerType" ng-model="searchObj.practitioner_master_id" ng-options="item.practitioner_master_id as item.practitioner_name for item in practitionersByType| filter: {practitionerTypeID:searchObj.practitionerType}"> 
                        <option value="">--Select--</option> 
                    </select>        
                    <select ng-disabled="!searchObj.practitioner_master_id" ng-model="searchObj.organizationName" ng-options="item.organizationName as item.organizationName for item in OrganizationByPractitioners|filter:{practitioner_master_id:searchObj.practitioner_master_id}"> 
                        <option value="">--Select--</option> 
                    </select>        
                    </i>  
                    </th> 
               </tr>   
            <tr>          
                <th><a href="#" ng-click="predicate = 'practitionerType';reverse=!reverse">Practitioner Type</a> </th>           
                <th><a href="#" ng-click="predicate = 'practitioner_name';reverse=!reverse">Practitioner Name</a></th>  
                <th><a href="#" ng-click="predicate = 'organizationName';reverse=!reverse">Organization Name</a></th>                                      
               </tr>  
            <tr ng-repeat="practitioner in practitionerData | orderBy:predicate:reverse| filter: {practitionerType:searchObj.practitionerType,practitioner_master_id:searchObj.practitioner_master_id,organizationName:searchObj.organizationName}">           
              <td   ng-class-odd="'odd'" ng-class-even="'even'"> {{practitioner.practitionerType}}</td>            
                <td   ng-class-odd="'odd'" ng-class-even="'even'"> {{practitioner.practitioner_name}}</td>           
                <td   ng-class-odd="'odd'" ng-class-even="'even'"> {{practitioner.organizationName}}</td>                
           </tr>                      
    </table>   
    </div>     
    </body> 


Finally, I am populating the dropdown and table with scope data. Remember that the <select> tag and I am cascading the dropdowns using “filter” in “ng-options”. “ng-disabled” is used to keep the child dropdown disabled until the parent dropdown has the value.

AngularJS with Free ASP.NET Hosting

Try our AngularJS with Free ASP.NET Hosting today and your account will be setup soon! You can also take advantage of our Windows & ASP.NET Hosting support with Unlimited Domain, Unlimited Bandwidth, Unlimited Disk Space, etc.


AngularJS with Free ASP.NET Hosting - HostForLIFE.eu :: How to Make Facebook Style AutoComplete in AngularJS with ASP.NET MVC?

clock May 19, 2015 10:31 by author Peter

In this tutorial, I will explain you how to make facebook style autocomplete in AngulaJS with MVC. First step, you must include the following libraries, AngularJS and ui-bootstrap-tpls.

After that, create a new ASP.NET MVC project and then Add a Home Controller. Add a Index view. Now, write the following code to your index view:
<html ng-app="myApp">
<head>
    <script src="~/Scripts/angular.min.js"></script>
    <script src="~/Scripts/ui-bootstrap-tpls.min.js"></script>
    <script src="~/Scripts/AutoCompleteDemo.js"></script>
    <link href="~/Css/bootstrap.min.css" rel="stylesheet" />
</head>
<body>
    <div class="container">
        <div ng-controller="myCtrl" class="row-fluid">
            <form class="row-fluid">
                <div class="container-fluid">
                    Code <input type="text" ng-model="selectedCode" />
                    City <input type="text" typeahead-on-select="setcode($item)" ng-model="selected" typeahead="Cityx.CityName for Cityx in City | filter:$viewValue" />
                </div>
            </form>
        </div>
    </div>
</body>
</html>

Now, binding typeahead directive to our input field. Make a js file and name it as AutoCompleteDemo.
Write the below code to it:
angular.module('myApp', ['ui.bootstrap'])
    .controller("myCtrl", function ($scope) {
        $scope.selected = '';
        $scope.City = [
                    { code: 'AL', CityName: 'Alabama' },
                    { code: 'ID', CityName: 'Idaho' },
                    { code: 'CA', CityName: 'California' },
                    { code: 'NV', CityName: 'Nevada' },
                    { code: 'NY', CityName: 'New York' },
                    { code: 'FL', CityName: 'Florida' },
                    { code: 'KS', CityName: 'Kansas' },
                    { code: 'OH', CityName: 'Ohio' },
                    { code: 'TX', CityName: 'Texas' },
        ];
       $scope.setcode = function (selection) {
            $scope.selectedCode = selection.code;
        };

});

In above code.
a) First Inject the dependency on ui.bootstrap module.
b) Create sample list of city with their code to see AutoComplete.

AngularJS with Free ASP.NET Hosting

Try our AngularJS with Free ASP.NET Hosting today and your account will be setup soon! You can also take advantage of our Windows & ASP.NET Hosting support with Unlimited Domain, Unlimited Bandwidth, Unlimited Disk Space, etc.


Magento with Free ASP.NET Hosting - HostForLIFE.eu :: How to Manage and Improve Top Links in Magento

clock May 13, 2015 07:15 by author Rebecca

Top Links navigation is one of the basic blocks in Magento. Top links block allows you to create a personal area for the customer within your online store. Top Links includes: Login/Logout, My Account, My Wishlist, My Cart and Checkout links. By default «Top links» are located in the header, but they can be moved wherever you want if it’s needed. In this tutorial, we will go through how to manage and improve Top Links in Magento.

One of the most important differences between top links and regular static links is that when you add products to the cart or to your wishlist, top links automatically records products which were added.

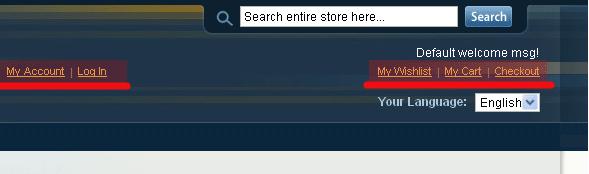
Example of Top links in the default  Magento theme in the header:

Usage of Top links in Magento

At first we have to call the block.
php echo this->getChildHtml(‘topLinks’) ?>

You may not create in template: template/page/html/header.phtml, but creates in page.xml
<block type=”page/html_header” name=”header” as=”header”>
<block type=”page/template_links” name=”top.links” as=”topLinks”/>
<block type=”core/text_list” name=”top.menu” as=”topMenu”/>
</ block>


Now we need to add links to this block by using the command:

<action method=”addLink” translate=”label title” >…</action>

We gotta make it in the following XML files:

  •     Login/Logout, My Account – customer.xml
  •     My Cart and Checkout – checkout.xml
  •     My Wishlist – wishlist.xml

It should be noted that link to  My Cart calls by the command:
<action method=”addCartLink”></action>
and
<action method=”addCheckoutLink”></action>

for Checkout link.

How to edit Top Links in Magento

All top links are based on a template which is located here: page/template/links.phtml. Here you can add additional classes or commit needed changes.

Often people want to use separate links. For example Login/Logout and My Account should be on the left side and My Wishlist, My Cart and Checkout on the right side.

Something like on the example below:

We can make this in a few simple steps as below:

Open page.xml and create another block there, almost identical to “topLinks” but with name  “topLinksLeft”;

<block type=”page/html_header” name=”header” as=”header”>
<block type=”page/switch” name=”store_language” as=”store_language” template=”page/switch/languages.phtml”/>
<block type=”core/text_list” name=”top.menu” as=”topMenu”/>
<block type=”page/template_links” name=”top.links” as=”topLinks”/>
topLinksLeft”/>
</ block>

In template template/page/html/header.phtml with help of the command:

php echo this->getChildHtml(‘topLinksLeft’) ?>

We can call our block in the proper place:

<div>
<h1 id=”logo” title=”<?php echo $this->getLogoAlt() ?>” style=”background-image:url(<?php echo $this->getLogoSrc() ?>);”><a href=”<?php echo $this->getUrl(”) ?>”><?php echo $this->getLogoAlt() ?></a></h1>
<div><?php echo $this->getChildHtml(‘topLinksLeft’) ?></div>
<?php echo $this->getChildHtml(‘topLinks’) ?>
<?php echo $this->getChildHtml(‘topMenu’) ?>
</div>

When you’ve done, open customer.xml  where we have to change the name of the block which is responsible for Login/Logout, My Account. We are changing its name from “top.links” on “top.links.left” as in example:

customer_logged_in>
<reference name=”top.links.left”>
<action method=”addLink” translate=”label title” module=”customer”><label>My Account</label><url helper=”customer/getAccountUrl”/><title>My Account</title><prepare/><urlParams/><position>10</position></action>
</reference>
<reference name=”top.links.left”>
<action method=”addLink” translate=”label title” module=”customer”><label>Log Out</label><url helper=”customer/getLogoutUrl”/><title>Log Out</title><prepare/><urlParams/><position>100</position></action>
</reference>
</customer_logged_in>

We also can assign other template to the links on the left ( rather useful in some cases) For that we just have to duplicate  template “page/template/links.phtml” and call it links_left.phtml. So now we have 2 templates “links.phtml” for the right side and “links_left.phtml” for the left side. Now all we need to do is just connect it. For connection we use block «topLinksLeft» page.xml and change it to links_left.phtml.

<block type=”page/html_header” name=”header” as=”header”>
<block type=”page/template_links” name=”top.links” as=”topLinks”/>
<block type=”page/template_links” name=”top.links.left” as=”topLinksLeft” template=”page/template/links_left.phtml” />
</ block>

Now you can apply different styles and HTML for the left and the right side.

Wow, almost forgot about “Register” button which is usually located near the “Login/Logout” button. No worries about that as well. As you can already guess we start from customer. xml file where we do next, if we want to add “Register” button to the top links:

<customer_logged_out>
<reference name=”top.links”>
<action method=”addLink” translate=”label title” module=”customer”> <label> Log In </ label> <url helper=”customer/getLoginUrl”/> <title> Log In </ title> <prepare /> <urlParams/> <position> 100 </ position> </ action>
<action method=”addLink” translate=”label title” module=”customer”> <label> register </ label> <url helper=”customer/getRegisterUrl”/><title>register</title><prepare/><urlParams/><position>10</position></action>
</ reference>
</ customer_logged_out>

Happy Coding! Hope it works for you.

Magento with Free ASP.NET Hosting
Try our Magento with Free ASP.NET Hosting today and your account will be setup soon! You can also take advantage of our Windows & ASP.NET Hosting support with Unlimited Domain, Unlimited Bandwidth, Unlimited Disk Space, etc.


Umbraco 7 with Free ASP.NET Hosting - HostForLIFE.eu :: How to Create Costum Sections in Umbraco

clock May 6, 2015 07:16 by author Rebecca

In this post, I will tell you how to create costum section in Umbraco 7. Every section in Umbraco is called an application, so sections and applications is basically the same thing.The first thing you’ll need to do is to create the application. In this examples I will not fiddle with the xml-files or the database. So, I’ll use class annotations to create my section.

The first step that you’ll need to do is to create a class that implements the IApplication-interface so that Umbraco will initialize this class on start up.

[Application("CustomSection", "CustomSection","icon-car", 15)]
public class CustomSectionApplication : IApplication {}


This is not something new for Version 7, The "Application"attribute basically tells Umbraco to create a new application:
Name: CustomSection
Alias: CustomSection

Icon: icon-car (the css class for the icon that will be displayed in the left side bar of the backoffice)
Sort order: 15

Next, Umbraco runs and will add an XML-element to the /config/applications.config-file that will add your new section/application to the Umbraco backoffice.

Creating The Tree

Umbraco will not care about your new application before creating the tree. An application without a tree is not worth anything. Let's start with creating a new class that inherits from Umbraco.Web.Trees.TreeController, make sure to suffix the class name with “Controller” ie. CustomSectionTreeController.

public class CustomSectionTreeController : TreeController
{
}

Now we need to give Umbraco some extra information about our tree. Let's add two attributes on the class, the Tree and the PluginController-attributes.
[PluginController("CustomSection")]
[Umbraco.Web.Trees.Tree("CustomSection", "CustomSectionTree", "My custom section", iconClosed: "icon-doc")]
public class CustomSectionTreeController : TreeController
{
}

PluginController
This attribute tells Umbraco that this class is part of a plugin, and it also tells Umbraco the name of that plugin. This will make Umbraco look for views inside the /app_plugin/{NameOfApplication}/-folder and not in the folder of the core-views which is the default.

Tree
This attribute is “older” and has been around since somewhere around 4.7 I think. It tells Umbraco that this is a tree-class and Umbraco will add this to the /config/trees.config-file. In V7 this attribute is mandatory for a tree that inherits from the TreeController-class as some underlying logic is looking at the attribute values to determine the name of the tree.

The properties are:
Application: CustomSection (must match the name of the application we added before)
Alias: CustomSectionTree (the name/alias of the tree)
Title: The title of the tree (used as the name of the root node)
Icon: The icon (or class) used as the tree icon.

Alright. Almost there. Now we need to add some code to show items in the tree.
[PluginController("CustomSection")]
[Umbraco.Web.Trees.Tree("CustomSection", "CustomSectionTree","My custom section", iconClosed: "icon-doc")]
public class CustomSectionTreeController : TreeController
{
    protected override TreeNodeCollection GetTreeNodes(string id, FormDataCollection queryStrings)
    {
        var nodes = new TreeNodeCollection();
        var item = this.CreateTreeNode("dashboard", id, queryStrings, "My item", "icon-truck", true);
        nodes.Add(item);
        return nodes;
    }
 
    protected override MenuItemCollection GetMenuForNode(string id, FormDataCollection queryStrings)
    {
       var menu = new MenuItemCollection();
       menu.DefaultMenuAlias = ActionNew.Instance.Alias;
        menu.Items.Add<ActionNew>("Create");
        return menu;
    }

}

This will give us something like this:

This code has two methods that are the least we need to do to create a new section.

GetTreeNodes (TreeNodeCollection)
This returns a collection of tree items, in our case we just return one item but we could of curse add more items to the collection. We use the CreateTreeNode-method from the base class to create a new node called “My item” with the id “dashboard”. Umbraco will append the id of the node to the URL later on so that we can handle the routing from our AngularJS-controllers.

GetMenuForNode (MenuItemCollection)
This method handles the “right click alternatives”. The “DefaultMenuAlias” configures which action that should be fired when we click the “touch dots”.

There's a lot of actions that you can use and you can also build your own ones:

Displaying Your New Section

To display your new section you need to give the current user access to it. Go to the users-section and open the edit-view for the current logged on user. In the bottom, check the checkbox for [CustomSection] and hit save. Now you’ll probably need to refresh the page using F5 to show the new section in the left side bar.

Umbraco 7 with Free ASP.NET Hosting
Try our Umbraco 7.2.2 with Free ASP.NET Hosting today and your account will be setup soon! You can also take advantage of our Windows & ASP.NET Hosting support with Unlimited Domain, Unlimited Bandwidth, Unlimited Disk Space, etc.


AngularJS with Free ASP.NET Hosting - HostForLIFE.eu :: How to Upload a Picture Using AngularJS with ASP.NET 5?

clock May 5, 2015 11:24 by author Peter

Today, I will show you how to upload a picture using AngularJS with ASP.NET 5. First, you must create a new project and then write the following code:

Web.config File
    <appSettings> 
       <add key="Filesize" value="50KB"/> 
       <add key="ChartImageHandler" value="storage=file;timeout=20;dir=c:\TempImageFiles\;" /> 
    </appSettings>


Asp File
    Protected Sub Page_Load(ByVal sender As Object, ByVal e As System.EventArgs) Handles Me.Load 
    Try 
    Response.Clear() 
    Dim fileid As String = System.Guid.NewGuid.ToString() 
    Dim imgsize As String = ConfigurationManager.AppSettings("Filesize") 
    Dim a As String = Context.Request.Files.Get(0).ContentLength.ToString 
    Dim b As String = Math.Round(a / 1024) 
    Dim c As String = imgsize.Replace(("KB").ToString, "") 
    If Val(b) < Val(c) Then 
        Context.Request.Files.Get(0).SaveAs("D:\manish\Project\Project\upload\" & fileid & ".jpg") 
        Response.Write("True|" & fileid) 
    Else 
        Response.Write("False|Select File Less Then " + imgsize + " || Your File Size is " + b + " KB") 
    End If 
    Response.End() 
    Catch ex As ArgumentOutOfRangeException 
    MsgBox("'Select A File' Then Click On Upload Button") 
    End Try 
    End Sub 

JS File
    var myApp = angular.module('myApp', ['ui.bootstrap']); 
    //upload a file code 
    myApp.directive('fileModel', ['$parse', function($parse) { 
       return { 
            restrict: 'A', 
            link: function(scope, element, attrs) { 
                var model = $parse(attrs.fileModel); 
                var modelSetter = model.assign; 
                element.bind('change', function() { 
                    scope.$apply(function() { 
                        modelSetter(scope, element[0].files[0]); 
                    }); 
                }); 
            } 
        }; 
    }]); 
    myApp.service('fileUpload', ['$http', function($http) { 
        this.uploadFileToUrl = function(file, uploadUrl) { 
            var fd = new FormData(); 
            fd.append('file', file); 
            $http.post(uploadUrl, fd, { 
                transformRequest: angular.identity, 
                headers: { 
                    'Content-Type': undefined 
                }        
            }) 
                      .success(function(data) { 
                if (data.split("|")[0] == "True") { 
                    $("#getimg").attr('src', 'upload/' + data.split("|")[1] + '.jpg'); 
                    $("#hid").val(data.split("|")[1] + ".jpg"); 
                   var img = $("#hid").val(); 
                    if (img == "noimage.jpg") { 
                        $("#Remov").hide(); 
                    } else { 
                        $("#Remov").show(); 
                    }        
                } else if (data.split("|")[0] == "False") { 
                    alert(data.split("|")[1]); 
                    var ab = $("#hid").val(); 
                    $("#getimg").attr('src', 'upload/' + ab); 
                    var img = $("#hid").val(); 
                    if (img == "noimage.jpg") { 
                        $("#Remov").hide(); 
                    } else { 
                        $("#Remov").show(); 
                    } 
                      } 
            })                  
.error(function() { 
                if ($(myFile).val() == "") { 
                    alert("Select a file"); 
                } else { 
                    alert("Select a image file"); 
                } 
            }); 
        } 
    }]);        
    $scope.uploadFile = function() { 
        var fileval = ['jpeg', 'jpg', 'png', 'gif', 'bmp']; 
        if ($(myFile).val() == "") { 
            alert("Select a file"); 
        } else if ($.inArray($(myFile).val().split('.').pop().toLowerCase(), fileval) == -1) { 
            alert("Select a image file"); 
            $(myFile).val(''); 
            $("#hid").val("noimage.jpg"); 
        } else { 
            var file = $scope.myFile; 
            var uploadUrl = "Image_Upload.aspx"; 
            fileUpload.uploadFileToUrl(file, uploadUrl); 
            $scope.myFile = ""; 
            $scope.remove = true; 
            var reader = new FileReader(); 
            reader.onload = function(e) { 
                scope.image = e.target.result; 
                scope.$apply(); 
            } 
        } 
              elem.on('change', function() { 
            reader.readAsDataURL(elem[0].files[0]); 
        }); 
        return false; 
    }; 

I hope this post wil works for you. Good luck!

AngularJS with Free ASP.NET Hosting

Try our AngularJS with Free ASP.NET Hosting today and your account will be setup soon! You can also take advantage of our Windows & ASP.NET Hosting support with Unlimited Domain, Unlimited Bandwidth, Unlimited Disk Space, etc.


About HostForLIFE.eu

HostForLIFE.eu is European Windows Hosting Provider which focuses on Windows Platform only. We deliver on-demand hosting solutions including Shared hosting, Reseller Hosting, Cloud Hosting, Dedicated Servers, and IT as a Service for companies of all sizes.

We have offered the latest Windows 2016 Hosting, ASP.NET Core 2.2.1 Hosting, ASP.NET MVC 6 Hosting and SQL 2017 Hosting.


Tag cloud

Sign in