Full Trust European Hosting

BLOG about Full Trust Hosting and Its Technology - Dedicated to European Windows Hosting Customer

AngularJS Hosting Europe - HostForLIFE.eu :: Data Exchange between Parents and Children in Angular 18

clock August 28, 2024 09:59 by author Peter

You will discover the solutions to the following questions and how to transfer/share data from the child component to the parent component in this walkthrough.

  • @Output: What is it?
  • An Event Emitter: What Is It?

What is @Output?
@Output decorator is used to share the data from the child component to the parent component.

What is an event emitter?

An event emitter is used to create custom events for AngularComponent. Mainly, the event emitter is used to pass data from a child component to a parent component using the @output decorator.

In short, sending data to the parent is publishing /emitting the vent, and the parent component listens the same.

Send Data from Child to Parent Component
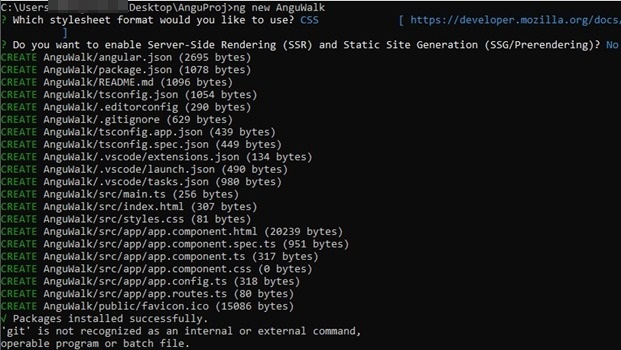
Create an Angular Project called “AnguWalk” using the following CLI command.

Command
ng new AnguWalk

Example

Move the cursor to inside the project folder and open Visual Studio code.

Command
cd anguwalk <enter>
code . <enter>


Example

Note. Visual studio code will get started only if your system is configured with path and settings.
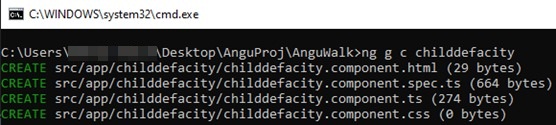
Now, we are going to Create a child component to issue the default city value.

Command
ng g c childdefacity

Open the childdefacity.component.ts file and update the following code.
import { Component, EventEmitter, OnInit, Output } from '@angular/core';

@Component({
  selector: 'app-childdefacity',
  standalone: true,
  imports: [],
  templateUrl: './childdefacity.component.html',
  styleUrls: ['./childdefacity.component.css']
})
export class ChilddefacityComponent implements OnInit {
  defaultcity: string = "Shirdi";
  @Output() updatecity = new EventEmitter<string>();
  ngOnInit(): void {}
  SendToParent() {
    this.updatecity.emit(this.defaultcity);
  }
}


Open the childdefacity.component.html file and update the following code.
<p>Child Component Content --> childdefacity works!</p>
<button type="button" style="font-size: xx-large;" (click)="SendToParent()">Send Default City</button>


Open the app.component.ts file and update the following code.
import { Component, NgModule, OnInit } from '@angular/core';
import { FormsModule } from '@angular/forms';
import { CommonModule } from '@angular/common';
import { RouterOutlet } from '@angular/router';
import { ChilddefacityComponent } from './childdefacity/childdefacity.component';
declare function HelloMsg(arg: any): void;
@Component({
  selector: 'app-root',
  standalone: true,
  imports: [RouterOutlet, FormsModule, CommonModule, ChilddefacityComponent],
  templateUrl: './app.component.html',
  styleUrls: ['./app.component.css']
})
export class AppComponent {
  parentdefacity: string = '';
  txtFullname: string = '';
  txtCityname: string = '';

  getdata(defacity: string) {
    this.txtCityname = defacity;
    // alert(this.txtCityname);
  }
  formpro(form: any) {
    alert('submit');
    console.log(form);
    console.log(this.txtCityname);
    console.log(this.txtFullname);
  }
}

Open the app.component.ts file and update the following code.
import { Component, NgModule, OnInit } from '@angular/core';
import { FormsModule } from '@angular/forms';
import { CommonModule } from '@angular/common';
import { RouterOutlet } from '@angular/router';
import { ChilddefacityComponent } from './childdefacity/childdefacity.component';
declare function HelloMsg(arg: any): void;
@Component({
  selector: 'app-root',
  standalone: true,
  imports: [RouterOutlet, FormsModule, CommonModule, ChilddefacityComponent],
  templateUrl: './app.component.html',
  styleUrl: './app.component.css'
})
export class AppComponent {
  parentdefacity: string = "";
  txtFullname: string = "";
  txtCityname: string = "";

  getdata(defacity: string) {
    this.txtCityname = defacity;
    // alert(this.txtCityname);
  }
  formpro(form: any) {
    alert("submit");
    console.log(form);
    console.log(this.txtCityname);
    console.log(this.txtFullname);
  }
}


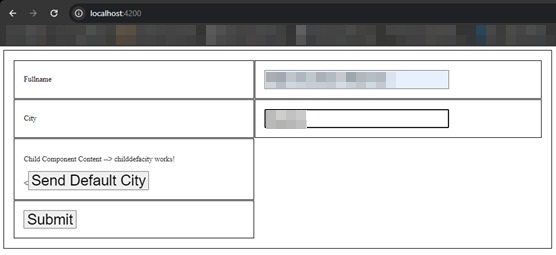
Open the app.component.html file and update the following code.
<router-outlet />

<form #contForm="ngForm" (ngSubmit)="formpro(contForm.value)">
  <table>
    <tr>
      <td>Fullname</td>
      <td>
        <input
          type="text"
          id="txtFullname"
          style="font-size: xx-large;"
          name="txtFullname"
          [(ngModel)]="txtFullname">
      </td>
    </tr>

    <tr>
      <td>City</td>
      <td>
        <input
          type="text"
          id="txtCity"
          style="font-size: xx-large;"
          name="txtCity"
          [(ngModel)]="txtCityname">
      </td>
    </tr>

    <tr>
      <td colspan="2">
        <app-childdefacity (updatecity)="getdata($event)"></app-childdefacity>
      </td>
    </tr>

    <tr>
      <td colspan="2">
        <button type="submit" style="font-size: xx-large;">Submit</button>
      </td>
    </tr>
  </table>
</form>


OUTPUT


AngularJS Hosting Europe - HostForLIFE.eu :: Knowing Angular vs. React

clock August 19, 2024 10:05 by author Peter

React and Angular are two of the most widely used front-end frameworks for creating contemporary online apps. Both are supported by sizable groups and have distinct advantages, yet they serve varying needs and tastes. We'll go over the main distinctions between Angular and React in this post to assist you in choosing the right framework for your project.

Overview

  1. React
    • Developed by: Facebook
    • Initial Release: 2013
    • Type: JavaScript library for building user interfaces, primarily focused on rendering UI components.
    • Learning Curve: Moderate
    • Main Concept: React is centered around components and follows a unidirectional data flow.
  2. Angular
    • Developed by: Google
    • Initial Release: 2016 (as Angular 2, the complete rewrite of AngularJS)
    • Type: Full-fledged framework for building web applications.
    • Learning Curve: Steep
    • Main Concept: Angular is an opinionated framework that provides a comprehensive solution for building large-scale applications, including built-in features like routing, state management, and HTTP services.

Architecture

  1. React
    • Component-Based: React is all about components. Each piece of UI is a component that can manage its state and be reused throughout the application.
    • Virtual DOM: React uses a virtual DOM to optimize rendering performance. When the state of a component changes, React updates the virtual DOM and then efficiently updates the real DOM.
    • Flexibility: React offers flexibility by allowing developers to choose their own libraries for routing, state management, and other needs. This makes React a "view library" rather than a full-fledged framework.
  2. Angular
    • MVC Architecture: Angular follows the Model-View-Controller (MVC) pattern, which helps in separating the concerns of data (Model), UI (View), and logic (Controller).
    • Real DOM: Unlike React, Angular directly interacts with the real DOM, which can impact performance in complex applications. However, Angular mitigates this with its change detection mechanism.
    • Built-In Features: Angular comes with a range of built-in features like form validation, HTTP client, routing, and RxJS for reactive programming. This makes Angular a complete solution for building applications without relying on external libraries.

Performance

  1. React
    • Virtual DOM: React’s virtual DOM significantly improves performance by minimizing the number of direct manipulations to the real DOM.
    • Component Reusability: React’s component-based architecture promotes reusability, which can lead to better performance in large applications.
    • Bundle Size: React itself is relatively lightweight, but depending on the additional libraries you use, the bundle size can grow.
  2. Angular
    • Change Detection: Angular’s change detection mechanism can sometimes lead to performance bottlenecks in large applications, but it also provides tools like OnPush strategy and NgZone to optimize performance.
    • Ahead-of-Time (AOT) Compilation: Angular’s AOT compilation improves performance by compiling the application during the build process, reducing the load time.
    • Built-In Features: While Angular’s rich feature set can impact performance, the framework’s ability to optimize these features mitigates the impact.

Learning Curve

  1. React
    • JSX: React uses JSX, a syntax extension that allows you to write HTML within JavaScript. While some developers find JSX intuitive, others might find it challenging initially.
    • Flexibility: React’s flexibility means you need to learn how to integrate and use various libraries for routing, state management, etc., which can be both an advantage and a challenge.
    • Documentation and Community: React has extensive documentation and a large community, making it easier to find resources, tutorials, and third-party libraries.
  2. Angular
    • Steep Learning Curve: Angular has a steeper learning curve due to its complexity and the number of built-in features you need to understand.
    • TypeScript: Angular is built with TypeScript, a statically typed superset of JavaScript. While this adds benefits like better tooling and error checking, it also requires learning TypeScript if you’re not already familiar with it.
    • Comprehensive Framework: Angular’s opinionated nature means that once you learn the Angular way of doing things, you have a powerful set of tools at your disposal.

Ecosystem and Community

  1. React
    • Ecosystem: React has a rich ecosystem with numerous libraries for state management (Redux, MobX), routing (React Router), and more. The flexibility to choose different tools gives developers more control over their stack.
    • Community: React has a large and active community, contributing to a vast array of plugins, tools, and resources.
  2. Angular
    • Ecosystem: Angular has a more integrated ecosystem. Many features that require third-party libraries in React are built into Angular, such as routing, HTTP services, and form handling.
    • Community: Angular also has a large community, but it is more centralized around the official Angular resources, documentation, and Google-backed initiatives.

Use Case
React

  1. When to Use React
    • You need flexibility in choosing libraries and tools.
    • You prefer a simple, component-based architecture.
    • You are building a project where performance and simplicity are key.
  2. Popular Use Cases
    • Single-page applications (SPAs)
    • Static sites with dynamic components
    • Dashboards and data visualization tools

Angular

  1. When to Use Angular
    • You are building a large-scale, enterprise-level application.
    • You need a framework with a comprehensive set of tools and built-in features.
    • You prefer an opinionated framework that guides architectural decisions.
  2. Popular Use Cases
    • Complex, enterprise-level applications
    • Applications requiring robust form handling and validation
    • Real-time applications with complex state management

Conclusion
The skills of your team and the needs of your project will determine which of React and Angular is best. React is an excellent option for projects where you want more control over the architecture because of its simplicity and versatility. In contrast, Angular offers a feature-rich, opinionated framework right out of the box, making it perfect for enterprise-level apps.

Both Angular and React are effective front-end development tools, and knowing the advantages and disadvantages of each will help you choose wisely for your upcoming project.


AngularJS Hosting Europe - HostForLIFE.eu :: Study Angular's Component Routing

clock August 14, 2024 07:19 by author Peter

In Angular, component routing is usually done via the Router service. This allows you to call or go to a component from another component. Here's how you can make this happen. In the Router Module, define routes. The first step is to configure your routes in your AppRoutingModule (or any other defined routing module). Describe the pathways and the matching parts.


import { NgModule } from '@angular/core';
import { RouterModule, Routes } from '@angular/router';
import { ComponentA } from './component-a/component-a.component';
import { ComponentB } from './component-b/component-b.component';

const routes: Routes = [
  { path: 'component-a', component: ComponentA },
  { path: 'component-b', component: ComponentB },
  // Add more routes as needed
];

@NgModule({
  imports: [RouterModule.forRoot(routes)],
  exports: [RouterModule]
})
export class AppRoutingModule { }

Use RouterLink in Templates
You can navigate to another component using the RouterLink directive in your template (HTML) of the first component.
<!-- component-a.component.html -->
<a [routerLink]="['/component-b']">Go to Component B</a>

Navigate Programmatically Using the Router
You can also navigate programmatically using the Angular Router in your component's TypeScript file.
import { Component } from '@angular/core';
import { Router } from '@angular/router';

@Component({
  selector: 'app-component-a',
  templateUrl: './component-a.component.html',
  styleUrls: ['./component-a.component.css']
})
export class ComponentA {

  constructor(private router: Router) { }

  goToComponentB() {
    this.router.navigate(['/component-b']);
  }
}


In HTML template
<!-- component-a.component.html -->
<button (click)="goToComponentB()">Go to Component B</button>


Outlet to Render Routed Components
Ensure you have a <router-outlet></router-outlet> in your main HTML template (e.g., app.component.html) where the routed components will be displayed.
<!-- app.component.html -->
<router-outlet></router-outlet>


Lazy Loading (Optional)
If you want to load a module lazily, define your route like this.
const routes: Routes = [
  {
    path: 'component-b',
    loadChildren: () =>
      import('./component-b/component-b.module')
        .then(m => m.ComponentBModule)
  }
];


Summary

  • RouterLink: For navigation within the template.
  • Router.navigate: For programmatic navigation within the component's TypeScript file.
  • Router Outlet: Acts as a placeholder in the template where routed components are displayed.


This setup allows you to call or navigate between components effectively in Angular.


AngularJS Hosting Europe - HostForLIFE.eu :: Enhancing Angular Efficiency With The @defer Directive

clock August 6, 2024 06:57 by author Peter

Increasing the speed and smoothness of an application requires performance tuning. To aid in this, Angular, a well-liked framework for creating online applications, has introduced the @defer directive. Both load times and user experience are enhanced. We'll explain the @defer directive, its operation, and how you can use it to improve your Angular apps in this blog post.

@defer: What is it?

Using an Angular condition, the @defer directive allows you to load specific portions of a template only when needed. This can improve the efficiency of your program by only rendering components when required. For instance, it can load and display material only after the user presses a button or until a certain portion of the screen is visible. In this manner, your software loads faster and more effectively because it just loads what is needed.

Syntax
@defer () {
} @placeholder () {
} @loading () {
} @error {
}


@defer Directive
This is used to delay the loading of a template fragment until certain conditions are met.
on <trigger>: Specifies an event that triggers the deferred loading. Here is one simple example of on viewport trigger

@defer (on viewport) {
  <component />
}

(on viewport) specifies that the deferred rendering should happen when the element comes into the viewport.

when <condition>: Defines the condition that needs to be true before the template is loaded.
prefetch on <trigger>: Optionally, you can prefetch the content based on a trigger.
prefetch when <condition>: Optionally, you can prefetch the content when a certain condition is true.

@placeholder Directive
This defines what should be shown while the deferred content is being loaded.

@loading Directive

This defines the content to be shown while the deferred content is actually loading.

@error Directive

This defines what should be shown if there's an error during the loading process.

In short, this syntax lets you control when different parts of your Angular template appear and what to show while you’re waiting, depending on different conditions and triggers.

Benefits of Using @defer directive

  • Faster Loading: By delaying less important content, your app loads quicker and feels smoother to use.
  • Better User Experience: Users see the key parts of your app right away, while the less important stuff loads in the background, so the app stays responsive.
  • Efficient Use of Resources: By waiting to display parts of your app that aren’t needed right away, you free up your browser’s resources, making everything run more smoothly.


Summary

The @defer directive in Angular helps make your app run better and faster. It allows you to delay loading some parts of your app until they're really needed. This way, your app stays quick and responsive, even if it has a lot of data or complex tasks. Using @defer can make your app perform better and provide a smoother experience for users.

Please let me know in the comments area if you have any questions.


About HostForLIFE.eu

HostForLIFE.eu is European Windows Hosting Provider which focuses on Windows Platform only. We deliver on-demand hosting solutions including Shared hosting, Reseller Hosting, Cloud Hosting, Dedicated Servers, and IT as a Service for companies of all sizes.

We have offered the latest Windows 2016 Hosting, ASP.NET Core 2.2.1 Hosting, ASP.NET MVC 6 Hosting and SQL 2017 Hosting.


Tag cloud

Sign in