In the following article we will be looking into credit card payment and credit card design using the Stripe element. Stripe is one of the online and in-person payment processing systems. It's not open source. In the below sample, we are using the test version. We can do operations like creating a customer, payment, custom UI element design using the Stripe card element, etc.

In the below sample, I have used the stripe.js npm package for Stripe payment processing in Angular and Stripe REST APIs. And for business logic, I have used the dot net in this article. I have defined back-end functionality.
Package Installation
Use the below npm command to install Stripe in Angular.
npm install @stripe/stripe-js
Create a customer using card tokenization
Creates a new customer in the Stripe system, associating a payment source; basically, it will create a customer after getting card info from users.
In this sample I am using a modal popup to get the card info.
creditcard.component.html
In the below sample, we are loading the card number, expiry date and CVV using stripe element.
<div class="modal-body">
<!-- Modal content area -->
<h2>Enter Your Credit Card Information</h2>
<!-- Title -->
<form (ngSubmit)="onSubmit()">
<!-- Angular form submission handler -->
<!-- Card Number -->
<label for="card-number">Card Number</label>
<!-- Label for card number -->
<div id="card-number" class="stripe-element"></div>
<!-- Stripe Element placeholder for Card Number -->
<!-- Expiry Date -->
<label for="card-expiry">Expiration Date</label>
<!-- Label for expiration date -->
<div id="card-expiry" class="stripe-element"></div>
<!-- Stripe Element placeholder for Expiration Date -->
<!-- CVC -->
<label for="card-cvc">CVC</label>
<!-- Label for CVC -->
<div id="card-cvc" class="stripe-element"></div>
<!-- Stripe Element placeholder for CVC -->
<!-- Errors -->
<div id="card-errors" role="alert"></div>
<!-- Placeholder to show card input errors -->
<!-- Buttons -->
<div class="modal-buttons">
<!-- Button container -->
<button type="button" (click)="vm.closeCardModal()">Cancel</button>
<!-- Button to cancel the modal -->
<button type="submit" [disabled]="isSubmitting">Submit</button>
<!-- Submit button, disabled while `isSubmitting` is true -->
</div>
</form>
</div>
creditcard.component.scss
.modal-body {
background-color: #f9f9f9;
padding: 20px;
border-radius: 8px;
box-shadow: 0 2px 10px rgba(0, 0, 0, 0.1);
max-width: 400px;
margin: auto;
}
.modal-content {
background: #fff;
padding: 20px;
border-radius: 8px;
width: 400px;
box-shadow: 0 4px 6px rgba(0, 0, 0, 0.1);
text-align: center;
}
.modal-buttons {
display: flex;
justify-content: space-between;
margin-top: 20px;
}
.requiredIndicate {
color: red; font-weight: bold;
}
h2 {
text-align: center;
color: #333;
}
form {
display: flex;
flex-direction: column;
}
.error-message{
font-size: 15px;
color: #df0707;
padding: 2px;
}
label {
margin-top: 10px;
color: #555;
}
input {
padding: 10px;
margin-top: 5px;
border: 1px solid #ccc;
border-radius: 4px;
}
button {
margin-top: 20px;
padding: 10px;
border: none;
border-radius: 4px;
cursor: pointer;
}
button[type="submit"] {
background-color: #28a745;
color: white;
}
button[type="button"] {
background-color: #dc3545;
color: white;
}
button:hover {
opacity: 0.9;
}
#card-errors {
color: red;
font-size: 0.9em;
margin-top: 5px;
}
creditcard.component.ts
In Component, we are loading the Stripe element to our UI element using Id. Don't hardcode the publish and secret key in the front end. try to get from backend
The mount() method is used to attach a Stripe Element (such as cardNumber, cardExpiry, or cardCvc) to a specific DOM element in your HTML.
Each Stripe Element can only be mounted to one DOM element. If you need to move it to a new location, unmount it first using the unmount() method
loadStripe() The method is used to create an instance of the stripe using the publish key.
displayError() method used to bind the error message to an HTML element.
onSubmit() method used for form submission and external validation if need means.
the createToken method in Stripe.js is used to securely create a single-use token that represents a payment method (like a credit card). This token can then be sent to your server for processing a payment or saving card details
import { AfterViewInit, Component, EventEmitter, OnInit, Output } from '@angular/core';
import { loadStripe, Stripe, StripeCardCvcElement, StripeCardExpiryElement, StripeCardNumberElement, StripeElements } from '@stripe/stripe-js';
@Component({
selector: 'app-creditcard',
templateUrl: './creditcard.component.html', // HTML template for the component
styleUrls: ['./creditcard.component.scss'] // SCSS styles for the component
})
export class CreditcardComponent implements OnInit, AfterViewInit {
// Stripe API keys (publishable key for client-side usage)
publishKey: string = ""; // Please replace your stripe publish key here.
// Stripe objects
stripe: Stripe | null = null; // Stripe instance
elements: StripeElements | null = null; // Stripe Elements instance
cardNumber: StripeCardNumberElement | null = null; // Card Number Element
cardExpiry: StripeCardExpiryElement | null = null; // Expiry Date Element
cardCvc: StripeCardCvcElement | null = null; // CVC Element
isSubmitting: boolean = false; // Prevent duplicate submissions
@Output() tokenGenerated = new EventEmitter<string>(); // Emit the generated token to parent component
constructor() { }
ngOnInit(): void {
// Component initialization logic (if needed)
}
async ngAfterViewInit() {
// Load the Stripe instance with the publishable key
this.stripe = await loadStripe(this.publishKey);
if (this.stripe) {
// Initialize Stripe Elements
this.elements = this.stripe.elements();
// Define the custom styles for Stripe Elements
const style = {
base: {
color: '#32325d', // Default text color
fontFamily: '"Roboto", sans-serif', // Font family
fontSize: '16px', // Font size
'::placeholder': {
color: '#aab7c4', // Placeholder text color
},
},
invalid: {
color: '#fa755a', // Invalid input text color
iconColor: '#fa755a', // Invalid icon color
},
};
// Create and mount the Card Number Element
this.cardNumber = this.elements.create('cardNumber', { style });
this.cardNumber.mount('#card-number');
// Create and mount the Expiry Date Element
this.cardExpiry = this.elements.create('cardExpiry', { style });
this.cardExpiry.mount('#card-expiry');
// Create and mount the CVC Element
this.cardCvc = this.elements.create('cardCvc', { style });
this.cardCvc.mount('#card-cvc');
// Attach event listeners to handle real-time validation errors
this.cardNumber.on('change', this.displayError.bind(this));
this.cardExpiry.on('change', this.displayError.bind(this));
this.cardCvc.on('change', this.displayError.bind(this));
}
}
displayError(event: any) {
// Handle real-time validation errors
const displayError = document.getElementById('card-errors');
if (displayError) {
if (event.error) {
displayError.textContent = event.error.message; // Show error message
} else {
displayError.textContent = ''; // Clear error message
}
}
}
async onSubmit() {
// Ensure Stripe and card elements are initialized
if (!this.stripe || !this.cardNumber) {
console.error('Stripe or card elements not initialized');
return;
}
this.isSubmitting = true; // Set submission state to true
// Create a token for the card details
const { token, error } = await this.stripe.createToken(this.cardNumber);
if (error) {
// Display error message if tokenization fails
const displayError = document.getElementById('card-errors');
if (displayError && error.message) {
displayError.textContent = error.message;
}
} else {
// Emit the token to the parent component
this.tokenGenerated.emit(token?.id);
// Close the modal (assumes `vm.closeCardModal()` is defined)
this.vm.closeCardModal();
}
this.isSubmitting = false; // Reset submission state
}
}
Sample Output of UI Element
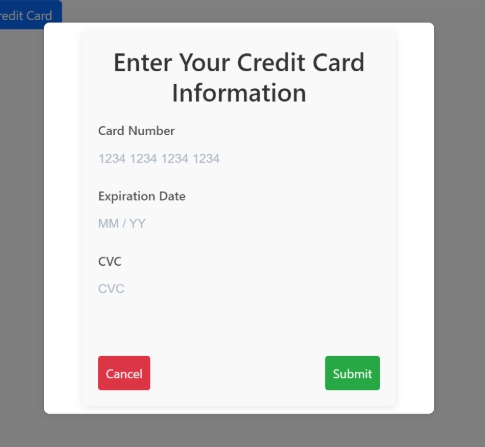
Modal Popup Open/Close
ngx-bootstrap npm package was used to open and close the modal. I have used a modal popup in the payment component to open and close the modal, so I have included it in payment.module.ts and declartion included.
package installation
npm i ngx-bootstrap
Include ModalModule in required module like below,
payment.module.ts
@NgModule({
declarations: [PaymentComponent,CreditcardComponent],
imports: [
CommonModule,ReactiveFormsModule,FormsModule,NgToggleModule,
PaymentRoutingModule, ModalModule.forRoot(),
]
})
payment.component.ts
Used to generate customer from the emitted output function creditcard.component.ts it will trigger customer generation.
openCardModal(): Used to open the modal popup with creditcard.component.ts.
constructor(private modalService: BsModalService,private paymentService:PaymentService)
{
}
openCardModal = () => {
// Opens the CreditcardComponent as a modal
this.modalRef = this.modalService.show(CreditcardComponent, {
animated: true, // Enables animation for the modal
keyboard: false, // Disables closing the modal via the ESC key
backdrop: 'static', // Prevents clicking outside the modal to close it
initialState: {
vm: this.vm, // Passes a custom `vm` object to the modal component's input
},
});
// Subscribes to the `tokenGenerated` EventEmitter from the modal component
this.modalRef.content.tokenGenerated.subscribe((token: string) => {
this.createCustomerForToken(token); // Calls the function to handle token processing
});
};
createCustomerForToken(token) method
This method processes the token emitted by the modal and uses it to create a customer by calling the paymentService
createCustomerForToken(token: string) {
// Calls the `createCustomer` method in the payment service
this.paymentService
.createCustomer(
this.paymentService.GenerateCustomer(
this.cardDetails.Name, // Name of the cardholder
this.cardDetails.CardNumber, // Card number (masked or partial if passed)
token // Token generated from Stripe
)
)
.subscribe((data: any) => {
// You can handle the response here, e.g., show success messages
});
}
closeCardModal Method
This method closes the modal when the operation is complete or canceled.
closeCardModal = () => {
this.modalRef?.hide(); // Hides the modal if `modalRef` exists
};
OnInit Method
This method used to initialize the vm's property and method
ngOnInit(): void {
this.vm = {
cardHolderName: null, // Placeholder for the cardholder's name input field (starts with null)
cardNumber: null, // Placeholder for the credit card number (starts with null)
expiryDate: null, // Placeholder for the card's expiry date (starts with null)
cvv: null, // Placeholder for the CVV input field (starts with null)
// Methods to open and close the card modal
openCardModal: this.openCardModal, // Reference to the method that opens the credit card modal
closeCardModal: this.closeCardModal, // Reference to the method that closes the modal
};
}
payment.service.ts
Generate an object using the generate customer, and for REST APIs, I am using the previous article. Create customers with a tokenization block to generate customers based on tokens.
var apiUrl = ""; should be end point of the service.
return {
Email: Email, // Use the passed 'Email' parameter
Name: Name, // Use the passed 'Name' parameter
Phone: "1234567890", // Replace with the actual phone number if needed
Description: "Customer for test", // Replace with an appropriate description if needed
SourceID: token // The token passed from payment process
};
public createCustomer(customer: any) {
return this.apiHandler.post(apiUrl + "/create-customer-with-tokenisation", customer);
}
public GeneratePaymentIntent(amount:number,offSession:boolean,paymentMethodID:string)
{
return {
amount:amount,
paymentMethodID: paymentMethodID,
customerId: null,
offSession:offSession
};
}
public createPaymentIntent(paymentMethod:any)
{
return this.apiHandler.post(apiUrl + "/create-payment-intent",paymentMethod);
}
public createPayment(amount:any)
{
return this.apiHandler.post(apiUrl + "/create-payment-intent-without-paymentmethod",{ amount: amount });
}
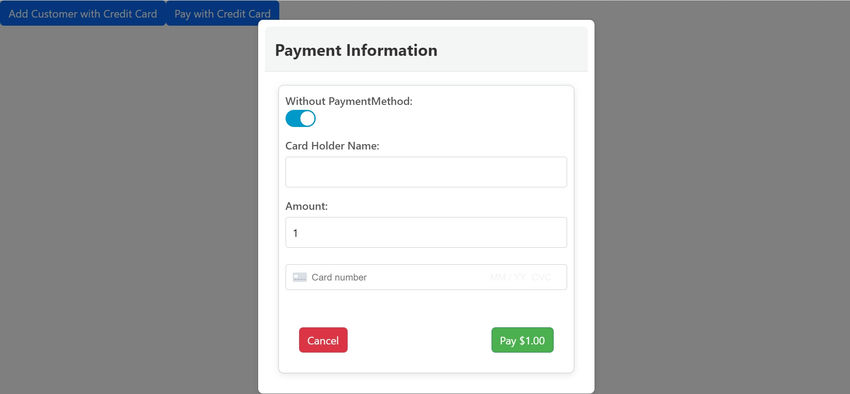
Pay using a card with the customer and payment method
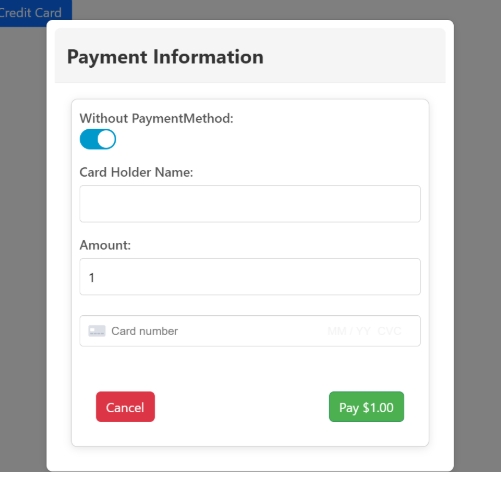
Payment template used to pay amount using credit card.
<ng-template #paymentTemplate>
<div class="modal-header">
<h3 class="modal-title">Payment Information</h3>
</div>
<div class="modal-body">
<div class="modal-content">
<form (submit)="handlePayment($event)">
<label>
Without PaymentMethod:
<ng-toggle [(ngModel)]="isPaymentMethod" name="toggle" required />
</label>
<label>
Card Holder Name:
<input type="text" [(ngModel)]="cardHolderName" name="cardHolderName" required />
</label>
<label>
Amount:
<input type="text" [(ngModel)]="amount" name="amount" required />
</label>
<div id="pay-card-element" class="card-element"><!-- Stripe Card Element --></div>
<div id="pay-card-errors" role="alert"></div>
<div class="pay-modal-buttons">
<button type="button" class="btn btn-failure" (click)="closeCardModal()">Cancel</button>
<button type="submit" class="btn btn-success" [disabled]="loading">Pay {{ amount | currency }}</button>
</div>
</form>
</div>
</div>
</ng-template>
payment.component.ts
In payment component, variable declaration and constructor, Don't hard code publish key and secret key in html side try to get from server side.
// Declaring a dynamic object for storing values related to the modal and card details.
vm: any = {};
// Secret key for server-side Stripe API communication (should not be exposed on the client-side).
secretKey: string = "";
// Publishable key used for client-side Stripe communication.
publishKey: string = "";
// ViewChild decorator for referencing the modal template.
@ViewChild('paymentTemplate') paymentModal!: TemplateRef<any>;
// The modal reference to control its visibility and behavior.
modalRef!: BsModalRef;
// Stripe object initialized for Stripe.js integration (holds the Stripe instance).
private stripe: Stripe | null = null;
// The card element used for securely collecting card details.
private cardElement: any;
// States for loading, error messages, and cardholder's name.
public loading = false;
public error = '';
public cardHolderName = '';
// Amount to be processed for payment.
public amount = 1;
// A flag to track if it's a payment method or another type of payment action.
isPaymentMethod: boolean = true;
// Constructor injecting modal service for modal control and payment service for backend communication.
constructor(private modalService: BsModalService, private paymentService: PaymentService) {}
// ngOnInit lifecycle hook, currently not used but reserved for any initialization logic.
ngOnInit(): void {
// Any initialization logic goes here if needed.
}
loadStripe() method
This method initializes Stripe Elements for securely collecting payment details.
- loadStripe(this.publishKey): Asynchronously loads Stripe.js with the public key for client-side operations.
- this.stripe.elements(): Creates an instance of Stripe Elements which provides a secure method to collect card information.
- this.cardElement.mount('#pay-card-element'): Mounts the cardElement (a Stripe UI element) into the DOM, allowing users to enter credit card information.
async loadStripe() {
// Load Stripe.js with the public key for client-side operations.
this.stripe = await loadStripe(this.publishKey);
// Check if Stripe was successfully initialized.
if (this.stripe) {
// Initialize Stripe Elements, which will be used to securely collect card details.
const elements = this.stripe.elements();
// Create a 'card' element for collecting card details, hiding postal code field.
this.cardElement = elements.create('card', {
hidePostalCode: true
});
// Mount the card element onto the HTML element with id 'pay-card-element' to display it on the page.
this.cardElement.mount('#pay-card-element');
} else {
// Log an error if Stripe is not initialized properly.
console.error('Stripe is not initialized');
}
}
handlePayment() Method
This method handles the payment process, triggered when the user submits the payment form
- event.preventDefault(): Prevents the form submission to allow custom handling via JavaScript.
- this.paymentService.createPayment(this.amount): Calls a service to create a payment request with the backend, sending the payment amount.
- this.stripe.confirmCardPayment(): Uses Stripe's API to confirm the payment using the card details entered by the user.
- Error handling: Sets the error message if payment fails, and resets the loading state.
- this.loading = false: Updates the loading state to stop the spinner once the payment process is finished.
async handlePayment(event: Event) {
// Prevent default form submission behavior.
event.preventDefault();
// Set loading state to true to show a loading spinner or message.
this.loading = true;
// Check if Stripe is initialized before proceeding.
if (this.stripe) {
// Call the backend to create a payment, passing the amount to charge.
this.paymentService.createPayment(this.amount).subscribe(async (data: any) => {
// Ensure Stripe is initialized before proceeding with payment confirmation.
if (this.stripe) {
// Use Stripe to confirm the payment using the card details and secret key.
const { error } = await this.stripe.confirmCardPayment(this.secretKey, {
payment_method: {
card: this.cardElement, // The card element that holds the user's card information.
billing_details: {
name: this.cardHolderName, // The name of the cardholder.
},
},
});
// Handle error if payment confirmation fails.
if (error) {
this.error = error.message ? error.message : 'An unknown error occurred';
this.loading = false; // Reset loading state.
} else {
this.error = ''; // Clear any previous errors.
this.loading = false; // Reset loading state.
}
} else {
// Error handling if Stripe is not initialized.
this.error = 'Stripe is not initialized';
this.loading = false; // Reset loading state.
}
});
} else {
// Error handling if Stripe is not initialized.
this.error = 'Stripe is not initialized';
this.loading = false; // Reset loading state.
}
}
openpaymentModal() Method
This method opens the payment modal where the user can enter payment details.
openpaymentModal = () => {
// Show the modal using the BsModalService, passing the initial state with the modal data.
this.modalRef = this.modalService.show(this.paymentModal, {
animated: true, // Enable animations for the modal.
keyboard: false, // Disable closing the modal via the keyboard.
backdrop: 'static', // Prevent closing the modal by clicking outside.
initialState: {
vm: this.vm // Pass initial data (vm) to the modal component.
}
});
// Call loadStripe to initialize Stripe and display the payment form inside the modal.
this.loadStripe();
}
Full code snippet of payment.compoent.ts
import { trigger, state, style, transition, animate } from '@angular/animations';
import { Component, OnInit, TemplateRef, ViewChild, ViewEncapsulation } from '@angular/core';
import { BsModalRef, BsModalService } from 'ngx-bootstrap/modal';
import { CreditcardComponent } from '../creditcard/creditcard.component';
import { PaymentService } from './payment.service';
import { loadStripe, Stripe } from '@stripe/stripe-js';
@Component({
selector: 'app-payment',
standalone: false,
encapsulation:ViewEncapsulation.None,
templateUrl: './payment.component.html',
styleUrl: './payment.component.scss'
})
export class PaymentComponent implements OnInit{
vm: any={};
secretKey:string ="sk_test_51Q2TApRw3m8aFNMV8RYvLabAEmwYOwHtiNWXrP1pR88IlVeuItDrhoxbb80YcCm45BoN9ncle0Mw84wv74Vc4rV700Y0gwbdh7";
publishKey:string ="pk_test_51Q2TApRw3m8aFNMVKcnlDcs0EH3pu0EuhPpKyYe99eaBXE2ex9Nd1aSkCi4dxZQ3jBZwjlyrUAU30RN8nuGth6dv00HGMKk8vH";
@ViewChild('paymentTemplate') paymentModal !: TemplateRef<any> ;
modalRef!: BsModalRef;
private stripe: Stripe | null = null;
private cardElement: any;
public loading = false;
public error = '';
public cardHolderName = '';
public amount = 1;
isPaymentMethod:boolean =true;
constructor(private modalService: BsModalService,private paymentService:PaymentService)
{
}
ngOnInit(): void {
this.vm = {
cardHolderName: null,
cardNumber: null,
expiryDate: null,
cvv: null,
openCardModal: this.openCardModal,
closeCardModal: this.closeCardModal,
};
}
openCardModal=()=> {
this.modalRef = this.modalService.show(CreditcardComponent,{ animated: true,
keyboard: false,
backdrop : 'static', initialState: {
vm: this.vm
}});
this.modalRef.content.tokenGenerated.subscribe((token: string) => {
this.createCustomerForToken(token);
});
}
createCustomerForToken(token: string)
{
this.paymentService.createCustomer(this.paymentService.GenerateCustomer('', '', token)).subscribe((data: any) => {
});
}
closeCardModal=()=> {
this.modalRef?.hide();
}
async loadStripe() {
this.stripe = await loadStripe(this.publishKey);
if (this.stripe) {
const elements = this.stripe.elements();
this.cardElement = elements.create('card', {
hidePostalCode: true
});
this.cardElement.mount('#pay-card-element');
} else {
console.error('Stripe is not initialized');
}
}
async handlePayment(event: Event) {
event.preventDefault();
this.loading = true;
if (this.stripe) {
if(!this.isPaymentMethod){
const { paymentMethod, error } = await this.stripe.createPaymentMethod({
type: 'card',
card: this.cardElement,
billing_details: { name: this.cardHolderName },
});
if (error) {
const displayError = document.getElementById('pay-card-errors');
if (displayError && error.message) {
displayError.textContent = error.message;
this.loading = false;
}
} else {
// Send payment method to backend
this.makePayment(paymentMethod.id);
}
}
else
{
this.paymentService.createPayment(this.amount).subscribe(async (data: any) => {
if (this.stripe) {
const { error } = await this.stripe.confirmCardPayment(this.secretKey, {
payment_method: {
card: this.cardElement,
billing_details: {
name: this.cardHolderName,
},
},
});
if (error) {
this.error = error.message ? error.message : 'An unknown error occurred';
this.loading = false;
} else {
this.error = '';
this.loading = false;
}
} else {
this.error = 'Stripe is not initialized';
this.loading = false;
}
});
}
} else {
this.error = 'Stripe is not initialized';
this.loading = false;
}
}
makePayment(paymentMethodId: string) {
this.paymentService.createPaymentIntent(this.paymentService.GeneratePaymentIntent(this.amount, false, paymentMethodId)).subscribe((data: any) => {
});
}
openpaymentModal=()=> {
this.modalRef = this.modalService.show(this.paymentModal,{ animated: true,
keyboard: false,
backdrop : 'static', initialState: {
vm: this.vm
}});
this.loadStripe();
}
}
Sample UI
Conclusion
This approach enables the creation of a robust payment system integrated with Stripe, giving you the ability to scale and manage payments efficiently within your application. Attached is the sample code.